FREE Knitting Patterns, Yarn Reviews, Tutorials, Magazines

Home » Yarns » How to adjust a simple cowl pattern for a different yarn

How to adjust a simple cowl pattern for a different yarn

by Cynthia MacDougall

This week we’re having some fun with several of the Universal Yarns that were featured in KNITmuch in 2016.

Yesterday’s post, knit a cowl by chance with Bamboo Bloom yarn. Today, we’re going to work with Classic Shades Metallic. Charles Voth reviewed this yarn in his August 2016 KNITmuch posts.

One of the questions I’m asked most often at Canadian Guild of Knitters is how to adjust a pattern for a different yarn. I found a pattern I liked in a collection of quick cowls — a free download from the Universal Yarn website, the Get to the Point Cowl.

A rather pretty cowl in shades of navy and denim, with a wide "turtle" neck that flares out over the shoulders into 6 points

The Get to the Point Cowl pattern is written for a chunky yarn, but our yarn is Aran weight.

Problem is, this pattern is written for Classic Shades Frenzy, and I have Classic Shades Metallic. Oh, they sound close enough, but Frenzy is a chunky weight yarn with a recommended tension of 13 sts and 17 rows to 4″ [10cm] on 10.5 [6.5mm] needles. Classic Shades Metallic, on the other hand, is an Aran weight yarn with a recommended tension of 18 sts and 24 rows to 4″ [10cm].

The next wrinkle is that the pattern calls for size 11 [8mm] needles, and the pattern tension is 12 sts and 18 rows to 4″ [10cm]!  How are we going to make our yarn fit?

Let’s look at what we know.

Frenzy recommends size 10 [6.5mm] needles, but the pattern uses size 11 [8mm] needles. So, the pattern uses two sizes larger than the recommended needle size. Going up two sizes for the Classic Shades Metallic recommended needles (size 8 [5mm]) is a good place to start swatching.
Two sizes larger is size 9 [6mm]. I make a swatch, and discover that my tension is 16 sts to 4″ [10cm]. At this point, I stop and feel the fabric. I ask myself if I’m happy with it — is it too soft and drapery? Is it too stiff to be comfortable around my neck? If I’m NOT happy, I’ll change needle sizes, going up or down one size, and try again until I AM happy.

A knitted swatch with a ruler laid across the center, stockinette section to show the tension at 16 stitches over 4".

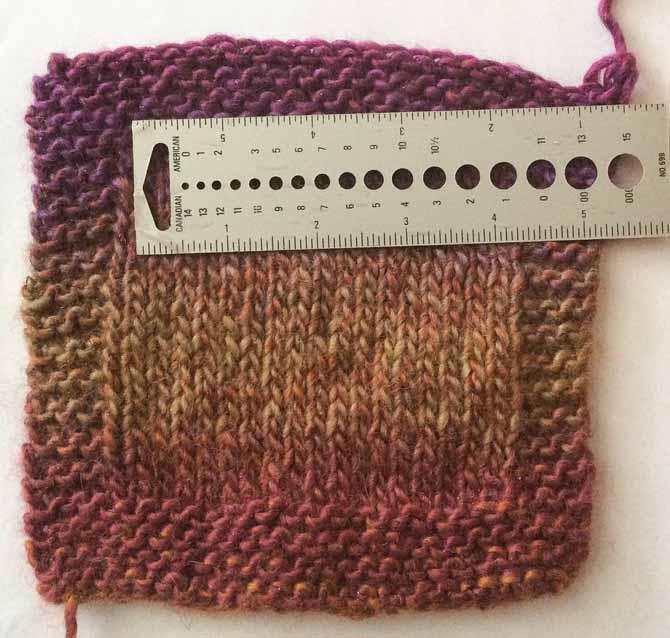
I must have knocked my ruler when taking this photo — ordinarily it would run evenly across the row.

Now, the pattern’s tension is 12 sts to 4″, and my tension is 16 sts to 4″. Armed with this information, we can proceed with our mathematics.
There are several ways you can go about this; you can work with ratios, or percentages, or just head out in blind faith. I tend to stay away from the last option.
Ratios scare most people, but when it comes to knitting, it’s usually just simple division and multiplication. In our example, the numbers are fairly easy. 12:16 is really a 3:4 ratio, which means that for every three sts in the pattern, I’m going to need to have 4 sts on my needle.
To apply this, the pattern says to cast on 120 sts. If I take 120, divide by three and multiply by 4, I find that I need 160 sts for my tension. I get the same result if I take 120, divide it by 12, and multiply it by 16. (Go ahead — try it.) I call this number our “base” or “literal” number.
To use percentages, we find out what the percentage 16 is of 12. 16 divided by 12 is 1.33333, or 133%. I can take this number, and multiply my cast on sts (120) by 1.33333, and get a result of 159.9996, which we would naturally round up to 160. What do you know? I got the same result!
However: we also have to consider the pattern multiple. Our pattern has six points, and it’s worked in the round, so we need to have a multiple of six to make our repeats work out. If we don’t, we’re going to have a wider or skinnier wedge at some point in our round.
Our result of 160 sts divides into 6 26 times, with a leftover of 4 — when you do this on a calculator, the result comes up as 160 ÷ 6 = 26.66667. Here, you have two options: round up or round down. I’ve found that it is often the best practice to round up — usually we want a bit more goodness when we’re knitting.
The first round of pattern says *k17, sl2-k1-p2sso; rep from * to end. Our repeat tells us there are 20 sts in each repeat (17 + 2 slipped sts + the knit 1)
So, 162 sts is 6 x 27, but wait — the pattern has an even number of sts in each repeat. Our pattern uses double decreases, so if I have an odd number of sts in the repeat now, I’ll still have an odd number of decreases when I get to the collar. Now, for a cowl, I don’t see that this will make a lot of difference, but you might run into applications — a cardigan knit from the top down for example — when you’ll need to have all the sections split off with an appropriate number of sts.
I want a slightly fuller piece, so I’m going to do both — round up, and start each section with 28 sts. Remember, our “literal” number of stitches is 160. When I round up, I’ve got 162 sts, and, when I add another stitch to each repeat (6 sts), I’m up to 168 sts, 8 more sts than our “literal” number. Our tension is 16 sts to 4″, so, adding 8 sts to the bottom or our piece means adds 2″ to the bottom width of the piece! In a cowl, this isn’t a big deal, but, if this was a sweater sleeve, it could really affect the fit.
You’ll notice I haven’t mentioned the row gauge at all. Again, because this is a cowl, it’s not especially important. In fact, row gauge tends to “fall into place” in most patterns with the exception of color stranding and cable pieces, where you might need a motif to align with a certain height.
Now we are “armed” with everything we need to adjust our pattern: 6mm needles, 16 sts to 4″, and two balls of yarn. Add a stitch marker and a pen, and let’s do this!
Here’s how I’d mark up my pattern (I might make a copy of it first, and nowadays I always use an erasable pen, so I can erase any errors).
Here’s how I would mark up my pattern to this point:

The top portion of a knitting pattern showing penned-in changes for the yarn, needle size, and gauge information

When substituting yarn, good note taking is important — the day may come when you want to make another one of these!

In the top section, I note the changes I’ve made in yarn, needle size, and gauge. I do this so I can repeat it down the road if I like the results.
In reading over my pattern, I discovered that the beginning of the round “moves” during the decrease (“pointy”) section, because of the double decrease at the end of the round. So, putting a stitch marker right on the needle isn’t going to be terribly practical. Instead, I’ll use the safety pin or split ring kind, putting it right into the fabric to give me a visual reminder of the end of my round. To remind myself of this in the future, I added a note about this under the pattern notes.

Stitch markers in assorted sizes, some look like a circle with a slice into the centre, two look like coilless safety pins, and one looks a little like a paperclip.

Any of these stitch markers can be linked right into the knitted fabric to provide visual reference

Time to cast on and start following my “new” pattern. Go ahead and do Rounds 1-4 yourself.
One word of caution: because you want your cowl to fan out over your shoulder, make sure you cast on loosely! You can ensure a loose cast on with this tip: hold a smaller needle – size 2 or 3 or so [3mm], alongside your knitting needle, and cast your sts on over both needles.

A close up of cast on stitches showing the stitches formed over two knitting needles.

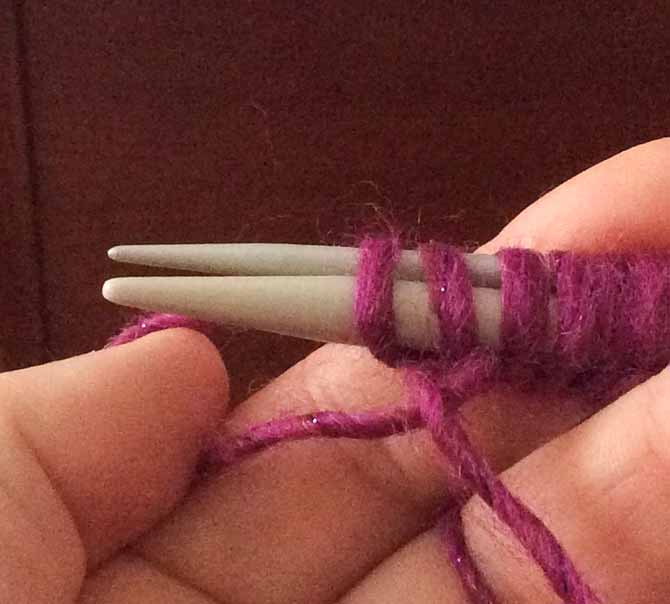
To make a loose cast on, hold a second, much smaller, double pointed needle alongside your cast on needle. Allow the sts to slide off the end of the smaller needle as you make the cast on — at that point it’s the same thing as the stitches sliding down onto the cable of the circular needle.

Knitting on a circular needle, with stitch markers inserted into the center "V" of the decreases.

The stitch markers are placed, and I’ve completed the first repeat of Round 4

Once I have the first round done, I can start placing my markers. Ordinarily, I only use markers at the beginning of the round, unless I’m doing a complex lace pattern. For the rest of my decreases, I “read” my knitting. Once my first decreases are done, I can see where they were made for all the subsequent ones. When I do use stitch markers all around, I reserve one color (usually green) for the beginning of my round (green means go!).
When I’m using markers to denote double decreases, I link the marker right into the “V” of the decrease.
So we’ve worked our way through round 4. It’s time to think about a couple more things:
1. Do I have enough rounds of garter stitch for the edge to lay flat under my coat?
2. How many stitches am I going to need at the neck to get that nice, rolled cowl?
As to 1:
I have two garter stitch ridges (which in circular knitting are knit 1 round, purl 1 round). In a chunky yarn, this might be sufficient for my piece to lay flat, but in a finer yarn, I think I’d like another ridge, maybe 2.
So, for Round 5, instead of knitting it, I’m going to do the same thing I did at Round 3, taking out two more purl sts in each repeat. My Round 5 will read: P23, k1; rep from * to end.
I will work round 6 as written (with my k st adjustments), then modify round 7 to: P21, k1; rep from * to end. Then I will work that little stockinette stitch section you see in the photo in denim blue.
As to 2:
For the neck, tje pattern says there are 72 stitches. How many will I need? Well, I can take 72, divide by 12 and multiply by 16, or I can divide by 3 and multiply by 4. Either way, I will come to a result of 96.
At the end of Round 8, I have 118 stitches, 24 more than 96. So, I need to do two more decrease rounds, an easy fix; all I have to do is repeat Rounds 8 and 9 twice more, working the appropriate number of stitches between the decreases on Round 8.
So, once I have my neck stitches, I need to modify Round 1 of the neck to read “* p15, k1; rep from * to end”, to complete the modifications to my pattern.

A photo of the knitting pattern with the changes outlined in the text of this article penned-in over the original information

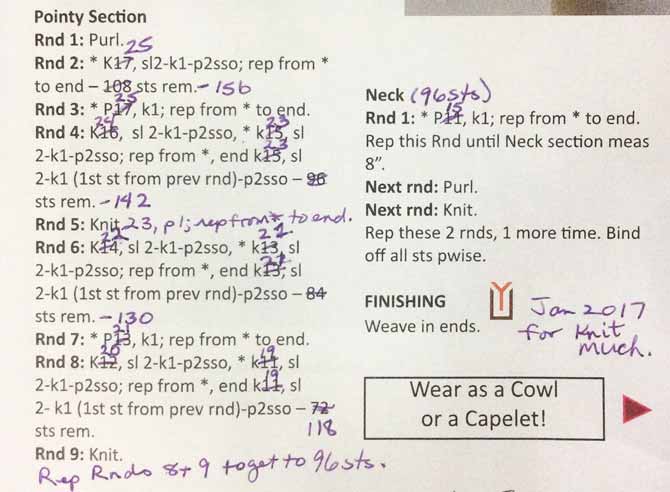
The finished pattern edits to take your cowl from a chunky yarn to an Aran weight

I’m going to leave you with this thought: 96 stitches at this tension is more than enough to make a hat. If you want your cowl to be a little closer fitting, how will you go about this?
(True confession: I did take my neckline in a bit. At 2″ into the 8″ of neck, I decreased 12 sts to 84 sts, then worked 3″ more. Then, I increased back to 96 sts for the next 3 inches, and added another 12 sts to work the garter stitch edge. Why did I do this? So that I would get a softer roll at the top, and so the garter stitch edge would flare back out a little and not pull in as it does in the photo.)

The finished cowl on a dress form

Happy result. I had to tear out about half of my tension swatch to finish this piece, so it took just about 98 grams of yarn. The “sparkle” is SO subtle, but it’s great for everyday wear!

This is part 3 of 5 in this series.
Go back to part 2:  Knit a cowl by chance with Bamboo Bloom yarn

Go to part 4: 2 tips to elevate your scrap yarn project to a professional level

YOU MAY ALSO LIKE...

Leave a Comment

This site uses Akismet to reduce spam. Learn how your comment data is processed.