
There are many different edgings that designers can add to their knit lace shawls or stoles. In today’s post, we’ll explore 2 simple solutions to adding easy picot edgings. This week we’re working with Universe yarn, a beautiful mix of cotton, linen, polyamide, and a touch of glitter.

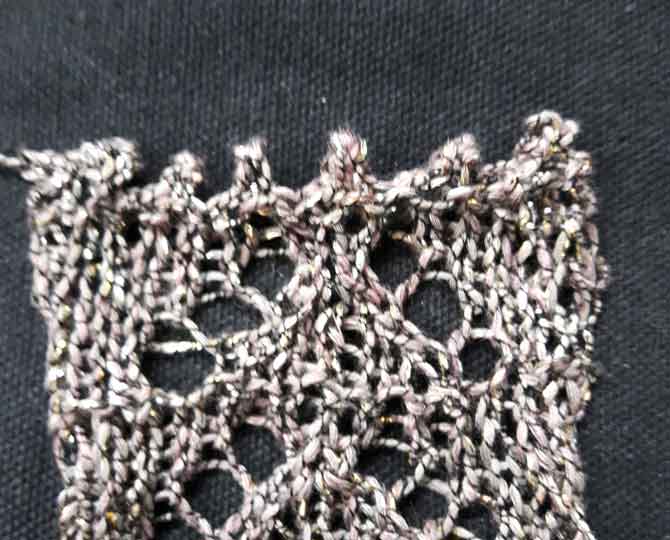
Picot Edging worked in crochet with Universe yarn
Right off the bat, and on a little side note, you may notice that the yarn on the skein in the photo is unruly and falling off the ball and making a bit of a bird’s nest. Every ball of Universe is wound on a paper core and comes with a rubber elastic around it and a paper ball band to keep it neat and tidy when displayed or stored in your stash. But when knitting with this yarn, I did find that several strands of it wanted to spring off the ball and into my knitting faster than I could keep up. I solved this two ways. I kept the rubber elastic around the ball and released several meters at a time. It didn’t tangle this way, and I was able to tame the yarn constantly. A friend of mine at knit-night is knitting a shawl and he re-wound the yarn into a cake with a ball winder and has a rubber band around it, but as it’s a center-pull ball, the yarn is coming from the inside and behaving itself.
For those of you who are multi-craftual/ cross-crafters, crocheting a picot edging may be the first course of action you choose because it’s faster than knitting and you can have your lace stole or shawl ready to wear much sooner. For the non-crocheters reading along with us, I’ll give several knit options later on.

Crocheted picot edging
A crocheted picot edge is great for rectangular stoles because they are worked the same on both ends, and like beads, they add a little extra weight, so the lace remains taut and lovely.
Crochet stitches don’t necessarily match up with stitch gauge in knitting, so to start with, you’ll need to swatch both a little of the crochet and a little of the knitted lace pattern of your stole. Find a favorite knit lace pattern in a stitch dictionary and work up a little swatch with 20 or so stitches. Knit enough rows to get a decent row gauge. For the crochet edging part of the swatch, I’d recommend that you ignore the ball-band recommendation. If you used 3mm (no US equivalent) for the knitting, go up to a 3.5 or 3.75mm (US E or F) crochet hook, so that the crocheted lace balances the knitted lace, and isn’t tighter than it.
Here are the instructions for the crocheted picot edging pictured above.
Crocheted picot edging
Abbreviations (US terms): ch=chain, sc=single crochet, tr=treble crochet, lp=loop, rep=repeat, sl st=slip stitch, st=stitch
Chain a multiple of 4 until your foundation chain is 5″ to 6″ long [13 to 16cm].
Row 1: Sc in 2nd ch from hook and in each ch across, turn—you’ll have 1 less sc than you did chs, an odd number.
Row 2: Ch 1, sc in each st across, turn.
Row 3: Ch 5, sk first 2 sc, tr in next sc, *ch 1, sk next st, tr in next st, rep from * across, turn.
Row 4: Ch 1, sc in first tr, *sc in next ch sp, sc in next tr; rep from * across, turn.
Row 5: Ch 1, sc in each st across, turn.
Row 6: Ch 1, sc in next st, *sc in next st, ch 3, sl st in front lp and front vertical leg of sc just made, sc in next 2 sts; rep from * across. Fasten off.
The next thing to figure out is how many stitches to pick up to knit across the other side of the foundation chain. For example, if your swatch tells you that you need to knit 20 stitches across 4″ [10cm] but your crochet swatch has 18 stitches/chains across 4″ [10cm], you’ll need to pick up 2 extra stitches in every 4″ [10cm] section of the stole. To do this, make 2 stitches out of one crocheted stitch. I do this by inserting the needle in the back loop of the next stitch and knit, then inserting the needle in the front loop of the same stitch and knit.
If you need fewer knit stitches than you have along the crocheted edge, then simply skip a stitch or two (or as many as needed) over each 4″ [10cm] span until you have the right number. Jot down the number of stitches on Row 2 — you’ll need this number at the other end of the stole.
At the opposite end of the stole, bind off, preferably with the bind off we looked at on Tuesday. Then, use your crochet hook to make the same number of stitches as in row 2 of the crochet edging evenly across the end of the stole and then work Rows 2 to 6.
Knit picot edging
Knit picot edging
In the above picture you can see a pretty bind-off technique that finishes up your knitting project and adds a lovely knit picot edging as well.
To make this finish symmetrical on both ends, cast on with scrap yarn. Then after the stole is finished and you have cast off the last row using this knitted picot edging, undo the provisional cast on, returning the stitches to the needles and work the knitted picot edging across the first edge.
With this edging, it doesn’t really matter how many stitches you have on the needles. When you get to the last few stitches, if you can’t work one more picot, just bind off (cast off) in your preferred method.
To work this picot edging, you need to now how to do the following:
Knit cast-on: Insert hook in stitch on the left hand (LH) needle and knit but without removing the stitch from the LH needle, rotate the right hand (RH) needle to twist the stitch and place it on the LH needle.
Instructions: K2, pass right-most stitch on RH needle over first st. Return this stitch to the LH needle. *Insert the RH as if to k2tog, but instead knit-cast on 1 st. Knit cast-on another st. K2. Pass the right-most st on RH needle over the first st. K1. Pass over. K1 through the back leg of the next st, Pass over. K1. Pass over. Rep from * across, ending with K1 pass over 1 or 2 times to use up all stitches.
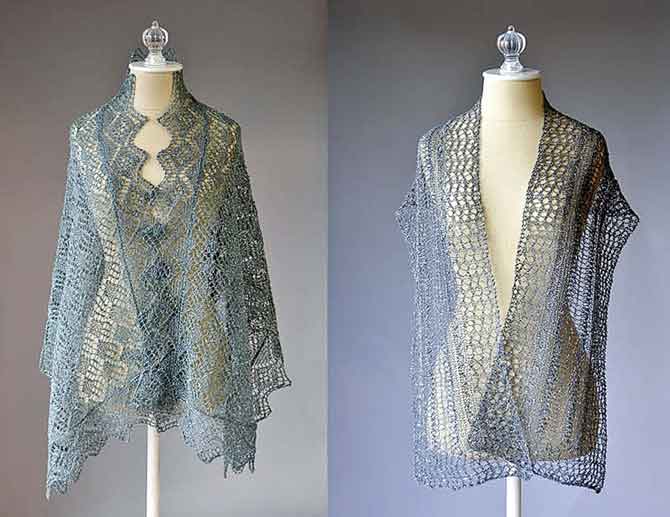
Knitted Lace patterns: Whimsical Wrap (left) and Starry Road Scarf (right)
Amy Gunderson and the Universal Yarn design team bring us four great free knitted lace patterns to try. The first two, Starry Road Scarf and Whimsical Wrap don’t have a picot edge, but the Starry Road Scarf on the right could easily be made using either technique we looked at today.
The other two designs, Going Places Shawl, and Planetary Shawl, have dramatic dramatic, knitted on edges already written into the instructions. These four patterns feature Universe, our yarn of the week, and really show off the subdued elegance that this yarn brings to knitted fabric.
The free patterns from Universal Yarns show how well Universe yarn takes aggressive wet-blocking (soaking the finished piece in water, pinning out the points and any internal lace features and allowing to dry), and how lovely the finished drape is. Let us know if you try any of these patterns.