
One of the most effective ways to enhance lace knitting (or knitted lace) is to block it. This week, we’re working with Fibra Natura’s Flax Lace yarn. Yesterday, we made two tension swatches – I started with one on size 6 US [4mm] needles, and wasn’t happy with it, so I made another on size 4 [3.5mm] needles.

Dare to wear white to a wedding! Our white skeins of Flax Lace will become a stole that could be worn by any woman at a summer wedding! Or, choose any of the other 10 colors to complement the bridesmaids’ dresses! What about a special gift for the mothers of the bride and groom?
Today, I’m going to give you tips and terminology for blocking, a technique that encourages knits to hold their shape by pinning them out to measurements.
Small items can be blocked on children’s foam play mats, or Styrofoam insulation. My favorite blocking board for small items is a 2′ x 4′ dropped ceiling tile. I cover it with a wide sheet of Styrofoam (you could use poster paper, or Pellon from the fabric store), stapling it onto the back side. I draw a series of geometric shapes on the paper in light pencil (I used a dark marker for the photo), then slide a dry cleaning wrapper from a dress coat over that. It’s perfect for doilies, tension swatches, and Christmas ornaments!
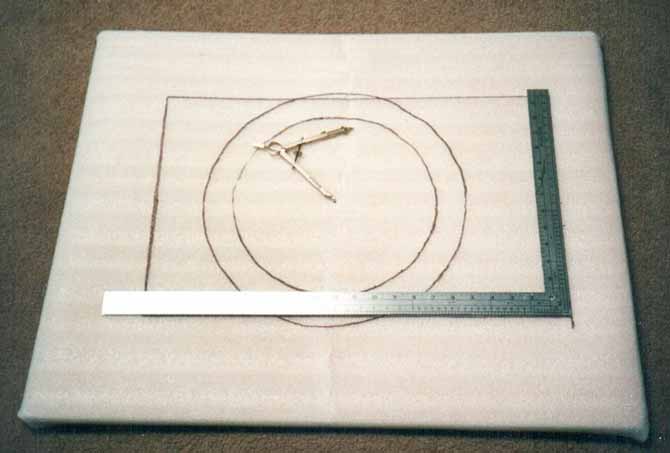
Make a blocking board with a 2′ x 4′ dropped ceiling tile! Wrap the tile with wide Styrofoam or poster paper, draw out the shapes you’re going to need, cover with plastic (to prevent the markings from transferring to your knitting), then you’re ready to go!
Larger items can be pinned out over linked-together children’s play mats, or the bed in the spare room. I have broadloom throughout my house, so I just look for an open floor area, lay down a checkered sheet and pin away!

This is a wedding shawl I made in 2007 for a bride who was having a destination wedding, blocked out on a sheet and pinned to the broadloom below it. There’s a blue crystal heart bead on each tip of the shawl.
Blocking can be done dry or wet. Even when a piece is pinned out dry, some form of moisture is usually added. It might be steam from an iron hovered above the item, or it might be a damp towel placed over it. The weight of the damp towel is enough to “press” the knitted fabric.
Wet blocking means washing the garment and pinning it out while it’s still wet. There are tools that help with the pinning process — the shawl in the photo above has blocking wires threaded through each point on the edging. Some people use gimp, fishing line (mono-filament) or the cords used to hold stitches in machine knitting, instead of blocking wires. Whatever you use, make sure the pins are either rustproof, or that they touch only the blocking tools, not the knitting itself!
Light blocking is something you might give to sweater pieces – they’re pretty much knitted to their finished size, but you just need to tweak the shapes – maybe the side seams biased a little when they were knitted, or perhaps you need to get a titch more ease.
Medium blocking might be used in a case where stretching the garment too much will either open the lace up too much, or make it too large. The shawl in the photo above was “medium blocked”: the depth of each triangle was 19½” [49cm] after the knitting. I pinned them to 23″ [58cm], which isn’t a lot for lace.
Hard blocking is used mainly for fine lacework. If a woolen garment is stretched too much, the “memory” in the wool fibers is apt to cause it to spring back into shape, so I wouldn’t hard block a sweater! But, doilies, shawls, stoles and other lace items (even silk or woolen ones) can be blocked “to within an inch of their lives” and look all the more lovely for it!
I left the size 6 [4mm] sample in its unblocked state, but blocked the sample I made on the size 4 [3.5mm] needles to 11″ x 11″ [28 x 28cm] — larger than the bigger sample! The smaller sample ended up being larger than the one made on the larger needles! If I’d blocked the shawl in the photo above to a similar percentage, it would have been another 3″ longer!
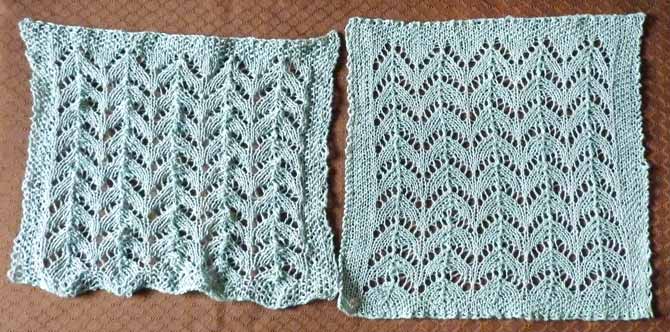
The magic of blocking! Before I blocked it, the sample on the right was smaller than the sample on the left. Blocking also “tames” the lace — isn’t it lovely!
Once blocked, your piece will relax a little, and thus end up a bit smaller than what it was on the blocking board. After it was unpinned, the swatch in the photo above relaxed from 11″ x 11″ [28 x 28cm] to 10¼” x 10⅜” [26 x 26.5cm].
The tension over 4″ was 25 sts and 38 rows before blocking and 22 sts and 40 rows after blocking (all to 4″ [10cm]).
Another way of taking tension that may be helpful is to measure the repeats. I measured 3 repeats in width (30 sts) and 5 row repeats (40 rows). The before blocking measurements were 4⅝” wide and 5″ high. After blocking, they were 5⅛” x 4⅞”. Why is this helpful? Because, if you want to shorten or lengthen the overall shawl, you need to do it by increments of 10 sts or 8 rows to get the horseshoe pattern to “fit” within the frame. Now that I’m armed with this information, I know now that every 30 stitches will add or subtract 5⅛” [13cm] to or from the length of the finished shawl.
Blocking the finished stole knit from the pattern you’ll find in my next post, I got the following results:
Before blocking, the stole measured 16″ x 71″ [40.5 x 180cm].
On the blocking sheet, I stretched it out to 17″ x 82″ [43 x 211cm]
After I took it off the sheet and left it for a few hours to rest, it measured 16¼” x 82″ [41 x 211cm]
Patterns rarely speak to blocking; they give the finished size, and, if you’re lucky, they’ll give the knitting gauge both blocked and unblocked. But, as you can already see, having a blocked tension is really helpful, especially in the case of our wedding stole, because it gives you the power to adjust the length of the piece.

To block this piece, I threaded blocking wires through the short ends of the stole, then threaded 3 long blocking wires through the edge on the right in the photo (this was the cast on edge). At the cast off edge, I used rustproof straight pins and pinned the edge at the base of each of the double decrease columns.
We’re now ready to talk about how to size a stole to fit different women – our topic for the next post! Join me!
This is part 3 of 5 in this series.
Go back to part 2: Bride’s handkerchief, aka tension swatch for a luxurious flax lace yarn
Go to part 4: The math behind customizing a knitted lace stole