
Do you ever go through your yarn stash and find a lovely summer yarn you were going to knit and you never did? By the end of this blog post, you’ll be ready to cast on and knit a cool, sophisticated knit lace summer tank-top. The one in the photographs is knit with our yarn of the week, Universe, which comes in 10 elegant colors that each have a little bling bling in them to make your summer evenings sparkle.

Eyelet Lace knit with 2 different needle sizes
I’m knitting this summer tank top out of Universe for Pam (my wife), and I thought it would be an excellent project to share with you. I have 5 different colors of this linen-cotton yarn that has a little glitter in it, and I thought it would go perfect over a camisole and under a jacket shrug or evening stole on a late summer’s evening out to the theater. I started with the darkest color I had (Tin) and changed the colors gradually as I worked up to the top. Below is a shot of it from the top down.

Eyelet lace from the top-down with gradient changes in color
I was inspired to develop this lace because of my love for Broomstick Lace, which is usually crocheted. I thought of the traditional knit sea-foam stitch, wherein extra wraps are made in certain stitches and then dropped to achieve an open lacy look. I played around with different increases and decreases till I got what I wanted. Then I threw in a change in needle size and voila…it was perfect.
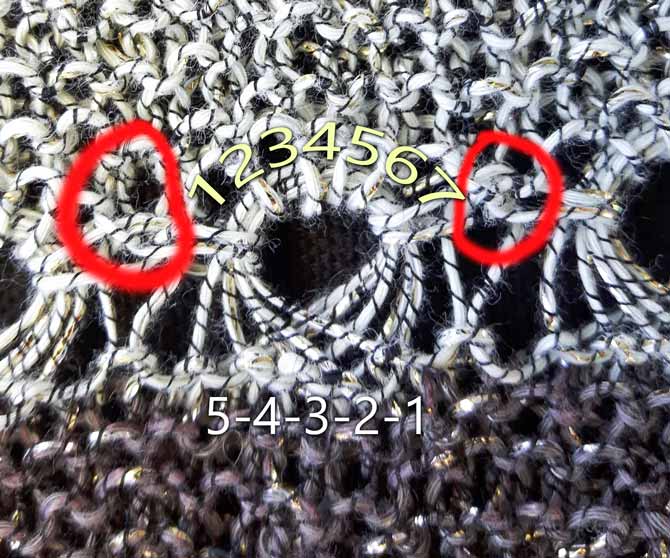
Structure of Eyelet Lace
To knit eyelet lace for your summer top, use a fine light-weight yarn, like Universe, and a needle size that’s perhaps one size (0.5mm) bigger than what is recommended on the yarn label. The pattern is made by working an even number of garter stitch rows between the eyelet lace rows. Change to a larger needle to work the first row that builds the eyelets. Each eyelet consists of 5 stitches that are worked together when you knit 7 stitches into each one. A single stitch flanks the eyelet on either side and separates the eyelets from each other. Work on a multiple of 6 stitches, plus 1.
Two rows after the eyelet row, you’ll need to get rid of the extra stitches that were worked into the eyelets. This is achieved with a double decrease right above the flank stitches (circled in red above).
Eyelet Stitch Instructions
Abbreviations: K=knit; tog=together; sl2togkpsso=slip next 2 sts as if to knit them together, knit 1, pass both slipped stitches over stitch just knit; sl=slip; ssk=slip each of next 2 stitches knitwise, return to LH needle, knit 2 together through back loops; LH=left-hand; RH=right-hand; rep=repeat.
Cast on a multiple of 6 stitches, plus 1. For a decent sized swatch you’ll want 31 or 37 stitches.
I used size 5 [3.75mm] needles for the main part of the stitch and a 7mm needle (closest size US 10 ½) for the eyelet row.
Rows 1-8: Knit with smaller needles.
Row 9 (RS): With size 7mm needle (or larger needle of your choice), k1, *[knit 1 by wrapping needle twice before drawing through stitch on LH needle] 5 times, k1; rep from * across.
Row 10: With smaller needles, k1, *[sl each of next 5 sts, dropping extra wraps, return to LH needle, through the 5 back loops together work (k1, yo, k1, yo, k1, yo, k1)], k1; rep from * across.
Row 11: Knit.
Row 12: K2tog, k5, *sl2togkpsso (see below), k5; rep from * across to last 2 sts, ssk.
Rows 13-18: Knit.
Row 19: With larger needle, k4, *[knit 1 by wrapping needle twice before drawing through stitch on LH needle] 5 times, k1; rep from * across, ending with k3.
Row 20: With smaller needles, K4, *[sl each of next 5 sts, dropping extra wraps, return to LH needle, through the 5 back loops together work (k1, yo, k1, yo, k1, yo, k1)], k1; rep from * across, ending with k3.
Row 21: Knit.
Row 22: K3, k2tog, *k5, sl2togkpsso; rep from * across to last 5 sts, ssk, k3.
Rows 23-28: Knit.
Repeat rows 9-28 for pattern.

Eyelet Lace is knit on a multiple of 6 stitches, plus 1.
Designing your own Tank Top
Now that you have knit a swatch, you’ll want to measure how many stitches are worked over 4″ [10cm]. This will be your gauge.
Second, you’ll need just a few measurements.

Schematic for a summer lace tank top
You can have a friend take your measurements while you’re in a bathing suit, but another easy way to get the numbers you need is to lay your favorite store-bought tank-top or t-shirt on a flat surface with the seams at the edges and measure from there. You’ll really only need the following to start, your bust measurement (at the widest point without adding any give or ease) — A on the schematic. Your cross-back measurement, B on the schematic, which is the distance from your left shoulder bone to your right shoulder bone. On a t-shirt this is the distance from one sleeve/shoulder seam to the other. On your body, be sure to ignore any soft tissue or muscle and go from the knobby part of the shoulder bone to the other outer knobby part. On the diagram you’ll see that the shoulder straps are a little bit in from the outer limits of measurement B…and that’s because you want the straps to cover bra or camisole straps.
A few calculations to design your tank top
Take your bust measurement and subtract ½” [1cm] from the total and then divide by 2. Round off any numbers to the nearest ¼” [0.5cm].
Example: 46″ – ½” = 45½”, divided by 2 = 22¾”.
A is the whole bust measurement on the schematic. Half of A is the width of the Front or Back of the Tank Top you are making. And we will knit the Front first, and then the Back separately.
If you have a gauge of 26 sts over 4″ [10 cm] then you insert that value into this formula.
A ÷ 2 ×26 ÷ 4… and that’s the number of stitches to cast on. in my example, that would be:
22.75 × 26 ÷ 4 = 148 stitches. I also need a multiple of 6 plus 1, so.
148 ÷ 6 = 24.666667 so I’ll ignore the numbers after the decimal point and multiply that number by 6 again.
24 × 6 = 144, + 1 = 145 stitches. Because we’re knitting a tank top we want to fit snugly, it’s better to round down than to round up.
In your case, you will need to change 26 for the number of sts you have in 4″ and the value of A to get the right number.
If I were using centimeters, my example would look like this:
A = 114.5cm and my gauge is 26 sts per 10cm.
A ÷ 2 × 26 ÷ 10 = 148.85…which when divided by 6 would be 24 as well, so I would cast on 145 stitches.
You can cast on this number of stitches and knit the Eyelet Lace pattern until the piece is as long as you want it from under your arm (the beginning of the armhole shaping to the bottom─distance G on the schematic.
The bodice of the tank top
This tank-top design is simple to design yourself, particularly once you get to the armhole shaping. Use the cross-back measurement B and then use your gauge again.
My example:
If my wife’s cross-back measurement is 16½”, then I take
16.5 x 26 ÷ 4 and get 107.25…do the math to see how many multiples of 6 I get.
107.25 ÷ 6 = 17.875…that’s pretty close to 18, so I’ll round up in this case.
So that’s 18 x 6 + 1 = 109 stitches.
Now I need to get rid of some stitches on both sides of the bodice panel, so I will take my original 145 and subtract 109… that gives me: 145−109 =36 stitches . However, I don’t want the shoulder straps to sit right at my wife’s shoulder bone, so I’ll bind off about another inch-worth of stitches. To start my armhole shaping I would bind off 18 sts (half of 36) plus another 6 (to adjust the location of the strap edge). That’s 24 sts cast off at the beginning of the next 2 rows. When I bind these off, that may land me in the middle of an Eyelet lace repeat, so I would just work enough stockinette stitches over to begin an Eyelet lace repeat.
Then I’ll continue in the Eyelet lace pattern as established until I reach the point that my wife wants the neckline to begin. At that point, I’ll just figure out how many inches wide she’d like each strap (see the little notches on line B on the schematic) and knit that many stitches on each side of the bodice panel, casting off the middle ones for the neck opening (D on the schematic).
The depth of the armhole (C on the schematic) is also a personal choice. Knit the straps until the bodice panel from the beginning of the armhole shaping is your desired depth. If you are knitting for someone else and it’s a gift or a surprise and you don’t want to try it on until it’s done, you can use the measurements provided by the Craft Yarn Council as a guideline. For women, men and children, there are charts which indicate what the standard armhole depth is for different sizes.
The Back piece is worked just like the front except you can choose to raise or lower the neckline — the straps can start right at the beginning of the armhole shaping which would change their length in the Back (E on the schematic), or the neckline can be placed higher than the front, or even the same height.

Close up of Eyelet Lace on the needle cable
There’s a few more weeks in July left and I’d better get cracking and finish this tank-top for my wife. I hope you’ve enjoyed this week’s posts about Universe yarn and that you feel inspired to try knitting with this excellent yarn.