
Welcome back! Continuing this week we’re working with Lion Brand Feels Like Butta uber soft yarn. Each day I’m helping you build your knitting skills with a group of free beginner’s knitting patterns for a perfect baby gift set. Monday I started the learning process using the I Wanna Knit a Baby Blanket. There were tutorials on Yarn Overs (YO) and Knit Two Togethers (K2tog), how to change colors and sew in ends. Yesterday’s post had tutorials for 1×1 ribbing and sewing up seams to help you complete a PomPom Baby Hat. If you missed any of these techniques, I suggest you pop back to those posts before beginning these adorable Booties.

How cute are these!!! Are you ready to make baby booties?
Though Booties look more challenging, they are easy with the skills you’ve already learned on the baby blanket and hat, and just a couple simpler techniques. It is knit flat then the sides and bottoms of the slipper are sewn up to finish them. I used the gray yarn for the foot of the boot then alternated 2 rows of white and two rows of pink 1×1 ribbing for the cuff.
What You’ll Need
- Feels Like Butta gray, white, and pink yarn left over from Tuesday’s baby blanket
- US 4 [3.5mm] and US 5 [3.75mm] needles
- stitch markers
- yarn needle
You’ll need some stitch markers to make up this pattern. If you have never used stitch markers before they are really simple. The Booties pattern tells you where to place your markers. When you come to a marker you slip the marker off the tip of the left needle to the right needle and continue to follow the next instruction in the pattern. If you’ve never used stitch markers before I recommend locking stitch markers like the orange one in the photo below. If you accidentally knit in your stitch marker, you can just simply open it like a safety pin and slide the stitch marker out of your knitting.
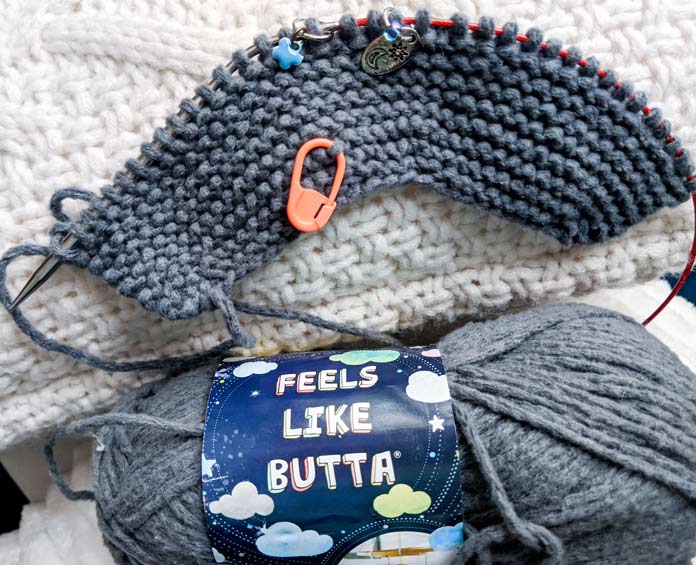
Set up for success with Locking Stitch Markers.
The first new technique you’ll encounter in this pattern is a Make One increase (M1). The hardest part of this when I was a novice knitter was finding the strand between the stitches. I’m sharing a quick video with you to help you, but simply if you pull open the space between the last stitch worked on the left needle and the next stitch to be worked on the right needle, you will see a strand of yarn between them. You will take the tip of the left-hand needle, put it below this strand from front to back, and pick it up as a new stitch. With your right hand needle you’ll knit into the back of this stitch. If this description is as clear as mud watch the video below to help you.
The next technique is the K2tog which was taught in Monday’s post for the baby blanket. Make sure you add your stitch markers according to pattern instructions. Magically as you do these decreases the shape of the toe appears! It’s really fun to watch it happen!

See how neatly the toe is formed with just a few K2togs!
Once you’re finished the foot section you’ll start working with the white and pink yarns to create the cuff. This section is done in 1×1 ribbing. If you need a refresher on that technique, you can rewatch the video in the post about making the PomPom Baby Hat. As for the color pattern in the bootie cuff, I started with white, and did four rows of white and four rows of pink switching back and forth between the two colors until I had knit a total of 24 rows. There are two methods of switching colors like this: cut the strand at the end of each section then add the new colour or carrying the yarn up the side as you color change. I prefer the second method as it has a lot fewer ends to weave to finish the bootie. As you can see below: photo A shows the many strands left by simply cutting the yarn at every color change, and photo B shows just a few strands left to weave in after carrying the yarn up the side. If you decide to simply switch colors the instructions on how to switch them are in Tuesday’s post for the I Wanna Knit a Baby Blanket. If you’d like to learn how to carry your yarn up the side, you can watch the video below.

Photo A – cut strands

Photo B – carried strands
To finish these booties, you’ll need to bind off in pattern. That means you’ll continue to knit and purl in the ribbing pattern. If you have forgotten how to bind stitches, don’t panic! A lot of newbie knitters struggle to remember the bind off technique. Quite simply you will knit one stitch, purl the next stitch. Then on the right-hand needle you will have two stitches. You’ll pull the first stitch on the needle (the stitch that was knit) over the second stitch on the needle (the purl stitch). There should now be just one stitch on the right-hand needle. You’ll go on in the ribbing pattern, knitting or purling one stitch, then pulling the left stitch on the right-hand needle over the right stitch. If this doesn’t make sense watch this video to help you through it: https://youtu.be/2P-U4vXbuDA
Finally, you’ll need to sew up your bootie. I chose to sew it from the top of the cuff (photo 1) to the back of the foot, and finally the bottom of the foot (photo 2). If you need a reminder of how to sew up the cuff ribbing, scoot on back to yesterday’s ribbing tutorial video. For the boot section check out the video on sewing up Garter Stitch.
Sewing up garter stitch video: https://youtu.be/9LKyaOL1d9A

Photo 1 – Step one is stitching up 1×1 ribbing

Photo 2 – Step 2 is sewing up the foot.
There you are, BOOTIES! Once you’ve knit a pair of these you’ll fall in love with how quick and fun these are and may find yourself knitting up many more. These are wonderful to give away as gifts for friends and family or your favorite family outreach program. Or, like me, use them to decorate your favorite pet (tee hee). Tomorrow I’ll teach you how to knit the icing on the cake of this sweet baby set: the Caterpillar. Drop in with your US 5 [3.75mm] 32” circular needle tomorrow and learn how to knit in the round with the appropriately named Magic Loop technique and the uber soft with Lion Brand Feels Like Butta yarn.

Ready to work a little more magic with this super soft Feels Like Butta yarn by Lion Brand?

Blanket, Hat, and Booties completed. On to the Caterpillar and magic loop knitting tomorrow!
This is part 4 of 5 in this series
Go back to part 3: The Beginner Knitter Skills Builder – Step 2: Pompom Baby Hat
Go to part 5: The Beginner Knitter Skills Builder – Step 4: The Cuddly Caterpillar