Blocks 1-6
This week we’re bringing a bit of the seventies into 2023 with a log cabin knit blanket called the Rockwell blanket (free pattern from Lion Brand Yarn) This thick cozy blanket knits up quickly using super bulky Hue+Me wool and large US 13 Lantern Moon Ebony needles. Yesterday, I introduced you to log cabin knitting and shared the material list for the Rockwell Blanket. I knit my blanket using the exact yarn and colors of the pattern, so it was easy to get started. Today, you’ll learn the basics of log cabin knitting with a couple of videos to help you pick up stitches for log cabin knitting patterns. I’ll explain, block by block, how to build the Rockwell Blanket with helpful graphics to keep you on track. Are you ready to jump into blocks 1-6 of this nostalgic knit? Good, let’s go!

The Rockwell Blanket – retro chic at its best.
Let’s get started with block 1
Here we go with block one! Grab your color B (this is the Spicy colorway in Hue+Me wool). Just a warning about the circular needles if you’re new to using them for flat projects. I chose the Lantern Moon Ebony needles with a 32” cord which is quite long for the first few squares. I did it because, as the blanket grows, the longer rope is needed to hold all the stitches. Unfortunately, until the blanket grows, the cord can be a little in the way. Trust me, it’s worth the inconvenience for the benefit of having the extra length to help balance such a heavy and large knitting project. That said, let’s get the first block done. This is the simplest, most straightforward part of the blanket. Cast on the 14 stitches loosely, knit 26 rows, then bind off. Easy!

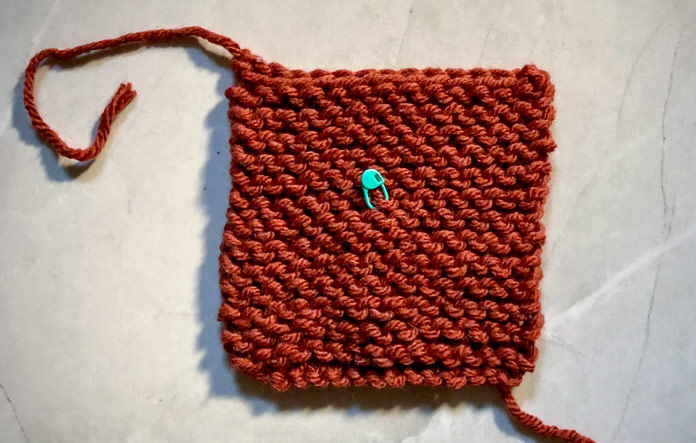
Place the tail of the bind off on the upper left hand corner and a locking stitch marker on the front of the square marking the right side of the work.
There are two important steps to do next. First, make sure to have your square turned so the tail of the bind off is at the top left hand corner (see photo above). Then place a locking stitch marker on the fabric that is faced towards you to mark the right side of your work (see photo above). The garter stitch looks identical on both sides, and it’s easy to lose track of the right side of your work in the beginning. To pick up your stitches properly for the log cabin knitting technique, you need to be clear that you’re on the correct side. You will always pick up stitches with the right side facing up…always! Now, you’re ready to start your second block and begin creating the log cabin pattern that will continue throughout this project.
Picking up the stitches for block 2
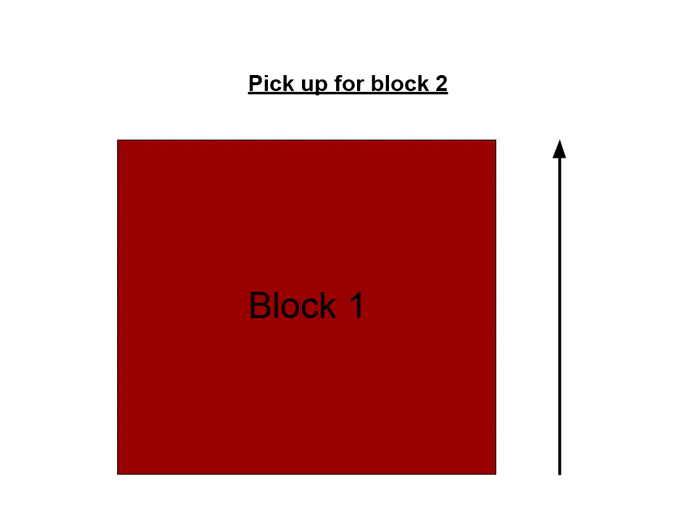
Below is an illustration to help you see the side of the block from which you will be picking up the stitches for block 2 and in what direction they are to be picked up.

Follow the direction of the arrow to pick up stitches for block 2 along the side edge of block 1 from right to left.
Using your color A (colorway Desert – Hue+Me wool), pick up and knit 14 stitches along the right side edge of the first block. If you’re not sure how to pick up stitches along a garter stitch edge, the video below by Martha Lyons is very helpful.
Here’s a quick video showing how to pick up stitches on a garter stitch edge.
Pick up a stitch at the cast on edge and then one for each garter ridge at the edge. Two rows of knitting in garter stitch (the right side and wrong side row) actually make up one edge stitch bump. So, the 26 rows of knitting you completed on block one only need 13 stitches picked up for this block. Along with the one stitch picked up at the cast-on edge, this makes the total of 14 stitches you need to knit block 2. Go on and knit block 2 according to the pattern, and we can move onto the next step.
Picking up the stitches for block 3
The next step is a little different from the last one. Below is a graphic to show you where to pick up the stitches for the next square. It has an arrow indicating the direction for the picked up stitches. This time you’ll pick up across 2 blocks not just one, and you’ll be doing it on a garter edge (block 2) and bind-off edge (block 1). Pick up the stitches across the top of blocks 1 and 2 from right to left using color A (Desert) as follows: pick 1 stitch at the bind-off edge of block 2 then pick 20 stitches at the garter edge of block 2; then pick up the 13 remaining stitches (remaining because one stitch was already worked to start block 2) of block 1. Knit block 3 as described in the pattern then bind off all the stitches loosely.

Follow the direction of the arrow to pick up stitches for block 3 across block 2 then block 1.
If you aren’t sure how to pick up along a bind off edge there’s a second video by Martha Lyon posted below to help you out. You use the exact same technique whether you are picking up on the cast-on or bind-off edge.
Block 4
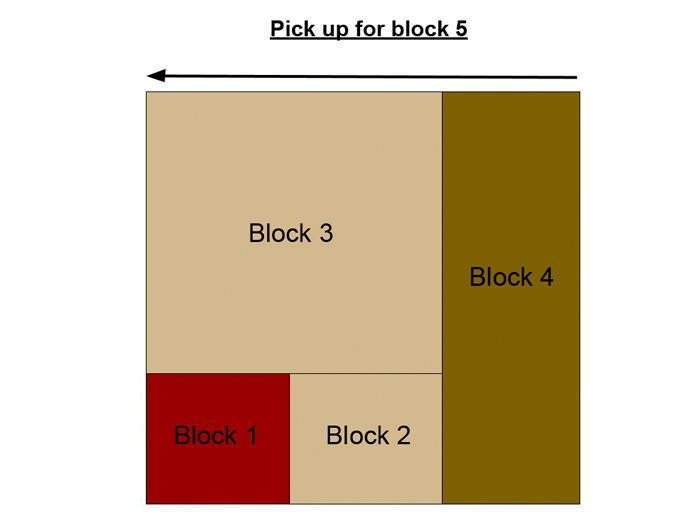
To help you complete blocks 4 to 6 I added graphics showing on which side to start the next block with an arrow showing the direction in which these stitches are picked up. Follow the instructions in the pattern for how many stitches to pick up for each block and what color of yarn to use. Be sure to read carefully how many stitches to pick up and note if there is a bind off stitch picked up at the corner before the garter row edges.
Switch to color C (Arrowwood) and pick up the remaining 13 stitches (14 stitches bound off for block 2, but only 13 remain because one was used for the pick-up of block 3) along the bind-off edge of block 2. Then pick up 50 stitches along the side edge of block 3. Knit the number of rows given in the pattern then bind off all the stitches.

Follow the direction of the arrow to pick up stitches for block 4 across block 2 then block 3.
Block 5
For block 5 return to color A (Desert). Pick up 1 stitch at the bind off edge of block 4 then 13 more stitches at the side edge of this block. Finish the setup for block 5 by continuing to pick up 33 stitches along the bound off edge of block 3. Knit the number of rows given in the pattern then bind off all the stitches.

Follow the direction of the arrow to pick up stitches for block 5 across block 4 then block 3.
Block 6
Block 6 continues with color A (Desert). Pick up the remaining 62 stitches of the bind off edge of block 4 then 13 stitches along the garter ridge edge of block 5. Knit the amount of rows for block 6 found in the pattern, then bind off all the stitches.

Follow the direction of the arrow to pick up stitches for block 6 across block 4 then block 5.
That’s a good start – let’s keep going!
I hope you’re enjoying the soft squishy Hue+Me wool as you work blocks 1-6 of the Rockwell blanket by Lion Brand Yarn. I think very soon you’ll begin to understand the wisdom of using the 32” Lantern Moon Ebony circular needles to balance the weight of your growing project. Tomorrow, we’ll continue on with blocks 7-11 followed by blocks 12-16 on Thursday. The last post will help you complete the borders (blocks 17-20). Throughout the rest of this week each post will include some stretches to help you manage the stress that knitting a larger, heavier project like this blanket can put on your body. I hope they make knitting your Rockwell much more comfortable and enjoyable! See you tomorrow as the adventures in log cabin knitting continue.
