Yesterday’s post was about converting a knit flat pattern to a knit in the round using Fibra Natura FLAX yarn. Today’s post is the challenging part, the dreaded ‘At the Same Time’ instructions that strike fear in many knitter’s hearts. But it’s not that scary. I promise.

The Finished Eyelet Skirt, knit in Fibra Natura FLAX yarn
The best thing you can do for yourself is to keep meticulous track of your rows. First, get a notepad or a Word file, and write down every decrease row for your size. In the Eyelet Skirt pattern, they’re fully numbered in the lace section so, just write down each row number for a decrease row.
Next, get yourself a row counter you’ll remember to use. This can be an app, a clicky counter, or a counter on the needles; it doesn’t matter what it is, so long as you remember to count your row when you’re done.
After that, it’s all about paying attention. Every time you start or end a panel with a decrease section (also, if you’re like me and knitting this in the round, the UNIQUE Knitting Split Ring Markers are going to be your absolute best friend here!) take a look and see what the decreases do to the lace pattern. You’re basically getting an extra stitch because of the decrease stitch, but you’re also losing a stitch because of the decreases.
Wait, what? This gets a little complicated, so please, try and stick with me.
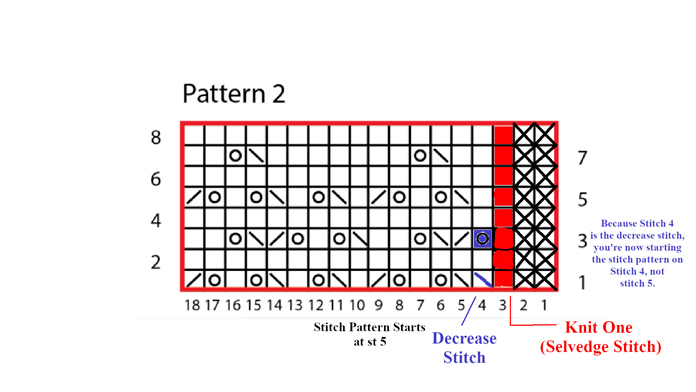
Take, for example, rows 11 to 18, where you’re supposed to work Lace Pattern 2, and you start row 1 of the lace chart on stitch 5 for the size small. This also coincides with the first decrease row on row 11.
So, that translates as k1 (selvedge stitch), ssk, (decrease row), ssk (fifth stitch of the first row of Lace Pattern 2), yo, and continue in pattern. Not too bad, right?
However, when you get to the start of row 3, that messes things up. Because we now have k1 (selvedge stitch), then an extra stitch from the ssk in the decrease row, then the fifth stitch of the chart. You, the knitter, cannot simply do only what the pattern says (which is to start row 3 of the Lace Pattern 2 on row 5), because now there’s an extra stitch in there! It won’t work (trust me, I tried, and got very confused). So, you have to account for that extra stitch, and treat it as the 4th stitch of row 3, which is a yarn over and, therefore you must also do the associated decrease in stitch 5, as well.
Still lost? Don’t worry, I was too, and had to make plenty of notes to get this to work. If it helps, here’s a copy of the notes I made on the stitch chart, for something that hopefully makes more sense.

My notes with an edited version of Lace Pattern 2 showing how the decrease row alters the lace pattern stitch count
The same logic holds true for the end of each section, where you’ll have an extra stitch from the decrease row. Here, however, it’s much easier to do as the pattern says. Look at the last set of stitches in the stitch repeat, and work the lace until you have three stitches remaining (one selvedge stitch and two for the decrease). Make sure that, in the lace pattern, you have enough stitches to work the yarn over stitch and its corresponding decrease. If you don’t have enough stitches, then just work in stocking stitch to the last three stitches of the panel.
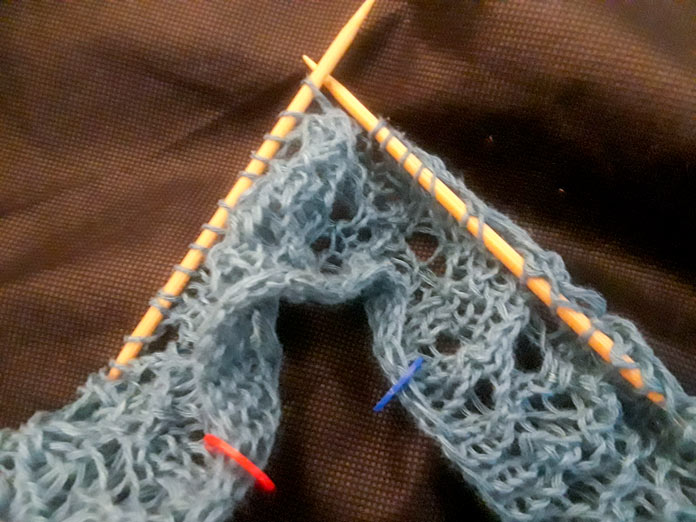
And this holds true for pretty much all the decrease rows, too. You have to account for any decrease rows when you’re working out where the charts sometimes start. The best thing I can say is that you have to pay attention, count your stitches, and account for both the selvedge stitch and any decreases when you’re figuring out where to start each row. Now, luckily, there’s no lace section where you have two decreases in one lace section, so you only have to do this step once, at most, for each lace chart.

The first decrease rounds of the Eyelet Skirt Pattern
Complicated? Yes, but, not untenable. And the Fibra Natura FLAX tinks back very easily, so if you do make a mistake or things don’t line up, it’s not too hard to go back and fix it. Yes, it’s not pleasant to unravel 300-plus stitches, but, at least, the yarn won’t be fighting you while you do so!
Also, learning to read your knitting will be a huge benefit here, so you can see pretty quickly if something doesn’t line up.
Once you get through the bottom edge of the skirt, that’s by far the most complex part. As you work your way up the skirt, the lace gets progressively less complex; the upper part of the skirt actually has no lace and is knit on smaller needles.
Why the change in needle size? Stay tuned for that explanation in tomorrow’s blog post, as we switch to a 4mm Clover Takumi Bamboo Circular Needle using Fibra Natura FLAX in the beautiful Adriatic color.
This is part 3 of 5 in this series
Go back to part 2: Knitting an Eyelet Skirt | Converting a pattern to knit in the round
Go to part 4: Why change needle sizes in a knitting pattern? What does it do?
