
We talked about stitch markers here on the KNITmuch blog, but today we’re going to take a moment to extol the virtues of stitch holders. These little life-savers aren’t hard to use, but we tend to use them while making slightly more advanced projects, so as you progress in your knitting skills you’ll find yourself reaching for them more and more. Stitch holders are safety nets for your knitting.

Stitch holders come in many sizes and are designed to securely hold your stitches aside.
Stitch holders come in different sizes, ranging from just a few inches long to nearly a foot. They’re a staple of the yarn shop tools display, and so helpful to use once you start knitting garments like sweaters. They are designed to do exactly what you might think – hold stitches aside, securely, for a portion of your project. (If you needed to put the whole piece aside for a short while, you would simply leave it on the needles).

The bottom of a sweater neckline is one of the most common places to use a stitch holder.
You’ll commonly see pattern directions telling you to use a stitch holder when you’re starting the neckline of a sweater while working from the bottom up. On the sweater pictured above, (which is the Ravine pullover pattern), you can see the center of the scoop neckline starts across the middle cable panel, and on each side just above that are the rows of decreases that shape the rest of the scoop. This bottom center of the scoop is first established by holding the stitches aside, and then working each side of the sweater front one side at a time. Once you’ve held the middle stitches aside, you’re essentially working two pieces, not just one.
When the sweater is all finished, the collar is worked by picking up stitches all along the edge of the neck, and transferring those stitches held aside back onto your needles so that they can be worked into the ribbing as pictures. So, once the sweater is done you can’t really tell that anything was temporarily held aside! It’s all just one step in the process of completing your sweater.

We’re using this cabled swatch as though it is the front of a neckline, to separate out the middle section of stitches.
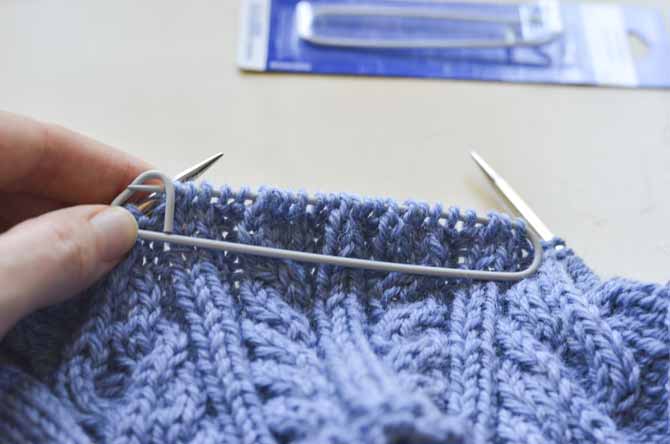
Simply slip the stitches from the needle onto the stitch holder, and then lock it closed.
The two photos above show what this looks like on a cabled swatch – I’ve taken the middle stitches and put them aside on the stitch holder. At this point, if it were a “real” sweater, I would continue working one side at a time and do some decreases on each side of the held stitches to finish shaping the rest of the neckline.
Another popular place to use a stitch holder is on the under-arm of a sweater knitted in the round, or when needing to hold aside thumb stitches on a mitten. This is where it helps to have a few different stitch holder sizes handy, depending on how many stitches you’re working with at once.
If you’re absolutely stuck and don’t have a stitch holder handy, you can accomplish the same task by using some “waste yarn” (a bit of extra yarn you’re not using) or even dental floss to hold onto the stitches. The advantage of stitch holders, though, is the security of being able to snap them closed! At those times when you’re working on a large project, it definitely feels like stitch holders are safety nets for your knitting.