This week, I’m knitting with Universal Yarn Wool Pop which is a blend of bamboo, superwash wool, and polymide that exudes a heathery sheen and subtle halo.
In yesterday’s post, I made a scarf using the double knitting technique, making it completely reversible. That project was worked flat. Today I’m making a hat to go with the scarf, but this time in the round.
Double knitting in the round is actually easier than not because you’re always working with the same side facing you. Rule 4 from the instructions in yesterday’s post doesn’t apply when working in the round, however, Rules 1 – 3 apply.

Wool Pop is available in a variety of 20 different colors. Silken and Graphite are my color choices for this week.
I’m using the same two colors of Wool Pop – Silken and Graphite and making the same motif.
sizing
This hat is sized to fit a 20” head.
materials
yarn
- 2 skeins Wool Pop, 1 Silken, 1 Graphite
needles
- 2 US 4 [3.25mm] 16” circular needles, or 32” for magic loop ***
- 2 US 7 [4.5mm] 16” circular needle, or 32” for magic loop ***
Note: If you don’t have a second set of the needle size, use a spare needle, preferably smaller, to act as a stitch holder when needed.
- 1 US 7 [4.5mm] or smaller crochet hook
- 1 cable needle
- 1 tapestry needle
other
- removable markers
- 2 Sets of Snap Fasteners, ⅝” [15mm] to attach the pompom
- (optional) scrap yarn for provisional cast on, pompom maker
instructions
The hat begins with a 1×1 rib in one color, then stitches are picked up from the starting edge in the other color and the 1×1 rib repeated. There are different methods for starting the 1st rib; a provisional cast on where you remove the scrap yarn and pick up the live stitches for the 2nd color; cast on the same way we did for the scarf and double knit the rib, but that will likely be difficult to do and create a loose tension; or cast on in a single color and pick up stitches from the cast on edge. I used a provisional cast on, of which there are many videos available on YouTube to show you how to do it.

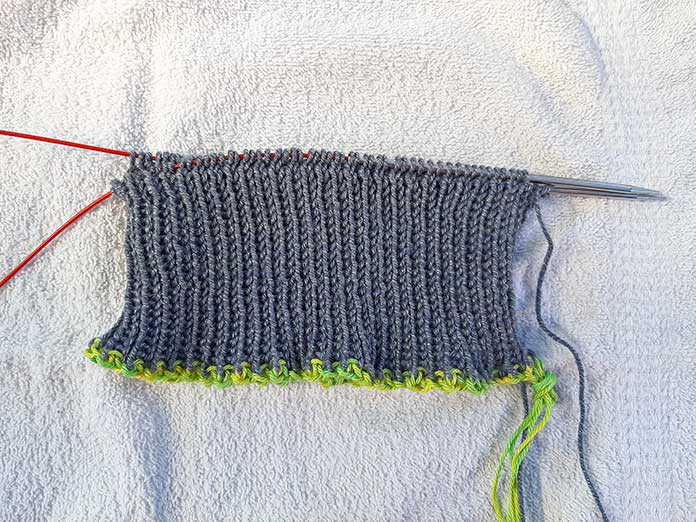
1×1 Ribbing in Graphite with a provisional cast on
abbreviations
K – Knit
K2tog – Knit 2 stitches together
SSK – Slip, Slip, Knit together through back loop
P – Purl
P2tog – Purl 2 stitches together
P2togtbl – Purl 2 stitches together through back loop
Inc – Increase
Dec – Decrease
Sts – Stitch or Stitches
Rnd – Round
BOR – Beginning of round
Rem – Remaining
Reversible Window Pane Hat Pattern
With US 4 [3.25mm] needles and Graphite (Dark) cast on 108 sts using a provisional cast on and scrap yarn. Join in the round, being careful not to twist stitches.
With Dark, K1, P1 rib for 3”. Leave stitches on the needle (or a spare needle).
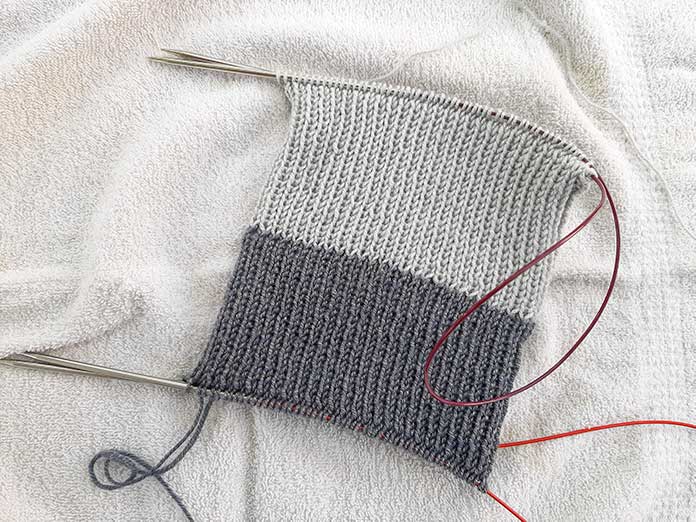
With another US 4 [3.25mm] needle and Silken (Light), remove provisional cast on, then pick up and Knit each stitch from the edge.
K1, P1 rib for 3”.

1×1 Ribbing with both colors. Weave in ends before folding.
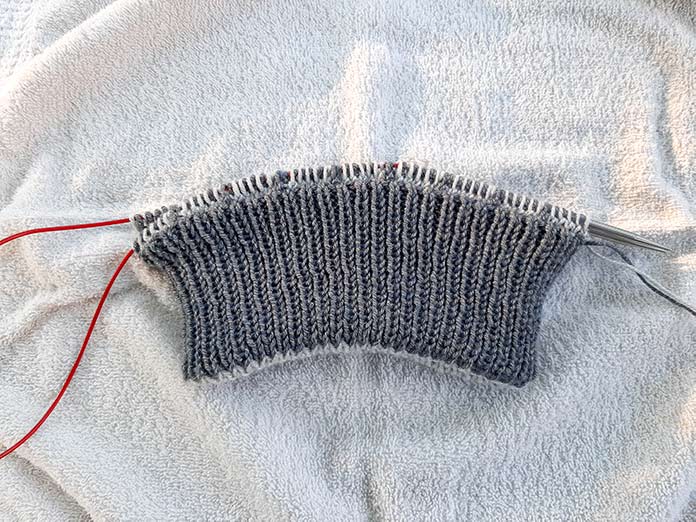
Weave in loose ends, then fold the Light rib inside the Dark rib.
With US 7 [4.5mm] needle, K1 with Dark from the front needle with both yarns in back, move both yarns to the front and P1 with Light from the back needle. The light yarn will already be on the first stitch, but you still Purl this first light stitch. Once completed, all stitches will be on the larger sized needle. (108 pairs/216 sts) Place a BOR marker.

Knit dark stitch from front needle, purl light stitch from back needle onto larger needle.
Proceed with pattern as follows:
Rnds 1 – 6: *(K1 Light, P1 Dark) 5 times, K1 Dark, P1 Light; repeat from * to end of round.
Rnd 7: *K1 Dark, P1 Light, repeat from * to end of round.
Repeat rounds 1 – 7 three more times.
Before starting the decreases for the crown, remember Rule 3 – Check your work, both inside and out. It’s much easier to pull out the crochet hook and fix any boo boo’s before starting the decreases. You’ll also need to use a cable needle to rearrange the stitches for decreasing.
Start decreases for the crown as follows:
1st Rnd: Slip the 1st Light st onto the right needle, slip the 1st Dark onto the Cable needle and hold in back, then transfer the Light stitch back to the left needle and SSK, then transfer the Dark stitch back to the left needle and P2tog. Work stitches according to pattern to the 4th block, and every 3rd block after, and repeat the process to the end of the round. 6 pairs/12 sts dec.
2nd Rnd: Work stitches to the 2nd block and repeat the decrease steps as per the 1st Rnd. 6 pairs/12 sts dec.
3rd Rnd: Work stitches to the 3rd block and repeat the decrease steps as per the 1st Rnd. 6 pairs/12 sts dec.
4th Rnd: (K1 Light, P1 Dark) twice, slip Light st onto right needle, slip Dark st onto cable needle, then transfer Light back to left needle and K2tog, then transfer Dark st back to left needle, P2togtbl; work stitches according to the pattern to the 4th block and every 3rd block after, and repeat the process to the end of the round. 6 pairs/12 sts dec.
5th Rnd: Work stitches to the 2nd block and repeat the decrease steps as per 4th Rnd. 6 pairs/12 sts dec.
6th Rnd: Work stitches to the 3rd block and repeat the decrease steps as per 4th Rnd. 6 pairs/12 sts dec.
7th Rnd: *K1 Dark, P1 Light, repeat from * to end of round. No decreases. (72 pairs/144 sts)
Check your work, inside and out. The block pattern is finished, and all remaining rows are K – Dark, P – Light.
8th Rnd: *K1 Dark, P1 Light, then slip Dark to right needle, slip Light to cable, transfer Dark to left needle & K2tog, transfer Light to left needle & P2tog. Repeat from * to end of round. 18 pairs/36 sts dec. (54 pairs/108sts rem)
9th Rnd: *Slip Dark to right needle, slip Light to cable, transfer Dark to left needle & K2tog, transfer Light to left needle & P2tog. Repeat from * to end of round. 18 pairs/36 sts dec. (36 pairs/72sts rem)
10th Rnd: Repeat 9th round. 18 pairs/36 sts dec. (18 pairs/36 sts rem)
11th Rnd: Repeat 9th round. 18 pairs/36 sts dec. (9 pairs/18 sts rem)
Cut yarn and draw each color through its corresponding stitches, pull tight and secure.
Time to embellish with a pompom. You can make your own, as I did by wrapping both yarns together, or you could purchase one of those faux fur pompoms. Since I made my own, I needed to get some snaps. I attached the female end to both the inside and outside of the hat, and the male end to the pompom. If you purchase a pompom, it usually comes with snaps, however, you may need to get an extra set so you can attach it to either side.

Attach a snap on each side of the hat and another to the pompom.
And here you have it, a double knit, reversible hat that can be worn slouchy or as a beanie.

Double knit hat worn as a beanie.

Double knit hat worn as a slouchy hat.

Double knit hat worn as a slouchy hat.
Wow, there was a lot of knitting this week. Now it’s time to relax with a glass of wine and admire my handy work.

Completed Wool Pop ensemble in Silken and Graphite.
I’m very pleased with the results. I have a lovely sweater, and a gorgeous reversible hat and scarf all made with Universal Yarn Wool Pop. The lightness of the yarn makes this sweater ideal for the cooler days ahead, and the double thickness of the hat and scarf should provide warmth and style during the cold winter months.
Stay safe, be healthy, and carry on knitting.
