
All week I’ve been working with Fibra Natura Radiant Cotton yarn. As sometimes happens when I get playing, I got carried away and ran out of time before I finished our cushion top. So, today’s post is a bonus to show you how I deal with loose ends and stitch together a knitted cushion cover. I’m even sewing in a zipper using the sewing machine! Come along for the journey!

Our two cushion covers. The pattern looked so good on either side, I made one of each!
Because we have negative ease in our pieces, the 12½” [31cm] seam will need to stretch to 16″ [40cm] without gaps.
You’ll recall from the patterns in yesterday’s post that I specified not to weave in the ends. That’s because I will work them into the seams.
TIP Whenever you have long ends to be used in a seam later, grab a bread bag tab and wrap the excess length of yarn around it.

To keep long ends from becoming unruly while you’re knitting, wrap the length around a bread bag tab.
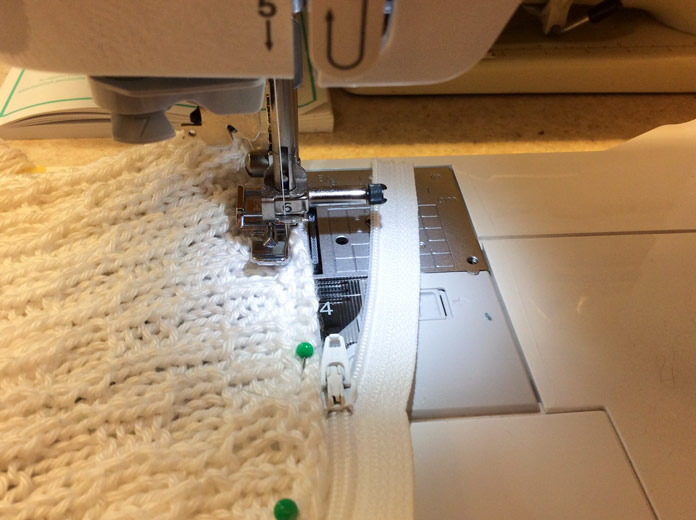
I’ll insert the zipper along the cast on edge. It needs to be centered, so find the center on both the zipper and the cushion cover.

The pins with the pink heads mark the center on both the zipper and the cushion cover.
Pin one side of the zipper to the cushion top. Stretch the top evenly along the length of the zipper, with about 1¼” [3cm] of cushion top (stretched) extending past each end of the zipper band. The band on a 12″ [30cm] zipper measures 13½” [34cm].
The idea is to have the cast-on edge of the knitting rest at the middle of the zipper teeth to minimize its visibility.

The zipper pinned along the edge of one cushion cover.
Using a zipper foot, stitch this side of the zipper to the cushion cover. Repeat these steps for the other side.
The zipper has been opened a little to make it easy to sew along the teeth. When I approach the slider, I will sink the needle, raise the presser foot and close the zipper, then carry on sewing.
Remember those long ends I told you to leave? We’re about to use them. In the photo below, I’ve laid the pillow form between the cover pieces, so you can see the negative ease I have in my piece. I’ll thread the white end (on the right in the photo), and use it to attach to the same corner of the cover on the underside.

The zipper has been opened a little to make it easy to sew along the teeth. When I approach the slider, I will sink the needle, raise the presser foot and close the zipper, then carry on sewing.
Ordinarily, I wouldn’t sew my cover up around the form but this time I will, I have a lot of negative ease and don’t want my seams to gap. To ensure that my seam stretches evenly along the top edge, I pinned the center and opposite end of the seam.
The actual sewing is done using a “lacing” technique, similar to the way we thread shoe laces. This gives me control over the drawing in of the two pieces. When I’m happy with a section of seam, I make a good old back stitch to lock that section down.

Detail of the lacing technique used to sew the cushion covers together along the top edge.
Chances are your cast off end won’t be long enough to get you all the way across the seam. When I reach the end of the first strand, I lock it down with a couple of back stitches, then thread the end from the cast off end of the other piece, and repeat the process. When I reach the end of the other strand, I stitch on for a few stitches to reinforce the join.

The yarn end from one cover got me more than half way across the seam. Time to thread the end from the other cover and close it up!
The color stripes help us divide the side seams into sections. We can draw up the sections, and use those lovely little bumps along the edges to perform mattress stitch! Mattress stitch is similar to the lacing technique I used above, the difference being that instead of going up from the back of each side of the seam, the needle goes through the bumps along the edges and always faces toward your non-dominant hand (in my case, the left).

Use the yarn ends from color changes to sew up the side seams. Mattress stitch gives control over the necessary stretch needed to make the pieces fit over the pillow form.
To finish the bottom edge (on either end of the zipper), use the same lacing technique used for the top of the cushion, working from the corner in to the end of the zipper. I worked in far enough to cover the stopper on the zipper.
NOW you can weave in your ends. Open the zipper, take out the pillow form, and turn the pillow case inside out. Use a crochet hook to bring all the ends to the inside of the cushion cover and weave them all in with a tapestry needle. Because a cushion gets a lot of tugging, punching, and fluffing, I split the yarn ends into two 2-ply ends and weave them off in different directions to give them a little extra stability.
To finish, stuff the pillow form back into the casing and zip it up. I love the soft sheen on this cushion thanks to Fibra Natura Radiant Cotton yarn! What two or three exciting colors will you choose?

The afghan in this photo was crocheted more than 20 years ago! Our Radiant Cotton cushion complements it well, and proves that timeless is as timeless does!
This is part 6 of 6 in this series.
Go back to part 5:
[shareaholic app=”follow_buttons” id=”23784471″]