
Maybe you’ve never heard of a shrug-yoke sweater construction. I’m not sure I’ve heard the name before, but I haven’t seen this type of design before either, so to me this is something new. This week we’ve been looking at Unity and Unity Beyond yarn, and I’ve used this lovely multi-colored and multi-fiber yarn to design a summer tee for my wife. I’m sharing a recipe for making your own version of this to adapt to your measurements, but if you want to follow a fully written multi-size pattern, refer back to yesterday’s post, where I shared quite a few designs worked in Unity and Unity Beyond.
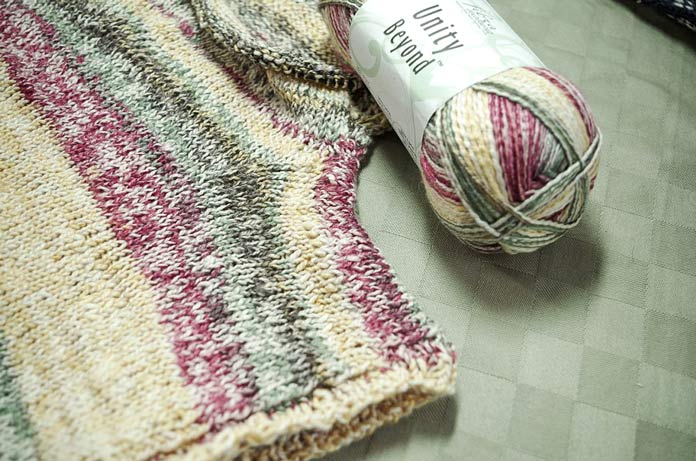
Sleeve of a shrug-yoke top down sweater in Unity Beyond.
To knit this tee, you’ll need some intermediate knitting skills — working a provisional cast-on, short-rows, increasing and decreasing. You’ll also need to be comfortable with knitting a gauge swatch, and keeping track of several different stitch counts and row counts, as different shapings happen at the same time.
There are a few key measurements that you’ll need to take for this:
- Your full bust
- The cross-back width (which is from shoulder bone to shoulder bone). You can measure this easily by wearing your favorite T-shirt and measuring from one shoulder-sleeve seam to the opposite one across the top of your back. There should be no slack in the measuring tape.
- The upper arm circumference at the widest spot
- The circumference of the hips at the point where you want the bottom hem of the Tee to land
- The desired length of the sleeve taken from the top of the shoulder
You’ll need between 5 and 8 skeins of Unity or Unity Beyond depending on whether you’re making a size X-small/Small up to a 3x/4x Tee. I used size US 6 (4mm) needles for the body and size US 5 (3.75mm) needles for the ribbing edges.
Cast on 26 to 30 stitches with US 6 [4mm] needles and knit a swatch as follows:
Rows 1-6: Knit.
Row 7: Knit.
Row 8: K3, purl to last 3 sts, k3.
Rows 9 – 42: Repeat Rows 7 & 8.
Rows 43 – 48: Knit.
Bind off.
Thoroughly soak your swatch in warm water. Remove as much excess moisture as you can, then pull the swatch vertically and let its natural elasticity return it to its natural shape. Lay the swatch flat, pin it out (without stretching it width-wise), and allow it to dry.
Then measure your gauge. I got 21 sts and 33 rows per 4″ [10cm].
If you’ve ever knit, worn, or seen a shrug, you know that basically it’s two sleeves with a rectangular or oval ‘back’ piece that connects the two sleeves. We’re doing something similar, but in this design, we’ll also knit a front.

The shrug yoke starts at the front bust line and is worked up and over the head and shoulders.
The shrug yoke starts at the full bust line. You knit the front and the fronts of the sleeves first, then shape the underarm and front bodice by working short rows for the sleeves. At the neck, separate balls are required to knit both sides at the same time.
At the end of the neck shaping, you’ll be partway down the back bodice. The back underarm shaping is worked differently than the front. It has a lace motif at the shoulder to mimic a shoulder seam (and provide a bit of ventilation). At the end of a few more short rows and a few rows to complete the back bodice, you’ll arrive back at the bust-line, where the stitches on your needle will join the ones from your provisional cast on and be finished off by being worked in the round.
The body is worked with gradual increases to achieve the hip circumference.

Eyelets define the faux sleeve seam at the back of this bodice.
The Math
Here are a few calculations you need to complete to begin your design tomorrow.
A. Number of bust stitches required
Bust measurement × stitch gauge ÷ 4” = Bust Stitches. Round this down to an even number if necessary and divide by 2.
Example 44″ bust × 21 sts ÷ 4 = 230 ÷ 2 = 115.
If your result is an odd number then subtract 1. Since our result is 115, I’ll reduce it to 114.
You could also simply divide your sts per 4″ by 4 to get the number of stitches per inch, which may help you figure out the numbers more easily.
B. Number of bodice stitches required
Cross-back measurement × stitch gauge ÷ 4” = Bodice Stitches. Round this down to an even number.
Example 16.75″ across back × 21 sts ÷ 4 = 230 = 88 stitches.
C. Amount to decrease during sleeve/bodice shaping
A. (Bust Stitches) – B. (Bodice Stitches) = Sleeve/Bodice Decreases.
Example 114 – 88 = 26 stitches
The decreases happen at each underarm and at the stitches ⅓ and ⅔ of the way across the front body stitches approximately.
D. Number of rows for armholes
Upper arm circumference measurement plus 4″ for ease (you don’t want your sleeves to choke your upper arms and this leaves a little room to breathe) × row gauge (from swatch) ÷ 4″ = Total Armhole Rows. Round up to an even number, if necessary, then divide by 2 to get the number of Front Armhole Rows (which is also the number of Back Armhole Rows).
Example (12.75 + 4) × 33 ÷ 4 = 138 ÷ 2 = 69
If the result is an odd number round up to the next even number. I will round up to 70 rows.
Example 70 rows for front half of shrug yoke.
E. Number of rows for sleeves
Sleeve Rows = 85% of Total Armhole Rows, rounded up to an even number.
Example 70 × 0.85 = 59.5 rows.
I will rounded up to 60 rows for my sleeves.
F. Number of rows for neck opening
Rows for Front Neck Opening = 50% of Front Armhole Rows (result of D) rounded to an even number.
Example 70 × 0.50 = 36 rows
For a more revealing neck opening use 60% and for a more conservative neck opening use 40%.
G. Number of stitches for neck opening
Neck Opening at Widest Point = 42% of Bodice Stitches (B, above) rounded to the nearest even number.
Example 88 × 0.42 = 36.96 stitches
The nearest even number is 36.
![To finish off the neck opening, I used [k2, p1, k1, p1] ribbing. It's a little different, and it gives a nice effect.](https://knitmuch.com/wp-content/uploads/img8744-253998-f-sa.jpg)
To finish off the neck opening, I used [k2, p1, k1, p1] ribbing. It’s a little different, and it gives a nice effect.
H. Shoulder Width
B. (Bodice Stitches) – G. (Neck Opening) ÷ 2 = Shoulder Width
Example (88 – 36) ÷ 2 = 26 stitches
J. Sleeve Stitches
Desired sleeve length (in inches) × stitch gauge ÷ 4, rounded to the nearest even number = Sleeve Stitches.
Example 5.5 inches × 21 ÷ 4 = 28.87 stitches
The nearest even number is 28.
K. Short row turns
D. (Front or Back Armhole Rows) – E. (Sleeve Rows) = Short Row Turns
Example 70 – 60 = 10 short row turns
Half of the short row turns are used in each sleeve, halfway across the number of sleeve stitches.

I used my examples to make this Unity Beyond Summer Top knit to fit a 44″ bust. By using custom measurements for shoulders and sleeves. I achieved a great fit!
So after you’ve done a little math, and taken detailed notes, you’ll be ready to use the recipe for this sweater that I’ll share with you tomorrow.
If you’re a visual person, it will help you to draw a schematic on a page of blank paper, and insert the information you have worked out today.

It may help to draw a diagram and “plug in” the information from your calculations. Here are some of the results of today’s examples, put onto a sketch.
This is part 4 of 5 in this series.
Go back to part 3: Unimaginable drape and comfort in knit designs made with Unity yarn
[shareaholic app=”follow_buttons” id=”23784471″]