
This week we’ve been looking at knitting with Unity and Unity Beyond yarns by Fibra Natura. Today I’m sharing the second part of my recipe for your own custom-fit summer tee with this excellent seasonal transition yarn.

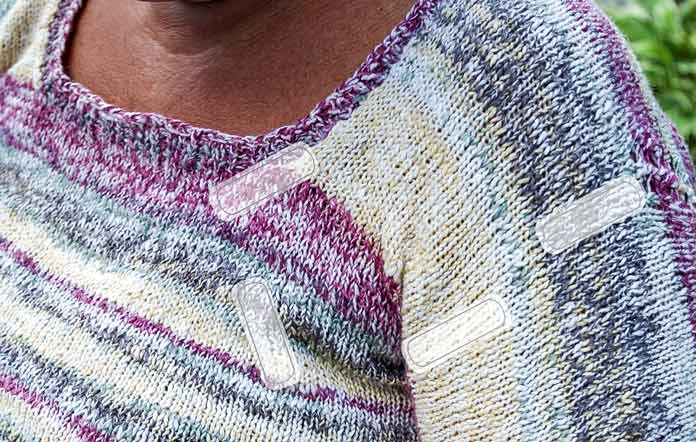
Here’s my wife Pam, wearing her shrug-yoke top-down sweater in the Unity Beyond colorway, Abode.
Using the numbers that you calculated using yesterday’s post, you can knit a custom fitted summer top. The schematic below shows the placement of shaping details that will make this tee fit perfectly.

This schematic shows where key shaping needs to be worked to fit your body perfectly.
The placement of the symbols shows approximately where the shaping will be worked — the actual number of symbols is just representative. Where I have shown 4 increases, you might have as few as 3 or as many as 8. It will completely depend on your calculations.
The circled areas indicate where shaping occurs on the shrug yoke.
Let’s get started
Now we can cast on. We’re using a provisional cast on, so you’ll need some scrap cotton or acrylic yarn that is the same weight or slightly finer than your Unity Beyond. You can use a crochet cast on or any other type of provisional cast on.
Cast on the whole amount of stitches for the front and both sleeves(the results of A and J × 2). In my case that’s 114 + (26 × 2) = 166 stitches. Place stitch markers where your “fake seam” will go – on my sweater, it is after the first 26 stitches and before the last 26 stitches. This helps keep track of the “boundaries” for the sleeves and body.
As I started working in stockinette stitch for 2 rows, I also added more stitch markers. I needed to work both the bottom yoke shaping for the bust and the short-row shaping for the sleeves. To do this yourself, you’ll need your number L. I needed to decrease 26 stitches at the lower bust, but the design looks best if you decrease both at the underarm and then at the places where a princess seam would land, which is about the ⅓ and ⅔ spot across the width of the body stitches. So I took 114 and divided it by 3, which is 38 sts. So I added stitch markers with 38 stitches between the sleeve seam stitch markers.
For the short row calculations, I use the value of K. Work short rows halfway across the number of sleeve stitches, placing a stitch marker at that point to remind you to do the turns. In my case, I need to work 5 pairs of short rows. I begin them halfway across the 26 sleeve stitches, placing a stitch marker at the 13th stitch point. I now have 6 stitch markers on my needles. To sum up, my needle now shows:
13 sts, sm, 13 sts, sm, 38 sts, sm, 38 sts, sm, 38 sts, sm, 13 sts, sm, 13 sts.
Your numbers will be different, as they will be based on your measurements.

The shrug yoke after all shaping is done, and with sleeve seams completed, and all body stitches on a circular needle.
After your stitch markers have been placed into the knitting in the first two rows of stockinette stitch, you can begin shaping. I’ve written out what I did below. You can copy my instructions and paste them into a document then substitute your numbers as necessary.
Row 1: Knit to second marker, sm, ssk, knit to next marker sm, ssk, [knit to 2 sts before next maker, k2tog] twice, knit remaining stitches.
Row 2: Purl across.
This makes 4 decreases. I need 26, so I’ll repeat these 2 rows 5 more times to reach a total of 24 decreases, then on the next decrease row, I will only make decreases at the sleeve seams.
At the SAME time, I need to work short-row turns. I use the German short row, but you can use any technique you like.
Right side: Knit across working the decreases as established above to the 6th stitch marker, leaving the marker on the left needle, turn work (which means the marker is now on the right needle).
Wrong side: Slip the first stitch purlwise, bring yarn over the top of the right-hand needle to the back of the work, and up between the needles to the front of the work, and tug hard (but not so hard as to break the yarn) to create a “hitch stitch” on the right-hand needle (this hitch stitch will look like a messy 4 strand stitch), purl across to the last stitch marker, leaving the marker on the left needle, turn work.
Right side: Slip the first stitch purlwise, bring yarn over the top of the right-hand needle to the back of the work, knit the next stitch and tug to tighten both the stitch just knit and the hitch stitch behind it. Knit across, working the decreases as established, to the next hitch stitch, knit into the hitch stitch so there are 2 strands on either side of the right-hand needle when you insert the tip into the stitch, then knit remaining stitches.
Wrong side: Purl across to the first marker, remove marker, purl 3, place marker back, purl to 2 stitches before the other hitch stitch, place a marker, purl 2, purl the hitch st with 2 strands on either side of the right-hand needle when you insert the tip to purl, remove the previously placed marker, purl the remaining stitches.
These 4 steps create the pair of short row turns. This will add 2 rows to the inside of the body, but not at the edge of the sleeves. As you work, you can see that the location of the row turns change by a few stitches. This is important to keep the sleeves from forming visible pleats.
In my case, as I was decreasing, I also worked 4 more pairs of short row turns. Then, I worked even in stockinette stitch on my 88 (for front) plus 2 x 26 (total 140 sts) until it was time to bind off for the front neckline, which in my case was after row 34. For your row count take your result of D and subtract F. For me it was 70 – 36.
Using your calculation for neckline width, G, you can figure out how many stitches will be bound off. You’ll need to leave some stitches for the diagonal corners of the neckline. I decreased 4 stitches on each side, so with my value of G being 36, minus 4 at each side, I had an initial bind off of 28 stitches. With 140 total, I simply subtracted 28 from 140 and divided the result by 2.
(140 – 28) ÷ 2 = 56.
For the beginning of the neck opening, I knit across 56 stitches, bound off 38, and knit the remaining 56. Then, I purled across the first half, joined another ball of yarn and purled across the second half. To help keep my striping “in sync,” I joined the new yarn in at the same place in the color sequence so that both halves of the front would match.
For the next 8 rows, I decreased 1 stitch at each edge of the neck opening on the knit rows. That left me with 52 stitches on either side of the neck opening. Your mileage will vary!
The next shaping required are the increases for the sleeve cap which are worked on the sleeve side of the seam stitch markers. I increased 2 stitches on each side every 4th row beginning about 10 rows before the end of the front. You may want to increase 3 or 4 stitches on each side, so just begin early enough.
At this point, you’re ready to work the back of the yoke.

This photo of the back yoke of this Unity Beyond Tee shows the lace eyelets next to the armhole shaping.
To knit the back, I didn’t reverse the shaping from the front exactly. I started by immediately increasing 1 stitch at each edge of the neckline 4 times and decreasing on the outside of the sleeve seam stitch markers. This gives the back of the neck a gentle scoop that allows room for the ribbing to come up the back of the neck later.
Once those decreases were done, I cast on 28 stitches for the center of the back neck and began working work all the way across again. Because we don’t need the extra shaping in the back, I left out the princess seam stitch markers. When my stitch count equaled 140, I had this on my needle:
13 sts, sm, 13 sts, sm, 88 stitches, sm, 13 sts, sm, 13 sts.
Then I started the eyelet lace, which incorporates the shaping to bring my stitch count back up to the number needed to match the cast on.
Row 1: Knit to 2nd marker, slip marker, k1, yo, ssk, yo, ssk, knit to 5 sts before next marker, k2tog, yo, k2tog, yo, k1, slip marker, knit across.
Row 2: Purl.
Row 3: Knit to 2nd marker, slip marker, k1, yo, ssk, yo, knit to 3 sts before next marker, yo, k2tog, ko, k1, slip marker, knit across.
Row 4: Purl.
This increases 2 stitches every 4 rows and adds the decorative eyelets.
At the same time, I worked 5 pairs of short-row turns as above.
When the stitch count was back to 166, I continued working rows 1 and 2 until the back was the same length as the front.
The yoke and sleeves are now complete. At this point, you can unpick the provisional cast on and graft the sleeve stitches to each other or put the sleeve stitches onto a different needle for the front and back stitches, then work a 3-needle bind off for the under-sleeve seams.
The remaining body stitches will all be placed on a circular needle and you can continue working in the round.
I decided to continue the eyelet lace in the locations as established. I also decided to flare out the body, by incorporating increases every 4th row until I reached the desired number of stitches for the hip circumference. This gives a gradual A-line silhouette to the top which pleases her. You can work the body in solid stockinette stitch with no shaping if you prefer. It’s up to you how you “cook” up a summer tee with this recipe.

The gentle shading of Unity Beyond creates horizontal stripes that are softer and more flattering to the figure than sharp color changes.
As you can see, I still need to add some ribbing to the neckline and cuffs and the bottom of the tee. You can also see that my wife will end up with a lovely top!
I got great mileage out of the Unity Beyond yarn. My version only used 4 skeins, and it’s a size XL. In the photo above, you can see a fifth skein, plus a skein of Unity in Adobe red, but there’s enough left in the ball without the band to finish the sweater. I’m sure you’ll be pleased with whatever you choose to knit with Unity yarn. My wife is thrilled with the feel, fit, and drape of her new Tee!
This is part 5 of 5 in this series.
Go back to part 4: Knitting a shrug-yoke top-down seamless tee shirt – part 1
[shareaholic app=”follow_buttons” id=”23784471″]