Welcome to the next part of the log cabin knitting tutorial for the cool ‘70s retro Rockwell blanket a free pattern from Lion Brand Yarn knit with Hue+Me super bulky wool and Lantern Moon Ebony needles. If you’ve worked blocks 7-11 from yesterday’s post, you’re probably starting to feel like a pro at log cabin knitting! If you missed posts 1, 2 or 3, follow the links back there so I can walk you through the first parts of the Rockwell blanket, then jump back here to knit the final sections. Everyone else, I’m sure you’re excited to be on the second half of this project, and are already imagining curling up underneath this cozy blanket while you sit by a roaring fire with a hot toddy in your hand. But before we jump into blocks 12-16, do you remember the warm up stretches from yesterday’s post? Do those now; I’ll wait…
You back? Now you’re ready to get knittin’!

The warm and cozy ‘70s retro Rockwell blanket.
Block 12
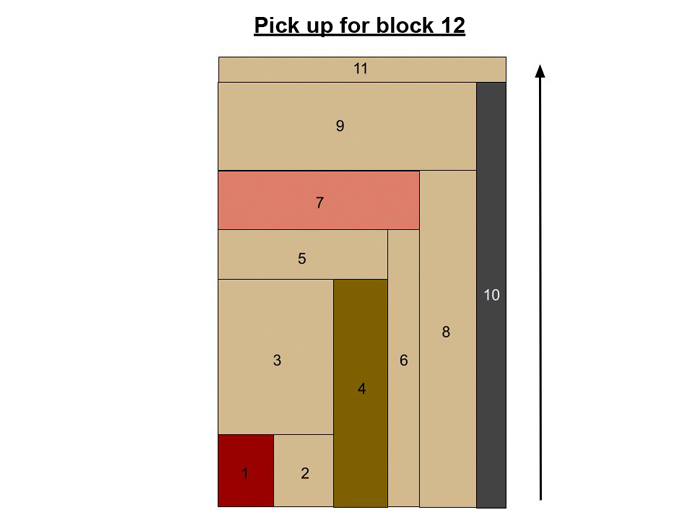
This process of picking up stitches should feel very familiar by now, but I’ll continue to describe how to set up each block as the blanket grows just to be sure it all goes smoothly til the end. This series of blocks follow the same pattern as all the previous ones. For block 12 use color A (Desert) to pick up the remaining 98 stitches across the bind-off edge of block 10 then pick up 7 stitches at the garter ridge edge of block 11 (see diagram below). Knit the required number of rows in the pattern and bind off.

Follow the direction of the arrow to pick up stitches from right to left for block 12 across block 10 then block 11.
Block 13
Switch to color F (Magic Hour) for this block. Pick up one stitch of the bind off edge of block 12 then 5 stitches for each of the ridges along the garter edge. To complete the setup of block 13, pick up the remaining 67 stitches of the bind off edge of block 11 (see diagram below). Then knit the required number of rows in the pattern and bind off.

Follow the direction of the arrow to pick up stitches from right to left for block 13 across block 12 then block 11.
Block 14
Return to color A (Desert) and pick up one stitch for each of the 104 remaining bind off stitches on block 12 then pick up 9 stitches along the edge of block 13 (see diagram below). Knit the required number of rows in the pattern and bind off.

Follow the direction of the arrow to pick up stitches for block 14 across block 12 then block 13.
Stop! Take a quick stretch break for your back, neck, and hips.
It’s really important, especially as this blanket grows heavier, to take a break in the middle of knitting to stretch out your body. Though a lot of the tension of knitting is in the hands and arms, it’s really important to be aware of the stress it puts on other areas of your body. Lion Brand Yarn has made a series of videos on yoga techniques for knitters. The video below is one of the series that targets the back, neck, and hips. Take a few minutes now, and do something good for your body.
Block 15
Continue to use color A (Desert) for this block. Pick up one stitch of the bind off edge of block 14 then 8 stitches for each of the ridges along the garter edge. Continue picking up the remaining 72 stitches of the bind off edge of block 13 (see diagram below). Knit the required number of rows in the pattern and bind off.

Follow the direction of the arrow to pick up stitches from right to left for block 15 across block 14 then block 13.
Block 16
Last block for today! Switch to color G (Juniper) and pick up one stitch for each of the remaining 112 bind-off stitches on block 14 followed by 3 stitches along the garter edge of block 15 (see diagram below). Knit the required number of rows in the pattern and bind off.

Follow the direction of the arrow to pick up stitches for block 16 across block 14 then block 15.
Almost there!
Phew! That was a lot of work! I hope you took breaks to stretch as you went along, so you can knit more enjoyably tomorrow without muscle tension. We are nearly at the finish line. The last post for the Rockwell blanket by Lion Brand Yarn is all about picking up the last four blocks which make up the border of the blanket. This is where you’ll be happy for the extra Desert skein of Hue+Me wool to make sure you’re not playing a losing game of yarn chicken. I’ll also share another video on yoga stretches to help you make knitting this big squooshy blanket a joy not a pain in the…hands.
This is part 4 of 5 in this series
Go back to part 3: Essential hand exercises for knitters as the Rockwell blanket grows!
Go to part 5: Knitting border blocks on a log cabin blanket
