
This week, I’m knitting with Fibra Natura Lina, which combines the softness of cotton with the durability and luxury of linen. Pleasant to work with, Lina is light, lovely, and luscious, and makes the perfect summer knitwear.
Yesterday I made the Miss Molly Tee and changed the lace on the body, added lace to the sleeves, and changed the 1×1 rib to garter stitch on the body, sleeves, and neckline to make it truly unique. Today, I’m taking on a greater challenge, converting a poncho to a loose fitting cardigan.
I had my heart set on making something that was loose fitting and light to wear on summer evenings, could easily be put on or taken off, and rolled up in a ball for storing in my bag when I wasn’t wearing it. I couldn’t find exactly what I was after, but I came across this pattern for a lightweight poncho and was inspired.

Summer Poncho – a free pattern from Universal Yarn
I like this poncho, but I don’t want to pull it on and off over my head when I’m sipping a class of wine at a side-way café. Since the heart wants, what the heart wants, I decided to use some of the design and rework it into an oversized cardigan. If you want to make the poncho, you can download the free pattern here.
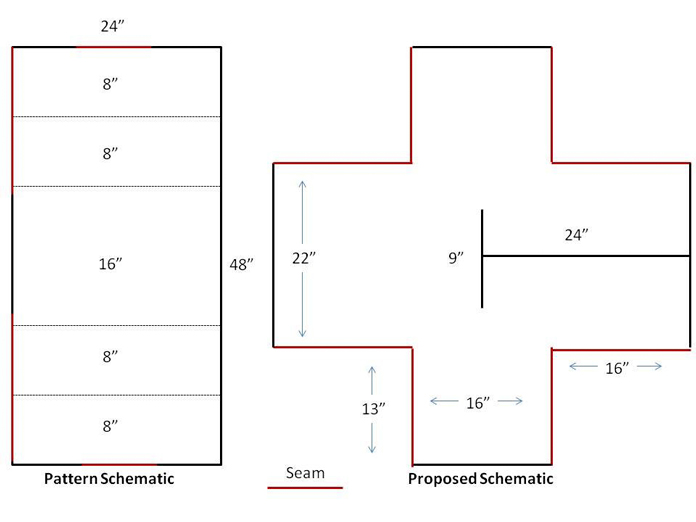
I looked at the pattern schematic and designed my own from there. The pattern calls for knitting two rectangles and sewing them together to make a poncho.
I want to knit it in one piece, starting with the right sleeve, working the body, and ending with the left sleeve.
I want to make it in one piece, starting with the Right Sleeve, working up to the body, then casting on stitches for the Right Front and Back. When I reach the neck opening area is when I’ll split the front and back stitches to work them separately. At the midway point on the front, I’ll cast off, then cast on stitches to start the Left Front. When the Left Front catches up in rows to the back, I’ll rejoin in one continuous row until starting the left sleeve where I’ll cast off the stitches and proceed down the sleeve. Once all rows are complete, I’ll seam the sleeves and back to fronts, and then I’m done. Doesn’t seem too bad, right?
It might be easier if I followed the pattern details and color changes, but of course, I’m not. The pattern details call for more purl rows than knit. I’m not opposed to purl rows, but I know many continental knitters that would much rather knit than purl. Using the look of the poncho for inspiration, I’ve come up with my own patterning. In addition, the pattern calls for using 3 different colors. I’m using 2, therefore, my color changes will be different. Overall, it sounds complicated, but it’s really not. I actually classify it as easy, well moderately easy.
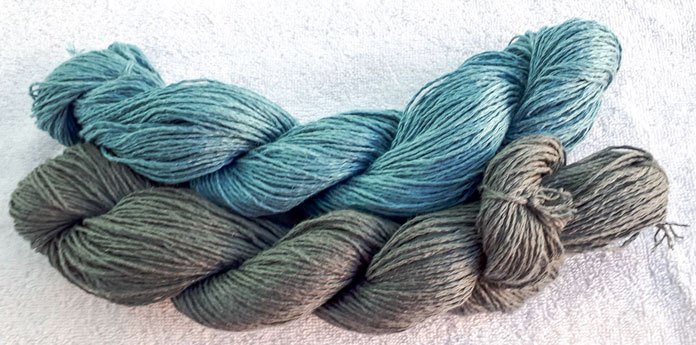
I’m using Fibra Natura Lina yarn in Sterling and Mineral for the Cardi. This combination reminds me of the Hammer Tone paint colors.
I decided to use Sterling and Mineral as my color choices for this cardi. Why not 3 you ask? Well, I really didn’t have 3 colors that worked together the way I wanted. So 2 it is.
Let’s get started.
gauge
When I swatched this pattern, I achieved 14 sts and 20 rows after laundering. What I discovered knitting the cardi was that 4 pattern sets were 6″ (40 rows = 6″) before laundry and blocking; which equates to 24 rows to 4″. That’s a significantly different gauge from the swatch. It shows you how versatile size wise this cardi will be based on blocking.
materials
- 3 skeins of Fibra Natura Lina in Sterling (MC)
- 2 skeins of Fibra Natura Lina in Mineral (CC)
- US8 [5mm] circular needle, 32” – you may prefer to use a second needle to hold stitches when separating the front from the back.
- tapestry needle
Pattern – Repeat 4 times for each color.
Row 1: With MC, knit.
Row 2: Purl.
Row 3: With CC, knit.
Row 4: Knit.
Row 5: With MC, knit.
Row 6: Purl.
Row 7: Knit.
Row 8: Knit.
Row 9: K2, *yo, k2tog, repeat to last 2 stitches, k2.
Row 10: Knit.
Carrying Colors
Not liking to sew in ends, I carry colors with me as I go. For the sleeve sections, it’s easy because it will be hidden by the seams. For the Fronts, I always use both colors on the first stitch.
Instructions
Beginning with the Right Sleeve, cast on 51 stitches.
Knit 4 rows.
Starting with MC, work the Pattern section twice (20 rows).
Increase row
K1, kfb, knit until 3 stitches remaining, kfb, k2.
Repeat increases every 20 rows until there are 59 stitches on the needle; i.e., 4 increase rows in total.
When 4 patterns are complete, change colors; i.e., rows 3 & 4 become MC, and all others CC.
Continue in this fashion – increasing every 20 rows, changing colors every 40 rows until 51 stitches and 2½ patterns sets are complete.
Cast on for Back and Front
When 10 patterns are completed and beginning with Row 1 of the 3rd instance of the pattern, work Row 1 and at the end, cast on 60 stitches for the Back.
Work Row 2 of the pattern and at the end, cast on 60 stitches for the Front. (179 stitches)
From this point on, you’re knitting the body and need to maintain a clean edge. The pattern stays the same, but all Right Side rows start with:
S1, k2, Pattern until 2 stitches remaining, k2, and
Wrong Side Rows – S1, k2, Pattern until 3 stitches remaining, k2, p1 (with both colors).
Work 6 pattern sets, incorporating color change as established, and on the 9th row of the last pattern set, do the following:
Work 89 stitches. Cast off the next stitch, work remaining 89 stitches to the end of the row. You may find it easier to move the Right Front stitches to another needle while the Back is worked.
Back
Work Row 10 to cast off stitch, and turn. Join another ball of Sterling. While working the Back stitches, remember to keep continuity of a clean edge:
RS Rows: S1, k2, Pattern until last 2 stitches, k2.
WS Rows: S1, k2, Pattern until last 3 stitches, k2, p1.
Beginning with Row 1 and color change, proceed to work 4 pattern sets, then repeat Rows 1 – 6 with the same color.
Right Front
Join another ball of Mineral at Neck Edge.
Starting with Row 10, complete the pattern set, remembering to keep a clean edge.
Proceed with color change and work 2 pattern sets.
Knit 4 rows.
Cast off using both colors to continue carrying the colors from the Right Front bottom edge.
Left Front
Cast on 89 stitches using both colors at Neck edge.
Knit 4 rows in Mineral (MC).
From this point forward, all Pattern Sets and color changes begin with Row 7 (Rows 7 – 10, 1 – 6 form Pattern).
Work two complete pattern sets, then proceed with Row 7 of color change and join Left Front to Back as follows:
Pattern across all Left Front stitches, cast on 1 stitch and continue in pattern across Back stitches. (179 stitches)
Work 4 pattern sets in Mineral, change color and work 1 complete pattern set, then the second pattern set up to and ready to begin Row 5 in Sterling.
Cast off for Left Sleeve
Beginning with bottom Left Front, work Row 5 as follows:
Cast off 60 stitches. Continue in pattern to end of row.
Row 6: Cast off 60 stitches. Continue in pattern to end of row. (59 sleeve stitches remaining)
Left Sleeve
Work 2 pattern sets, and change color.
Row 7: K1, ssk, pattern to 3 sts remaining, k2tog, k1. Repeat this decrease row every 20 rows until 51 sts remaining.
Continue with sleeve incorporating color changes and decreases until the last row of the final pattern color set, ending with Row 5.
Row 6: Knit
Knit 3 more rows.
Cast off.
Sew side seams, sleeve seams, and loose ends.
Voila!
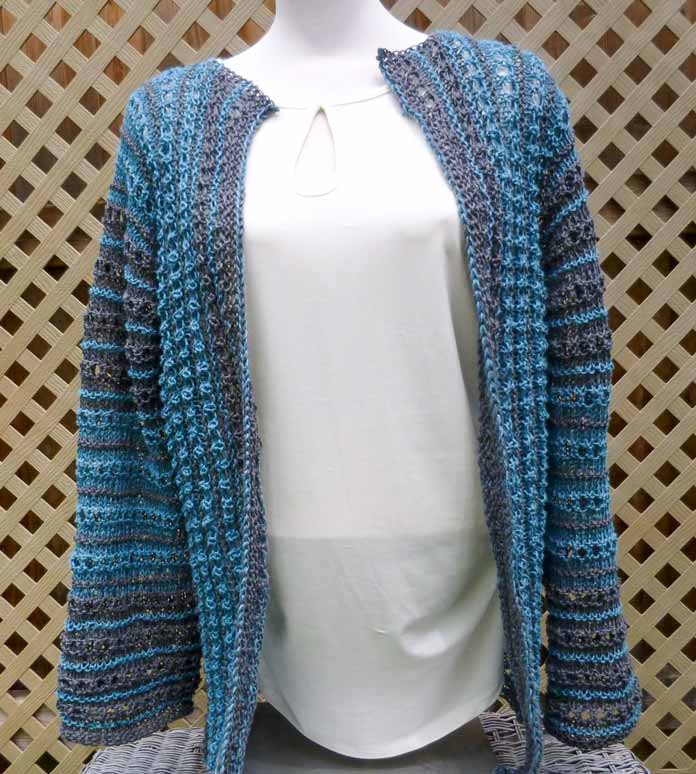
My finished Cardi. Just what I wanted … light, lacy, and loose fitting. Fresh off the needles. I haven’t had the chance to wash and block it yet, but it still looks great.
The colors in this picture are not all that reflective of the actual colors, however, the picture of the back is more representative.
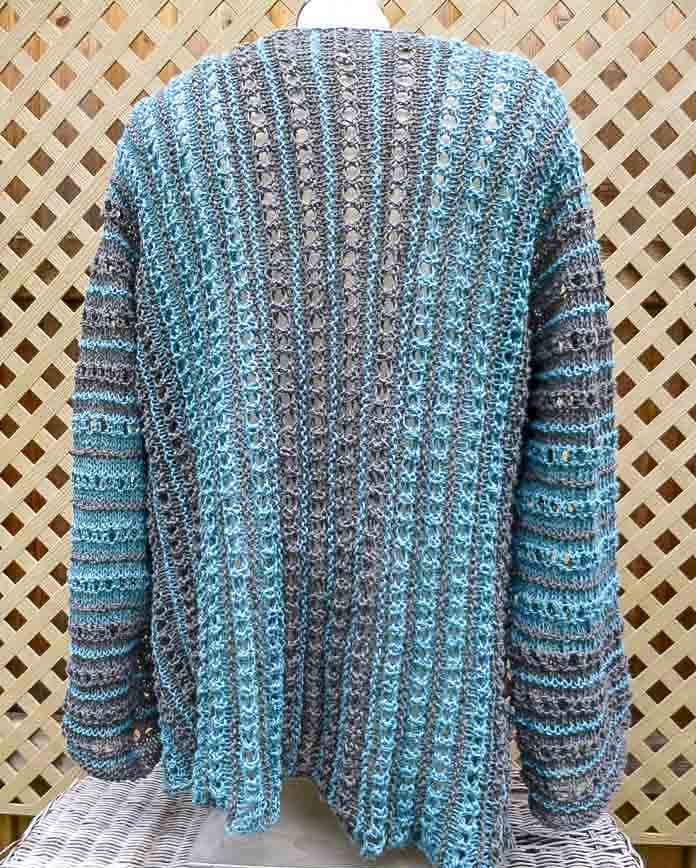
This picture reflects the colors more accurately. It really does remind me of Hammer Tone paint, both in color and texture.
The colors and texture really do remind me of Hammer Tone Paint, so I think that’s what I’ll call it. The Hammer Tone Cardi. It’s exactly what I was after. I didn’t have time to wash and block it, but I can assure you that it can stretch out quite a bit with blocking. I want to wear it tonight so blocking will have to wait until tomorrow.
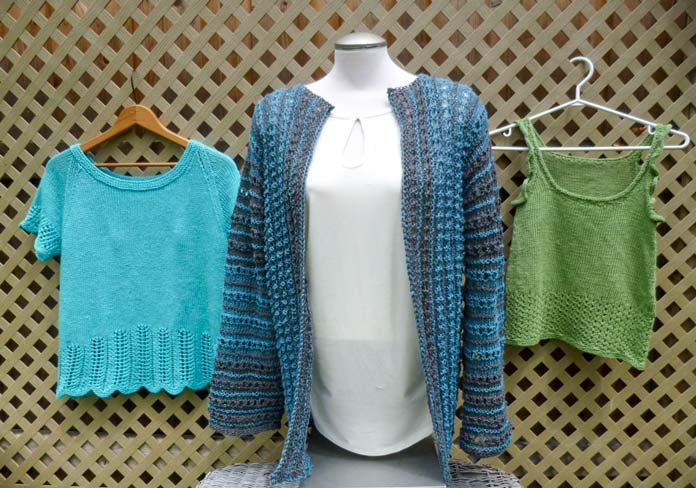
The complete ensemble, all made with Fibra Natura Lina — a blend of linen and cotton that is perfect for summer knitwear.
Wow, this has been quite a week for projects (yeah right, like I really made them all in one week). First, I made an adorable little tank top and made a few changes to the neckline. Then I made some fairly significant changes to the lace work of the Miss Molly Tee. And finally, I took inspiration from the Summer Poncho to make the Hammer Tone Cardigan. I made them all with Fibra Natura Lina, a delightful blend of linen and cotton that is machine washable and tumble dry, and becomes soft enough for a baby.
All three of these projects reflect my personal touch, so I have no fear of running into myself at a fiber festival this season. Oh, by the way, should you decide you want to make one of these projects with my personalization details, do me a favor and please, pick a different color.
Happy Knitting!
This is part 5 of 5 in this series.
Go back to part 4: Customizing the Miss Molly Tee knitted pattern using Lina yarn
[shareaholic app=”follow_buttons” id=”23784471″]