
This week, I’m knitting with Fibra Natura Lina, which combines the softness of cotton with the durability and luxury of linen. Pleasant to work with, Lina is light, lovely, and luscious, and makes the perfect summer knitwear.
Yesterday I made the Sprout Tank and altered it by adding different elements than those called for in the pattern. Today, I’m taking a readily available pattern for a t-shirt and customizing to make it my very own.
The pattern I selected is Miss Molly Tee, which is a free pattern that you can download.

Miss Molly Tee – free pattern used to highlight Fibra Natura Lina yarn
As much as this pattern looks great on the young model, there are a couple of aspects that are not favorable to, what shall I call it, a more mature physique.
For one, the difference between the bottom measurement and the bust measurement for a medium size is 7”. That’s a lot of flair around the midriff. I prefer a gentle A-line to complement my figure.
Also, the lace pattern uses double yarn overs (yo) which creates big lace holes; again, not the best choice for those that do not have a model flat tummy.
Both of these are easily adjusted to suit my preferences. I like the way the pattern fits from the shoulders down, which is the most important part about a good pattern. The bottom can be easily changed without compromising the garment structure. That’s why I’ve chosen this pattern as my medium customization to make it my own.

Caribbean turquoise is the most universal color as it looks great on everyone
The pattern calls for Finn by Universal Yarn, but I’m using Lina in color Caribbean, my favorite anytime color. Turquoise is one of those colors that looks great on everyone, regardless of skin tone or hair color, and it makes you feel good.
If you remember from Tuesday’s post, I made a swatch using a US 6 [4mm] needle that included a lace pattern. This is the pattern and needle size I’m using for this project. The medium size calls for 45¾” at the bottom and 38¾” at the bust. That’s 7” difference, whereas the small calls for 41¼” at the bottom, making a 2½” difference. I’m good with that as it makes for a great A-line shaping. That means I’ll cast on 216 stitches instead of 240. What I’ll need to adjust is the shaping decreases, but I’ll get to that later.
Next on the alteration list is the lace section. I decided to use a lace pattern that has a 12 stitch repeat, which is the same number of stitches required by the pattern. Great – no adjustments needed for stitch count, but, there are changes needed for the rib section. Instead of doing a 1×1 rib as called for by the pattern, I’m doing 6 rows of garter stitch.
The body of this tee is knit in the round from the bottom up and separated for raglan shaping, and the sleeves are knit flat from the bottom up.
materials
The materials I used to make a size medium are as follows:
- US 6 [4mm] 32” circular needle
- 3 skeins of Fibra Natura Lina in color Caribbean
- tapestry needle
Body Changes
Cast on 216 stitches and join in the round being careful not to twist the stitches.
Work 6 rows of garter stitch (knit 1 row, purl 1 row) 3 times.
Lace Section
Row 1: *K2tog, (yo, k1) 4 times, ssk, ssk, k2tog, repeat from * to end of round.
Row 2: Knit.
Repeat these 2 rows 12 times in total (24 rows).
Rather than just ending the lace section and starting the stocking stitch section, I decided to taper the lace motifs from the outside in. For the medium size, it works out that there are 9 repeats of the lace for each side (front and back). I tapered the lace as follows:
Row 1: *K12, then work lace pattern until 12 stitches before side marker k12, sm, repeat from *.
Row 2 and all even rows: Knit.
Row 3: *K24, then work lace pattern until 24 stitches before side marker, k24, sm, repeat from *.
Row 5: *K36, then work lace pattern until 36 stitches before side marker, k36, sm, repeat from *.
Row 7: *K48, then work lace pattern until 48 stitches before side marker, k48, sm, repeat from *.
Proceed to work stocking stitch as per the pattern instructions.
Since I started with less stitches than the pattern called for, the number of decreases in the stocking stitch section is reduced from 36 to 12 stitches. That means they need to be spaced out more than the 6 rows as instructed by the pattern; i.e. 12 – 18 rows apart. The main thing is to get to the correct stitch count, in this case 204 stitches.
I have a confession to make … I decided to work the sleeves in the round as well, and join everything in the round to do the raglan shaping. I don’t recommend doing this. It turned out to be more fuss than I was counting on. My recommendation, just follow the pattern by working the sleeves flat and seaming them to the body.
Sleeve Changes
I changed the sleeves to incorporate a lace pattern. The medium calls for 65 stitches. Since a 12 stitch repeat doesn’t work for the number of stitches, I used an 8 stitch lace repeat. Because I did them in the round, I cast on 64 stitches. If working flat, you would need 66 stitches – 1 stitch at each side for the selvedge.
Work 6 rows garter stitch, then proceed with Sleeve Lace as follows:
Row 1: *K2tog, (yo, k1) twice, yo, ssk, k2tog, repeat from * to end of round.
Row 2: Knit.
Repeat these 2 rows 6 times in total (12 rows).
Decrease 1 stitch in an inconspicuous place on the last knit row to get the correct stitch count then follow the pattern instructions.
Neckline Changes
Since I’m using garter stitch instead of 1×1 rib at the bottom of the body and the sleeves, I chose to do the same for the neckline.
I used a US 4 [3.5mm] needle to pick up the correct number of stitches as per the pattern instructions, worked ¾” in garter stitch and cast off.
Then I sewed in the ends and went off to the laundry. Because the lace section needs blocking, I didn’t let it tumble until dry, just damp, then blocked it.
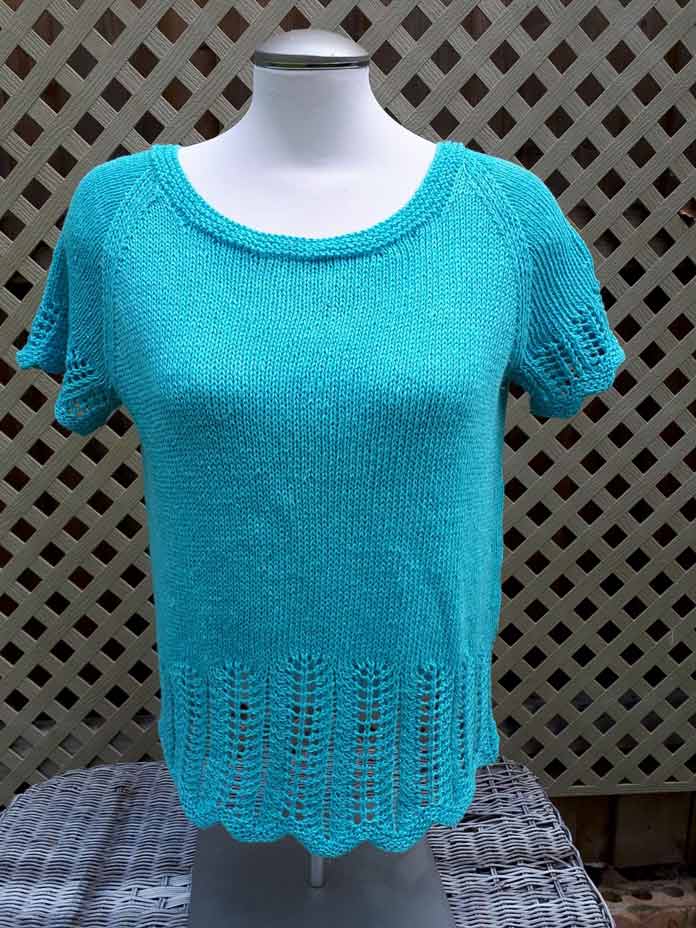
My very own Miss Molly Tee made with Fibra Natura Lina in color Caribbean.
If you compare my finished tee with the stock photo above, I think you’ll agree that it looks completely different. No chance of running into myself at the next fiber festival with this one.
To summarize the alterations made to the Miss Molly Tee, I:
- Reduced the number of stitches from 240 to 216 at the bottom to make it more A-line in shape.
- Changed all the 1×1 rib sections (body, sleeves, neckline) to garter stitch.
- Used a different lace pattern on the body and tapered it.
- Used a lace pattern on the sleeves to tie it all together.
This was a fun experiment and I’m very pleased with the results. I hope you tune in tomorrow when I take on the big challenge . . . using a pattern for a poncho and turning it into a loose fitting cardigan with Fibra Natura Lina!
This is part 4 of 5 in this series.
Go back to part 3: How to alter a knitted pattern to add a personal touch
Go to part 5: Taking a pattern for a poncho and reworking it into a loose fitting cardi
[shareaholic app=”follow_buttons” id=”23784471″]