
You should now be well on your way to designing and knitting a custom fit men’s sweater vest with Colorburst yarn. Yesterday, I walked you through planning and knitting the back of the sweater, and the front up to the V-neck opening. Today we’ll take a look at steeking and why I use it on this design.
Steeking the V-neck opening ensures that the stripes match on either side, which just brings out the best of this self-striping Colorburst yarn.
Because the center front has an even number of stitches, about an inch before I start the armhole shaping, I decreased a stitch near the center of the front panel. It’s hidden by the cables that I have crossing my front design, but if you’re working in stockinette, you can decrease that stitch near one of the edges where it won’t be visible to have an even number of stitches, in this case 125 before the armhole shaping, and 111 stitches after.
When I want to start the V-neck opening, I knit to the center stitch (continuing the armhole shaping if that’s not finished yet) and place it on a locking stich marker. Then I cast on 6 stitches by adding reverse cross yarn-over loops onto the RH needle, and then finishing the row as established. Then I need to calculate the rate of decreases to shape the sides of the V-neck opening. Do not forget that these extra 6 stitches need a stitch marker before and after them because they are worked straight, and any shaping is worked outside of the pair stitch markers.
I chose to work a steek because then I’m guaranteed that both sides of the V-neck opening have symmetrical stripes. If I were to work one side of the neck opening first and then the other, first of all the stripes would be wider, and secondly, there would be an abrupt transition when I joined the yarn on the 2nd half. If I didn’t want an abrupt change, I’d have to discard lengths of the yarn until I got to the same color repeat and sequence as the first half. All in all, too risky for my taste.
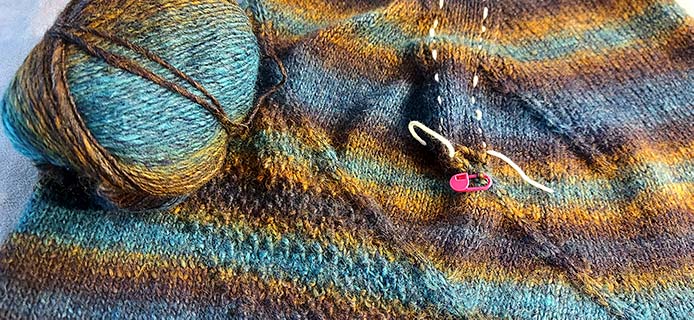
With a different yarn, I basted long stitches between the columns of stitches where the stitch markers keep the steek stitches from being worked into the neck shaping.
Each side of the V-neck is 4” wide, so I can simply use my gauge of 23 stitches over 4” as the number of decreases I need to work. However, if your neck opening is wider than 8”, you’ll need to do the same calculation as IN yesterday’s post, to figure out how many stitches correspond to your width.
Let’s look at the schematic again.
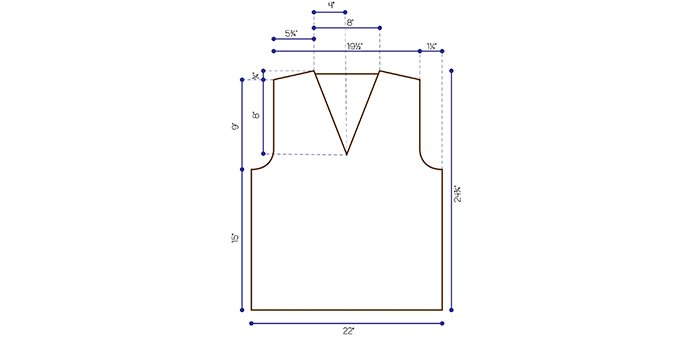
These measurements can be changed to make a custom fitting sweater vest for a man in your life, or yourself.
For me, this is when row gauge is valuable for the first time in this particular project. Because I have a whole Back and a lower Front panel done, I can take my row gauge from these and have a more accurate row gauge to use in my calculations than a measly 4-inch square. The depth of my V-neck is 8¾” and my row gauge is 29 rows per 4”. I use the same calculation as yesterday, starting with the known amount of 29 rows times the desired length, 8¾”, divided by the gauge length, 4”. 29 × 8¾ ÷ 4 = 63 rows…I want an even number, so I’ll round up to 64. In addition, I have 6 rows that I need to use for the shoulder shaping, and I’d rather have my neck opening shaping done before I get to those last 6 rows, so I will use 58 rows to work my shaping.
The dilemma now is that I have 23 stitches I need to decrease over 58 rows. If I decrease 1 stitch every other row on each side of the neck opening, I’ll be done in 46 rows and have 12 rows left to work straight. That’s easy! If I don’t want a steep V-neck opening, I could space out the decreases a little more, so I’ll show you how I calculate that.
The following formula uses long division and a few sums. This formula is amazingly simple and helps solve the distribution of increases or decreases at all different moments while you’re designing. I learned it from the book Knitwear Design Workshop by Shirley Paden. It‘s by far the most recent publication that’s comprehensive and I’d recommend it to any budding designer if you want to explore the field in more depth than what we’re doing this week.
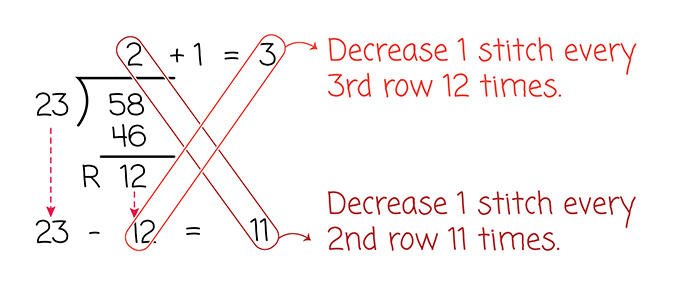
You take the smaller number (in this case the number of decreases for the side of the V-neck) and divide it into the larger number (the rows for the V-neck depth) and you figure out the remainder (R) instead of using decimal places. Then you subtract the remainder from 23 to get another number (11). At the top, you take the answer of the division calculation and always add 1 to it and write down that answer above the one that you did below. Then you circle across the written work to get these important numbers.
Now that you know the frequency of the decreases, you can space them out two different ways. You can do the first 11 decreases every other row first (that’s 22 rows), and then the next 12 decreases every 3rd row (that’s 36 rows). 22 + 36 is equal to 58…the depth of the V-neck section of the vest. Remember that these decreases are worked on the outside of the pair of stitch markers that keep the center 6 steek stitches in plain stockinette.
You can also alternate and *decrease 1 st every 3rd row once; then decrease 1 st every 2nd row once; then rep from the * until you’ve worked 23 decreases and you’ll have reached 58 rows.
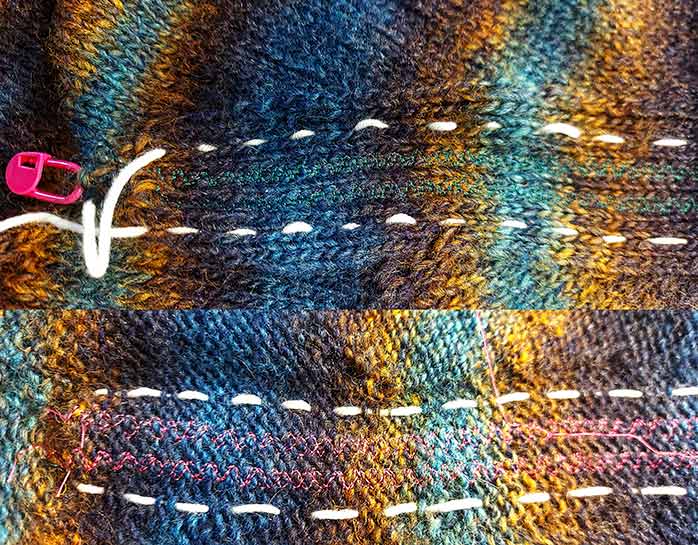
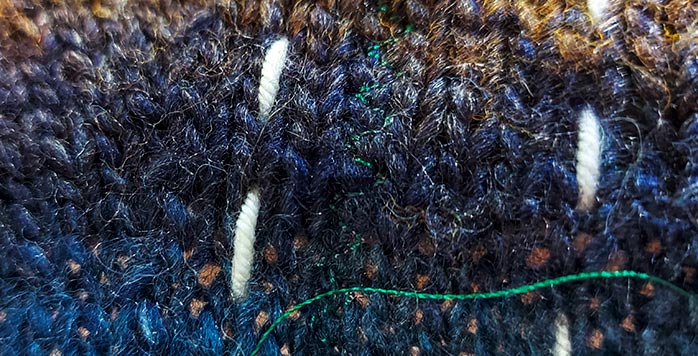
The right side and wrong side of the steek stitches are shown here with the white yarn basted in to make the path for the sewn zigzag stitches.
By decreasing for the neck, I have removed 23 + 1 (center stitch waiting on marker) + 23 stitches from the center 111 of the front panel. This leaves 32 stitches on each side. I would bind off 11 stitches at the beginning of the next 4 rows, then 10 stitches at the beginning of the next 2 rows for the shoulder shaping and bind off the 6 steeking stitches at the end. Then it’s time to prepare the steek for cutting.
Using a broken zigzag stitch on my sewing machine and a walking foot, I stitched along columns 2 and 3, and 4 and 5 of the steeked stitches, leaving columns 1 and 6 untouched. Then I simply cut between the 2 center columns of steek stitches, which remain safe from unraveling with the zigzag stitches.
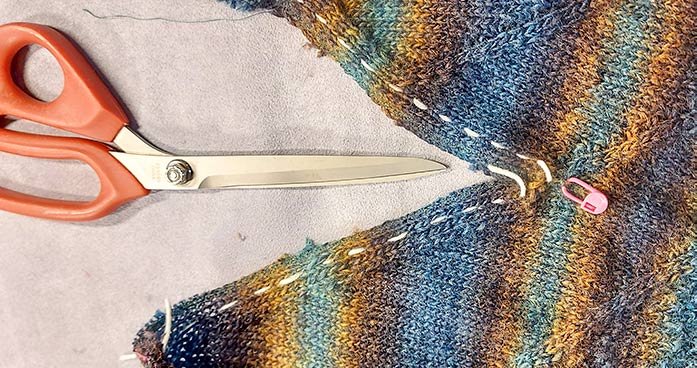
The steek has been cut open and is not unraveling because of the sewn zigzag stitches along the inner 4 steek stitches.
If you don’t have a sewing machine, there are ways to prepare steeks with crochet stitches or hand-sewn stitches, and plenty of online tutorials, so don’t let no machine slow you down!
Colorburst yarn self-striping pattern stays symmetrical with this steeked V-neck opening, making it look great! Tomorrow, we’ll look at the finishing touches to this vest, and how to work some of the textured stitches I experimented with – but did or did not end up using.
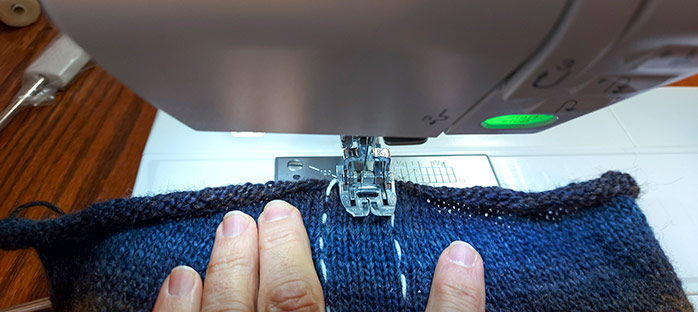
The walking foot on my sewing machine is ready to secure the steek stitches with zigzag stitching.
2 comments
I have wondered about steeking a V-neck. Thanks for all your tutorial and experience.
Kim, I hope you try steeking a V-neck…It was much easier than I thought I would be. And it has made all the difference for the stripes on both sides.