
This week, I’m knitting with Rozetti Yarns Nymph, that combines 84% cotton with 16% polymide for an irresistibly soft yarn that is great for all ages. This DK-weight yarn has a light chainette construction, with soft fibers blown through for a gorgeous halo.
Yesterday, we completed the squares (Horseshoe Stitch, Trellis Stitch (R and L) and Gingham Stitch) and laid them out only to discover that one big blanket became two smaller ones. Today, I’m assembling them and embellishing each one with a border in two different stitch patterns.
First, let’s talk about the joining method used. During our KAL project, one of our members, Dawn, demonstrated how to do a flat seam using the Crochet Zipper Join technique. This is an easy to do, and terrific method for joining both knitted and crocheted pieces together. It can be almost invisible, or as an embellishment depending upon the color used in relation to the pieces being joined. There are a number of YouTube videos available that demonstrate this technique, but it basically uses crocheted slip stitches into the bottom leg of either the slipped stitch edges, or the cast on and off edges.
Starting with a loop on the crochet hook, insert the hook into the bottom leg of the edge stitch on the left, then into the bottom leg of the adjacent stitch on the right. Draw the joining yarn through all three loops. That’s all there is to it. Make sure the crocheted stitch is loose, otherwise it will pull your squares to align with the join stitch instead of letting the join stitch align with the squares.

The Crocheted Zipper Join technique makes a lovely flat seam when joining knitted or crocheted pieces together.
I decided that I would do each blanket a little differently. On one, I used Goblet for the joining seams and for the border. It created a frame around each square. On the other, I matched the seam color to an adjoining square to make it somewhat invisible.
Once all the squares were joined, the next step was to embellish each blanket with a border. I used two different methods. For Blanket 1, where I had framed each square using Goblet, I wanted to continue that theme. For Blanket 2, I was concerned that I didn’t have enough of one color left to make the border, so I went with a 2-color pattern. The instructions for both follow.
Border 1
This method created a border frame that was then joined to the main field of the blanket using the same joining technique. One of the main benefits of this technique is that you don’t have the entire blanket on your lap while knitting the border. Once complete, it’s best to lay the blanket and border on a table to seam the sides with the Crocheted Zipper Join.
I wasn’t quite sure how much yarn would be needed for the border. I had previously estimated 2, but since I started with a partially used ball, I can’t be quite sure. I had to go into a 3rd ball to complete the project, but unfortunately, I forgot to weigh the balance to know for sure.
materials
yarn
- 2 – 1.75oz [50g] of Rozetti Yarns Nymph in Goblet, may need a 3rd ball or leftover yarn from a square to be safe
needles
- US 6 [4.0mm] 32” [80cm] circular needle
- US 7 [4.5mm] crochet hook
- stitch markers
- stitch holder
abbreviations
k = Knit
p = Purl
kfb = Knit into the front and back of the same stitch
pm = Place marker, this is only used to aid in the count of the number of cast on stitches. It saves time when you lose count along the way, which we all know happens frequently. The 2 inner markers can be removed on the next row.
rm = Remove marker
RS = Right side
WS = Wrong side
sl = Slip stitch purl-wise
st(s) = Stitch(es)
yb = yarn in back of work
yf = yarn in front of work
Instructions
Crochet cast on 10 sts, pm, cast on 37 sts, pm, cast on 37 sts, pm, cast on 37 sts, pm, cast on 10 sts. (131 sts)
Checkerboard Pattern Motif
Row 1: Sl1, *(k3, p3), continue to last 4 sts, k4.
Row 2: Sl1, *(p3, k3), continue to last 4 sts, p3, k1.
Row 3: Repeat Row 1.
Repeat Rows 1 – 3 until 12 rows are completed (or desired length).
Row 13: Sl1, k3, p3, k2, kfb, rm, cast off sts until you reach the last marker; rm, k1, cast off last st, pick up previous stitch that was just worked with left needle and k1; k3, p3, k4. 22 sts
Place right border sts on a st holder or join a separate ball of yarn and work the right side at the same time as the left border.
Left Border
Continue to work in pattern, slipping the 1st st and knitting the last st in every row for 207 rows. Place sts on hold.
Right Border
With WS facing, join yarn and proceed in pattern starting with Row 2 for 207 rows ending with RS facing for next row.
Top Border
Pattern across right border to the last st, K1 then place this stitch on the crochet hook, PM, proceed to cast on 37 sts, PM, cast on 37 sts, PM, cast on 37 sts and place the last stitch from the crochet hook over the 1st stitch from the stitch holder and Purl the 1st & 2nd stitch together from the stitch holder; then proceed to finish in pattern from stitch holder. 131 sts
Beginning with Row 3 of pattern, work across the row, and complete 4 more pattern repeats. Cast off.
Using the Crochet Zipper Join technique, join the border frame to the blanket.

Border 1 is knit as a frame that is then joined to the main field of the blanket with the Crocheted Zipper Join, all made with Goblet.
Border 2
Since I was uncertain about the amount of single colored yarn needed, I opted to do a 2-color border. This version uses a provisional cast on with scrap yarn on either side of the blanket and stitches are picked up along the bottom edge. The bottom border is worked, then the sides. Once the side edges are complete, stitches are picked up along the top edge of the blanket, and then the top border is completed. The bottom part of the border is worked without side edge slipped stitches. They are picked up separately with a crochet hook and placed on the needle with the side stitches. From that point onwards, slipped stitches are worked on each edge of the side borders to form both the side edge and the joining edge. Note the slipped stitches are only worked with color A, which is not conducive to neatly sized slipped stitches. You will get a long stitch, followed by a short one.
For this border you will need:
- Scrap yarn for the provisional cast on stitches – a smooth cotton works best
- 1 ball of Nymph in Taiga (blue) Color A
- 1 ball of Nymph in Salvia (lavender) Color B
- US7 [4.5mm] Crochet hook
- US6 [4mm] 32” [80 cm] circular knitting needle
- US6 [4mm] 16” [40 cm] circular or dpn
- Stitch holder
- Stitch markers
- Tapestry needle
Pattern
I previously used this pattern when I made a hat and cowl with Baby Hugs. I have since learned that it’s called a 2-Color Sand Stitch. It’s a very easy pattern stitch that looks great with 2 contrasting colored yarns. In this case, the two colors are not contrasting, but when combined, it almost seems like a new color.
Row 1: Color A – Knit, DO NOT TURN WORK, slide stitches back to the beginning of the row
Row 2: Color B – (K1, P1) across the row to the last st; K1. Turn work.
Row 3: Color A – Purl, DO NOT TURN WORK, slide stitches back to the beginning of the row
Row 4: Color B – Same as Row 2
Instructions
Step 1: Begin with a Provisional Cast On
Using a crochet hook and scrap yarn, chain 2 sts, then proceed with a crochet cast on over a stitch holder or dpn for 11 sts, then chain 4 more stitches. You will need to make 2 of these, but the second can be done with the 32” circular knitting needle.
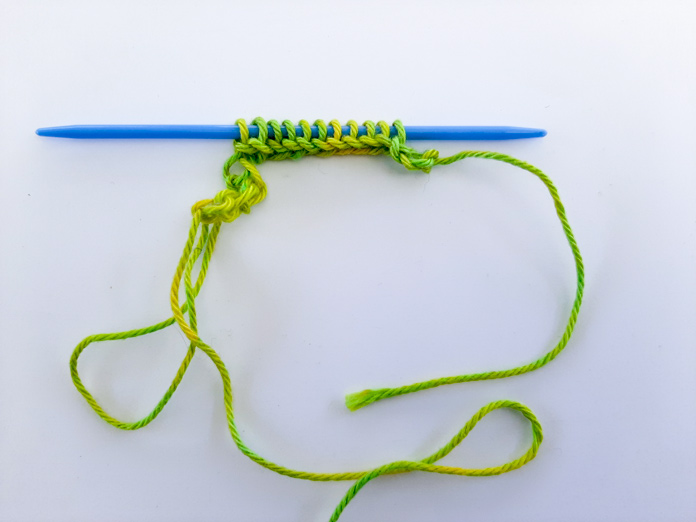
A provisional cast on was used for the side border stitches. A smooth cotton scrap yarn works best when it comes time to unravel and pick up the stitches.
Step 2: Pick up Stitches for the bottom border
With Color A, K11 from provisional cast on stitches.
Pick up and Knit 111 stitches from the bottom edge. Normally, I would pick up and knit both legs of the bottom cast on stitches, but I decided to do something different this time. I picked up the back leg only which left a ridge of the square color along the bottom.
TIP Place a stitch marker after picking up the 37sts from the 1st square, then again after picking up 37 sts from the 2nd square. These markers can be removed on the next row, but it helps out when trying to count the number of stitches you’ve picked up.
Knit the 11 provisional cast on stitches from the stitch holder. 133 sts
DO NOT TURN WORK.
Step 3: Slide stitches back to the beginning of the row. With Color B, proceed with pattern beginning with Row 2.
TIP Loosely make a knot with the tail from both colors. This is to temporarily anchor the yarn.
Step 4: Continue in pattern for 18 rows in total, ending with Row 2 (or desired length).
Step 5: With Color A, cast off purl-wise, DO NOT CUT YARN. Insert the crochet hook into the last loop of the cast off and make a slipped stitch edge up the left side by crocheting a slip stitch into every other row until you reach the provisional cast on stitches. Place the last stitch on the 16” circular or dpn needle.
Step 6: Unravel the scrap yarn and place the provisional stitches on the knitting needle. You should have 13 sts in total, but don’t be surprised if you’re short a stitch or 2. I didn’t anchor the yarn at the beginning and believe that I lost the outside edge stitch. This was easily rectified with a tapestry needle to form a stitch. That gave me the extra stitch needed to make 13 sts.
Step 7: With WS facing, and Color A (brought up from the crocheted slipped stitch edge), purl across all stitches. DO NOT TURN WORK. From this point on, only Color A will work the 1st and last stitch of Rows 1 and 3. Color B will slip both the 1st and last stitch of Rows 2 and 4, as follows:
Row 1: Color A – Knit, DO NOT TURN WORK, slide stitches back to the beginning of the row
Row 2: Color B – Sl1, yb, (K1, P1) across the row to the last 2 sts; K1, Sl1. Turn work.
Row 3: Color A – Purl, DO NOT TURN WORK, slide stitches back to the beginning of the row
Row 4: Color B – Sl1, yb, (K1, P1) across the row to the last 2 sts; K1, Sl1. Turn work.
Step 8: Continue with left border pattern, starting with Row 4 for 203 rows (204 in total). This should be in line with the top edge of the blanket. Place stitches on a stitch holder.
At this point, I weighed each ball and discovered that I had 26g of Color A and 27 of Color B. That meant I should be able to get the right and top border sections with the balance of the yarn from each ball. I hate cutting yarn if it isn’t absolutely necessary until I’m 120% sure. Rather than cutting the yarn, I pulled the yarn from the other end of the ball to continue with the Right border. This can be cumbersome, and sometimes I end up cutting it to alleviate the twisting and snagging, but for now, I’m leaving it attached. The yarn chicken game begins.
Step 9: Right Border
Unravel the scrap yarn and pick up the provisional stitches. I find that using a smaller sized needle makes this task easier. You should have 12 stitches on the needle. With Color A and the crochet hook, make a loop into the bottom right cast off stitch and make a crocheted slip stitch edge up the side by inserting the crochet hook into the edge of every 2nd stitch. Place the last loop on the needle with the provisional stitches (13). The yarn is on the right hand edge with the RS facing you.
Step 10: Beginning with Row 1 of pattern, proceed with the Right Side border for 204 rows, ending with Row 4, with RS facing to begin the next row. Note that Color B is worked as follows:
Row 1: Color A – Knit, DO NOT TURN WORK, slide stitches back to the beginning of the row
Row 2: Color B – Sl1, yf, (P1, K1) across the row to the last 2 sts; P1, Sl1. Turn work.
Row 3: Color A – Purl, DO NOT TURN WORK, slide stitches back to the beginning of the row
Row 4: Color B – Sl1, yf, (P1, K1) across the row to the last 2 sts; P1, Sl1. Turn work.
It can be difficult to count rows with this pattern. I inserted a removable stitch marker on every 26th edge stitch to make the count much easier. This was also helpful for Step 11.
Step 11: With the crochet hook and Color A, make the Zipper Join up either side to join the side borders with the side of the blanket. The slipped stitch edge is irregular with this pattern. You end up with a long stitch, followed by a short one. This can be tricky to insert the crochet hook. I found that by using a smaller hook to enlarge the opening of the short stitch, I could insert the larger hook to complete the join stitch. You should have 25 slipped stitch edges stitches on each square plus the 3 joins for a total of 103 zipper join stitches. You won’t be able to do the last join on each side until the 1st row of the top border has been worked as the last edge stitch for the side is on the needle.
Step 12: Top Border
With 32” circular needle and Color A, K11 across side edge stitches, K2tog. Proceed with picking up the 111 stitches across the cast off edge of the squares; (if you picked up the bottom border stitches using the back loop, make sure you do the same for the top edge), K2tog the first 2 stitches from the stitch holder, Knit to end of row. (135 sts) DO NOT TURN. Slide stitches back to the beginning and continue pattern with Color B and Row 2 as per the Step 10 instructions. You can now complete the remaining edge stitch on either side and fasten off the zipper join yarn.
Continue in pattern until 18 rows have been completed. Cast off purl-wise in Color A.

The 2-color Sand Stitch almost seems like a 5th color. It’s neither Salvia, nor Taiga but rather a blend of both.
This method seems to have a lot of steps, but I actually really like the results. The only part I wasn’t really keen on was the next step …. Finishing. On a more positive note, I won the yarn chicken game! With only a couple of yards to sparn with Taiga, I was able to finish the border. Now I feel more confident in saying that Border #1 needs 2 balls, but still have a few left yards on hand, just in case.
Finishing
Now that both blankets have been joined and embellished with borders, it’s time to weave in all the ends (there’s lots of them) and block.
Finished Measurements of each blanket after blocking:
Right Blanket 1 – 24” x 30½”
Left Blanket 2 – 24¼” x 30½”
And now, for the finished projects ….

Finished Favorite Things blanket 1 made with Nymph in colors Taiga, Salvia, Swan, and Goblet
I’m very happy with the finished results. These two blankets are so pretty. I love the colors and how the stitch definition is so prominent in all of the patterns. When I blocked them, I made sure that the scalloped edge of the Horseshoe Lace pattern would remain. I love it.

Finished Favorite Things Blanket 2 made with Nymph in colors Taiga, Salvia, Swan, and Goblet
Notice how blocking the squares after they were joined brought everything into line. They’re not perfect, but a perfect square was not my objective.
I really enjoyed working with Rozetti Yarns Nymph this week. Now that I see how beautiful the yarn works with the different stitch motifs, I really would like to make a summer top.
Thank you for joining me this week. I hope you enjoyed. Until next time, stay safe and happy knitting!

Finished Favorite Things Blankets 1 and 2 made with Nymph in colors Taiga, Salvia, Swan, and Goblet
This is part 5 of 5 in this series
Go back to part 4: Knitting 4 more of my favorite stitch motifs – Part II