
This week, I’m knitting with Rozetti Yarns Nymph, that combines 84% cotton with 16% polymide for an irresistibly soft yarn that is great for all ages. This DK-weight yarn has a light chainette construction, with soft fibers blown through for a gorgeous halo.
Today, I’m continuing to knit squares in some of my favorite motifs. Yesterday, I share the instructions for making the first set of 4 knit stitch patterns: Waffle Stitch, Checkerboard Lace, Eyelet Stitch and Faux Cable Stitch. Today’s patterns are a little more advanced than those of yesterday, but equally as lovely.
Just as a reminder, all squares have the same number of stitches and rows. The crochet cast on method is used throughout, along with a conventional cast off, and slipped stitch edges. If you’re unfamiliar with the crochet cast on method, you can find any number of videos on YouTube that demonstrate this technique.
For ease of reading, I’ve repeated the list of materials I used and standard abbreviations. Whenever there’s something unique to a particular pattern, it will be noted with the pattern. Unless the pattern states otherwise, I used a US 6 [4.0mm] needle.
materials
yarn
- 16 – 1.75oz [50g] balls of Rozetti Yarns Nymph, 4 of each in the following colors: Taiga (blue), Salvia (lavender), Swan (white), Goblet (grey). A single ball yields approximately 2½ squares.
needles
- US 5 [3.75mm], US 6 [4.0mm], and US 7 [4.5mm] knitting needles
- US 7 [4.5mm] crochet hook
abbreviations
k = Knit
p = Purl
kfb = Knit into the front and back of the same stitch
ktbl = Knit through back loop of stitch
k2tog = Knit 2 sts together
p2tog = Purl 2 sts together
lh = Left hand needle
yf = Yarn forward
yb = Yarn in back
yo = Yarn over, bring yarn to front before knitting next stitch
ssk = Slip, Slip, Knit, slip each stitch knit-wise, then knit them together through back loop
sl = Slip stitch purl-wise
st(s) = Stitch(es)
rem = Remaining
RS = Right side of work
WS = Wrong side of work
Horseshoe Lace
When Gloria introduced me to this stitch pattern for our KAL, I knit it up and immediately fell in love with it. We used it to advance the Lace category as the yarn over moves on each right side row and the decreases are always static. Gloria found this in her pattern stash on a worn and torn piece of paper. She thinks it’s from a vintage blanket pattern, which would be stunning. It has a beautiful scalloped edge and I can envision using this pattern for a cowl or on a sweater. In fact, there’s a good chance you’ll see it used again in a future KNITmuch post.
Cast on 38 sts using the crochet cast on method.
special abbreviations
Sl1, k2tog, psso – Slip 1 stitch knit-wise, knit next 2 sts together, pass slipped st over (2 sts decreased).
The Pattern
Set Up Row: Sl1, k2tog, k1, purl to last 3 sts, k3 (37 sts).
Row 1: Sl1, k2, yo, k3 * sl1, k2tog, psso, k3, yo, p2, yo, k3* rep from * to last 9 sts, sl1, k2tog, psso, k3, yo, k3.
Rows 2, 4, 6, 8: Sl1, k2, purl to last 3 sts, k3.
Row 3: Sl1, k3 * yo, k2, sl1, k2tog, psso, k2, yo, k1, p2, k1 rep from * to last 11 sts yo, k2, sl1, k2tog, psso, k2, yo, k4.
Row 5: Sl1, k4, * yo, k1, sl1, k2tog, psso, k1, yo, k2, p2, k2 rep from * to last 10 sts, yo, k1, sl1, k2tog, psso, k1, yo, k5.
Row 7: Sl1, k5* yo, sl1, k2tog, psso, yo, k3, p2, k3 rep from * to last 9 sts, yo, sl1, k2tog, psso, yo, k6
Repeat rows 1 – 8 5 times more.
Last Row: Sl1, Knit to last 3 sts, kfb, k2. 38sts
Once completed, you should have 50 rows.
Cast off loosely in row 8 of pattern.

I used a US 6[4.0mm] needle and Nymph in Salvia for the Horseshoe Lace square, which has become a personal favorite of mine.
Trellis Stitch
This pattern stitch goes by different names; Trellis, Lattice, and even Twill stitch. You can make it left leaning or right leaning. We used the right leaning stitch in combination with purl stitches to create a unique ribbing effect in our KAL. It’s become a favorite for both Gloria and myself. I couldn’t decide between left or right leaning, so I decided to make both – Swan and Goblet for the left, and Taiga and Salvia for the right. The left leaning version is a tighter knit because of knitting through the back loop of the stitches to make them lean left. For this pattern, I used a larger needle size.
special abbreviations
k2togtbl = Knit 2 sts together through back loop
needles
- US 7 [4.5mm] knit loosely
The Left Leaning Pattern
Cast on 38 sts using the crochet cast on method.
Row 1: Sl1, *ktbl of 2nd st on LH needle, then k2togtbl and take both stitches off the needle; repeat from * to last st, k1.
Row 2: Sl1, purl to last st, k1.
Row 3: Sl1, k1, *ktbl of 2nd st on LH needle, then k2togtbl and take both stitches off the needle; repeat from * to last 2 sts, k2.
Row 4: Sl1, purl to last st, k1.
Work Pattern Rows 1 – 4: 12 times total; then repeat Rows 1 & 2.
Once completed, you will have 50 rows.
Cast off loosely.
Right Leaning Pattern
Cast on 38 sts using the crochet cast on method.
Row 1: Sl1, *K2tog leaving sts on needle, knit the first st again, then drop both sts off needle; rep from * to last st, k1.
Row 2: Sl1, purl to last st, k1.
Row 3: Sl1, k1, *k2tog leaving sts on needle, knit the first st again, then drop both sts off needle; rep from * to last 2 sts, k2.
Row 4: Sl1, purl to last st, k1.
Work Pattern Rows 1 – 4: 12 times total; then repeat Rows 1 & 2.
Once completed, you will have 50 rows.
Cast off loosely.

I used a US 7 [4.5mm] needle and Nymph in Goblet and Swan for the Left Leaning Trellis stitch pattern.

I used a US 7 [4.5mm] needle and Nymph in Salvia and Taiga for the Right Leaning Trellis stitch pattern.
Gingham Stitch
Who doesn’t love gingham fabric. It’s fresh and depending on the colors you choose, very summery, or wintery. I first used this pattern stitch in double knitting to make a cowl. I fell in love with it. This version does not use the double knitting technique, which means to avoid floats on the back, I needed to catch the opposite color with each stitch. I discovered that if I was consistent, I could actually create a motif on the wrong side. I didn’t get it perfected until the third square, so naturally, that’s the one shown. Since 2-color work can be a little tighter, I also used the larger needle size.
If you remember from the materials list, each ball of yarn should yield 2½ squares. This motif used up a few of those ½ balls. I made three of these squares; Swan with Goblet, Taiga with Swan, and Salvia with Swan. This may be easier to read if charted, but for every stitch, I prefaced it with the color of either A or B. For example: Ak6 means to Knit 6 stitches with color A; (Bk1, Ak1) means Knit 1 with color B, then Knit 1 with color A.
With Color A and US 7 [4.5mm] needle, cast on 38 sts using the crochet cast on method.
Row 1: Sl1, *Ak6, (Bk1, Ak1) 3 times; repeat from * to last st, Bk1.
Row 2: Sl1, *(Bp1, Ap1) 3 times, Ap6; repeat from * to last st, Ak1.
Rows 3 – 6: Repeat row 1 and 2.
Row 7: Repeat Row 1.
Row 8: Sl1, *Bk6, (Ak1, Bk1) 3 times; repeat from * to last st, Ak1.
Row 9: Sl1, *(Ap1, Bp1) 3 times, Bp6; repeat from * to last st, Bk1.
Rows 10 – 13: Repeat row 8 & 9.
Row 14: Repeat Row 8.
Repeat rows 1 – 14 twice more, then repeat rows 1 – 7, then repeat row 2.
Once completed, you should have 50 rows.
Cast off loosely with color A.
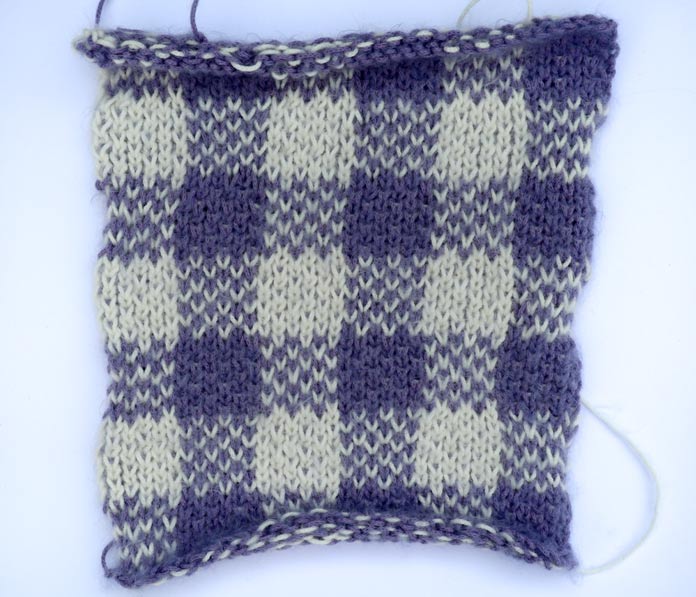
I used a US 7[4.5mm] needle and Nymph in Salvia and Swan for the Gingham square.

By being consistent with carrying the colors, I was able to create a neat and tidy wrong side.
Now that all of the squares have been knit, it’s time to lay them out for assembling. If you kept track, I actually made 24 squares with the intent of using them all together on one blanket. This is where my project morphed into projects. I laid out all the squares on my deck table and realized that my original plan for making a 4 wide by 6 high blanket was too large for an infant, and too small for an adult. I was also having difficulty arranging the squares in a manner that made me happy.

With all 24 squares laid out on my deck table revealed that it was too big for an infant and too small for an adult.
So that’s when I started playing with different combinations and came up with two blankets. One contained the squares where I had used all four colors in the pattern motifs, and the other where I had used three of each stitch pattern.

Rearranging the squares into 2 separate blankets made more sense and was more pleasing to the eye.
Two blankets made me much happier, and happy knitting is what it’s all about. Now that the layout has been determined, the next step is to put them together. As you can see by the photo above, the different stitch patterns created different-sized squares even though they all have the same number of stitches and rows. Most knitters would say to block each square before assembling, but I chose to block them after.
Tomorrow, I’ll seam and embellish each blanket with a border using different stitch patterns. I hope you’ll join me as I put the finishing touches on my Nymph “favorite things” blankets.