
In my previous post, I shared some thoughts about summer yarns and the one I chose for my project, Fibra Natura FLAX in color dusted apricot.
In this post, I’ll talk about the pattern which is a Simple Summer Tunic I created years ago.
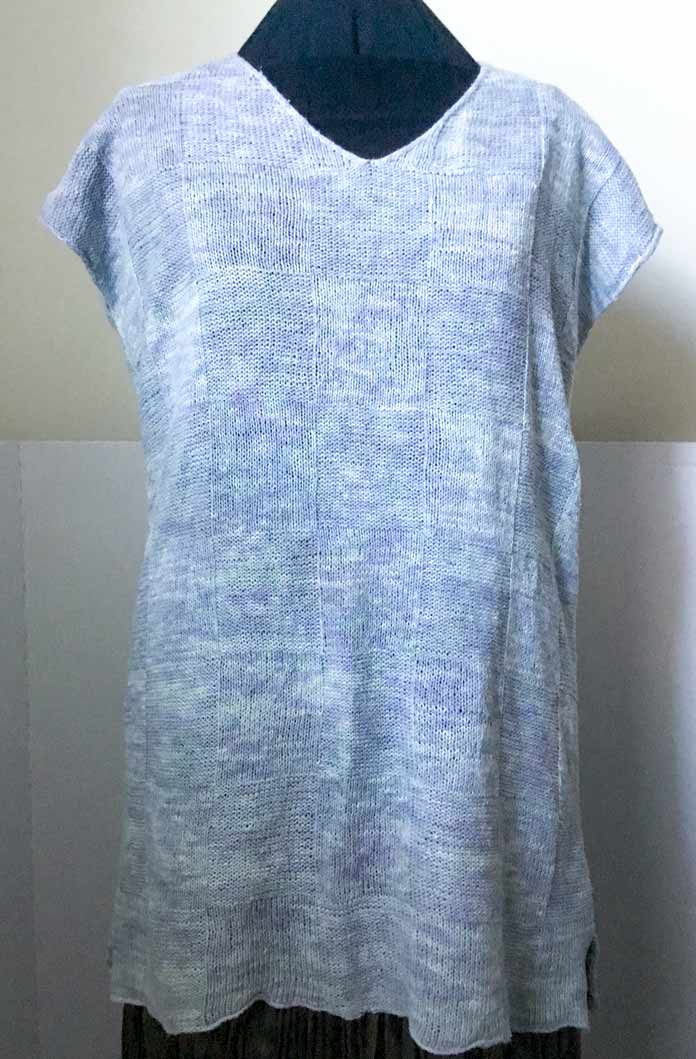
A simple summer tunic
Start of pattern
The garment is knitted in 4” squares, alternating between stockinette and reversed stockinette stitch, creating a relaxed tunic or mini dress.
With very little shaping and no sleeves, the knit is fast and a good social knitting project.
The tunic is knitted top down allowing for different lengths. It can become a top or a dress, depending on the length. If you decide to knit a dress, allow for more yarn. With an additional 3 skeins, you can knit a midi dress.
sizes Small (Medium)
materials
yarn
- 7 (8) skeins of Fibra Natura FLAX
notions
- row counter
- stitch markers
- tapestry needle
gauge
24 stitches and 28 rows for 4” [10cm] using US 3 [3.25mm] needles
The pattern is written for sizes S(M) with the instructions for the smaller size followed by the instructions for the larger size in brackets. Where only one number is given, that number is used for both sizes.
abbreviations
k = knit
p = purl
st(s) = stitch(es)
pm = place marker
rm = remove marker
sm = slip marker
RS = right side
WS = wrong side
Back
Using a scrap yarn, cast on 114 (128) stitches.
Switch to your working yarn and work across the row on the RS:
Row 1: K2, place a marker, * knit 22(24) sts, purl 22(24) sts **, repeat once more from * to **, knit 22(24) sts, pm, k1, slip 1 with yarn in front.
Row 2: K1, p1, slip marker, work stitches as they appear (knit the knits and purl the purls) up to the marker, p1, slip 1 with yarn in front.
This will set up the 5 squares alternating the stockinette and reversed stockinette.
If you don’t want to do any shoulder shaping, repeat Row 1 and Row 2 until you complete 28 rows.
| Optional – shape shoulders using short rows. Note: In this section, I use the wrap-and-turn technique for short rows, but any other technique will work as well. Row 3: (Optional, shaping the shoulders) k2, sm, work stitches as set up to the last section of purled stitches: 90 sts (98 sts). Wrap and turn. Row 4: (Optional, shaping the shoulders) work stitches as they appear up to the last section where the reversed stockinette changes to stockinette stitch. Wrap and turn. Row 5: (Optional, shaping the shoulders) work stitches as they appear for 3 sections. Wrap and turn. Row 6: (Optional, shaping the shoulders) work stitches as they appear for 1 section (the central section). Wrap and turn. Row 7: (Optional, shaping the shoulders) work stitches as they appear to the end of the row, unwrapping the wrapped stitches as you reach them. Row 8: (Optional, shaping the shoulders) work stitches as they appear to the last 2 sts, unwrapping the wrapped stitches as you reach them, p1, slip 1 with yarn in front. Repeat row 1 and 2 until 28 rows are completed. |
Row 29: K2, * purl 22 (24) sts, knit 22 (24) sts **, repeat once more from * to **, purl 22 (24) sts, k1, slip 1 with yarn in front.
Row 30: K1, p1, * k22 (24) sts, p22 (24) sts **, repeat once more from * to **, k22 (24) sts, p1, slip 1 with yarn in front.
Repeat row 29 and row 30 until you reach row 56.
Continue repeating rows 1 to 28 (without any shaping) and 29 to 56 to the desired length. Depending on your preferences you may end with row 28 or row 56.
Right front V neckline
Remove the provisional cast-on and mark the center 40 sts for the back of the neck.
Row 1 (RS): K2, place marker, purl the knitted stitches and knit the purl stitches up to 2 stitches before the center 40 stitches, place marker, k1, slip 1 with yarn in front. Turn work.
Row 2 (WS): Slip 1 st, purl 1 stitch, sm, work the rest of the stitches as they appear up to the marker, p1, slip 1 with yarn in front.
Row 3: Repeat row 1 slipping the stitch marker.
Row 4: Repeat row 2 slipping the stitch marker.
Row 5 (RS) Increase row: K2, sm, work stitches as they appear up to the marker, make 1 left, slip marker, k1, slip 1 with yarn in front.
Row 6 (WS): Repeat row 2 slipping the stitch marker.
Row 7 (RS): Increase row: k2, sm, work stitches as they appear up to the marker, make 1 left, slip marker, k1, slip 1 with yarn in front.
Row 8 (WS): Repeat row 2 slipping the stitch marker.
Row 9 (RS): Repeat row 1 slipping the stitch marker and taking care to switch from stockinette to reverse stockinette when the center section reaches 22 (24) sts, not counting the stitches after the marker.
Row 10 (WS): Repeat row 2 slipping the stitch marker.
Repeat rows 5 to 10 until you increased 21 sts. Leave the RS, but do not cut the yarn.
Increases are done alternating every 4 rows with every 2 rows.
Left front V neckline
Place the center 40 sts on a scrap yarn and resume working on the left 37 (42) sts. Attach a new yarn and start on the RS, at the neckline end.
Row 1 (RS): K2, place marker, purl the knitted stitches and knit the purled stitches up to the last 2 stitches, place marker, k1, slip 1 with yarn in front.
Row 2 (WS): K1, p1, slip marker, work stitches as they appear up to the marker, p1, slip 1 with yarn in front.
Row 3: Repeat row 1 slipping the stitch marker.
Row 4: Repeat row 2 slipping the stitch marker.
Row 5 (RS) Increase row: k2, sm, make 1 right, work stitches as they appear up to the next marker, slip marker, k1, slip 1 with yarn in front.
Row 6: (WS) Repeat row 2 slipping the stitch marker.
Row 7 (RS) Increase row: k2, sm, make 1 right, work stitches as they appear up to the next marker, slip marker, k1, slip 1 with yarn in front.
Row 8 (WS): Repeat row 2 slipping the stitch marker.
Row 9 (RS): Repeat row 1 slipping the stitch marker and switching from stockinette to reverse stockinette when the center section reaches 22 (24) sts, not counting the stitches after the marker.
Row 10 (WS): Repeat row 2 slipping the stitch marker.
Repeat row 5 to 10 until you increase 21 sts. Cut the yarn.
Joining the left and right front
Place all stitches on the same needle, and resume knitting with the yarn from the RS of the front neckline.
Work the edge stitches as usual: k2, work up to the last marker, remove marker.
The last 2 stitches of the RS and the first 2 stitches of the left side are worked together.
Place the first 2 stitches of the left side onto a cable needle. Knit the stitch before last of the RS together with the first stitch of the left side from the cable needle, knit the last stitch of the RS with the second stitch from the cable needle (2 stitches decreased) remove marker and work to the end of the row up to the last marker, slip marker, k1, slip 1 with yarn in front.
Next row (WS): K1, p1, sm, work stitches as they appear up to the last marker, p1, slip 1 with yarn in front.
Next row (RS): K2, sm, work stitches as they appear up to the center two stitches. Work the center two stitches in the pattern of the central square.
Continue working alternating stockinette and reverse stockinette every 28 rows up to the desired length.
Finishing the tunic
Sew the side seams using the knitted edge stitch as guide for the seam line. Leave an opening of 7¼ (7½)” for the arm opening.
Finishing the neckline
Starting at the middle of the back, attach a new yarn and knit 20 sts, pick up stitches along the V neckline using the knitted edge stitch as a guide for picking up stitches. For a tighter neckline pick up 3 stitches for each 4 rows, otherwise pick one stitch for each row. Knit 20 stitches to the middle of the back.
Bind-off using an I-cord bind-off
- With RS facing, cast on 3 stitches needed for I-cord onto the left needle.
- Knit 2 stitches.
- Knit the next two together through the back loops.
- Transfer all stitches from the right needle back to the left needle.
- Repeat steps 2 to 4 until all stitches are bound off.
Finishing the armholes
Starting at the underarm seam and using the knitted edge stitch as a guide, pick up 3 stitches for each 4 rows around the armhole.
Bind-off using an i-cord bind-off.
Sew in the ends.
Your tunic is ready for the hot days to come!
options
You have the option to make the back longer than the front for a more sophisticated look, add pockets for convenience, or extend the tunic to create a midi dress.
Style the tunic with a skirt or wide long pants. You can also use it as a long vest over a shirt. It is a simple but very wearable garment.
End of pattern
——————————————————————————————————————————-
More about my swatches for this pattern
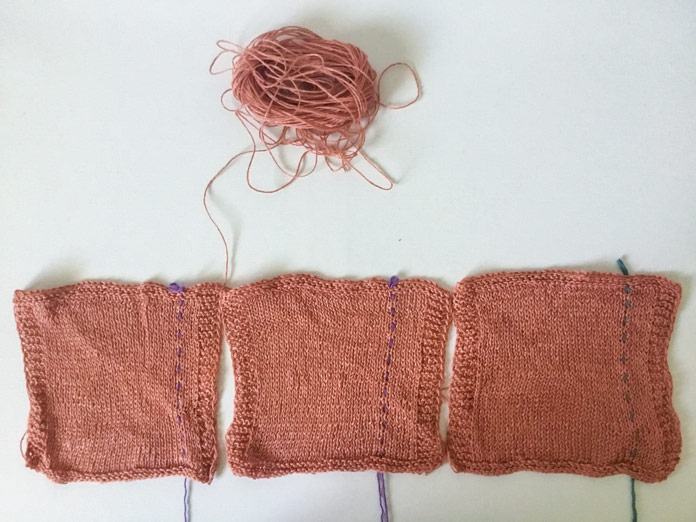
Blocked swatches for the tunic using different size needles
The swatches are knitted and washed. I laid them flat to dry and now I can measure them to choose the type of needles I’ll use for the project.
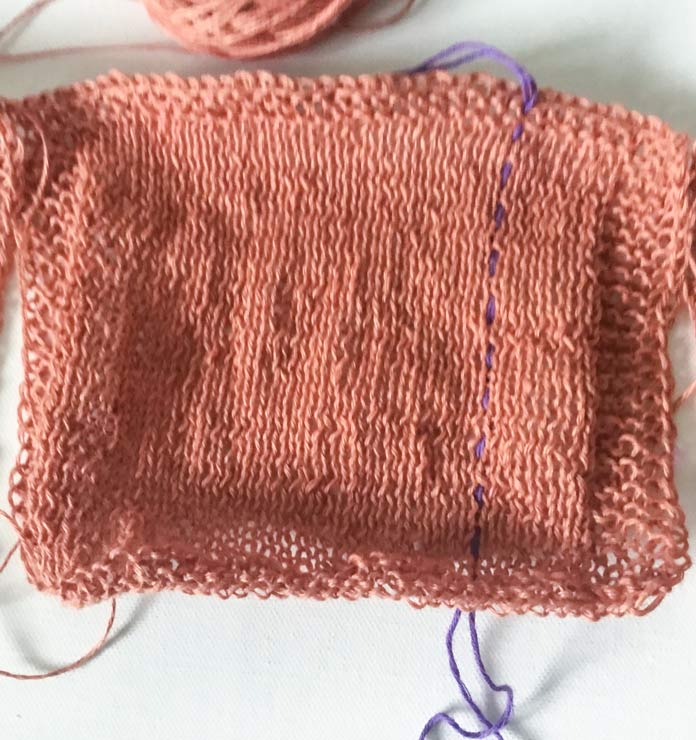
The swatch knitted with metal needles has 24 stitches and 27 rows for 4 inches.
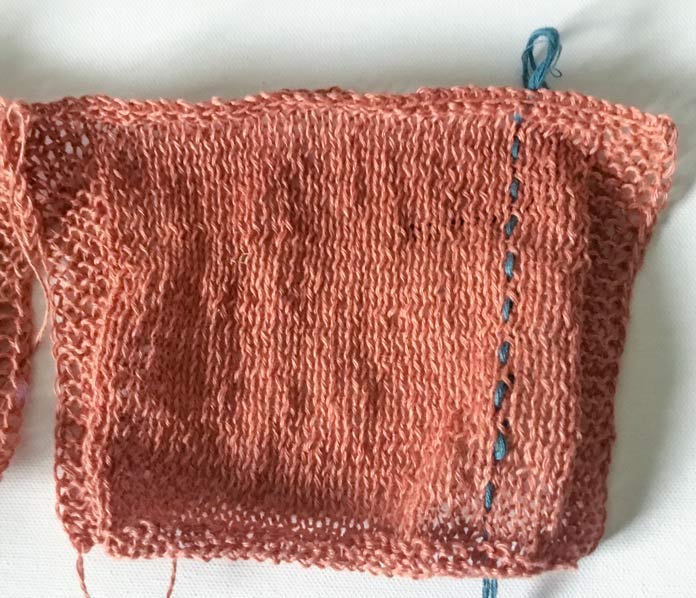
Swatch using US 3 [3.25mm] size metal needles before blocking
The swatch knitted with plastic needles has 25 stitches and 29 rows for 4”.
Swatch using US 3 [3.25mm] size plastic needles before blocking
There isn’t a big difference, so I can choose the needles that give a better look and feel to my knitted fabric. I like the feel of the fabric knitted with the wood needles, so I’ll use for my project the LANTERN MOON Destiny Circular Needles 32 (80cm) – Size US 3 (3.25mm)
Join me tomorrow when I’ll show you how my project is progressing.
This is part 2 of 5 in this series
Go back to part 1: Fibra Natura FLAX | A fine natural yarn for knitting and crocheting
Go to part 3: Fibra Natura FLAX | Getting started & following the pattern