
This week I’m warding off the winter chill by knitting with Universal Yarn Deluxe Worsted Superwash. This beautiful, springy, 100% superwash wool with a rich and expanding palette of colours is a great choice for warm and cozy garments, accessories and home décor.
Yesterday, I knit the back, fronts, and sleeves of the sweater and today, I’m knitting the front edges and collar. If you look at the picture of the sweater, the collar is much smaller than I would like. I want a larger collar on my sweater that incorporates the front edges.

Roof Tiles Sweater from Universal Yarn
Front Edges
The pattern instructions state to use a 1×1 ribbing for the front edges. I opted to use a seed stitch pattern in place of the rib because seed stitch lays flatter than ribbing. The zipper will be attached to the front edges and I find it’s much easier to do if the knitted portion stays flat. I also added two more stitches than instructed and slipped the 1st stitch on each row. This will all become clear when we sew in the zipper tomorrow.
In case you’re unfamiliar with rib vs. seed stitch, here’s a comparison of the two methods over an even number of stitches.
Rib: *K1, P1, repeat from * to end of row
Seed worked over 2 rows:
Row 1: *K1, P1, repeat from * to end of row
Row 2: *P1, K1, repeat from * to end of row.
Once both edges have been knit, I then knit a 2nd set, one for each edge that will be used as the interfacing for the zipper. I made the two inner sets 1 row less than the front. These two pieces will be attached when the zipper is sewn in.
The Collar
Now I’m ready to knit the collar. Since I’m including the two front edges in the number of stitches that I’m picking up, I added 10 more stitches than the pattern instructed. Why 10? Based on the size I’m making, the pattern stated to pick up 74 sts. By incorporating the 2 front edges, I need 6 more stitches plus I want an extra stitch at the beginning and end for a slipped stitch edge. That makes 82 stitches, but I need a multiple of 4 sts. By adding 2 more stitches, it worked out to 84 stitches in total.
Here’s a tip when picking up stitches for a neckline … Pick up all the stitches as you go around avoiding any holes or gaps. If you pick up a gap, it will only make the gap larger and unsightly. Always remember to avoid the holes or gaps when you pick up a stitch. If you find you have too many stitches you can reduce the number as you work the first row. For example, I ended up with 90 stitches on my needle. On the first round, I K2tog 6 times evenly placed around the neckline – 1 at each join of the front to the back, and 1 at each of the 2 crooks in the neck shaping on either side.
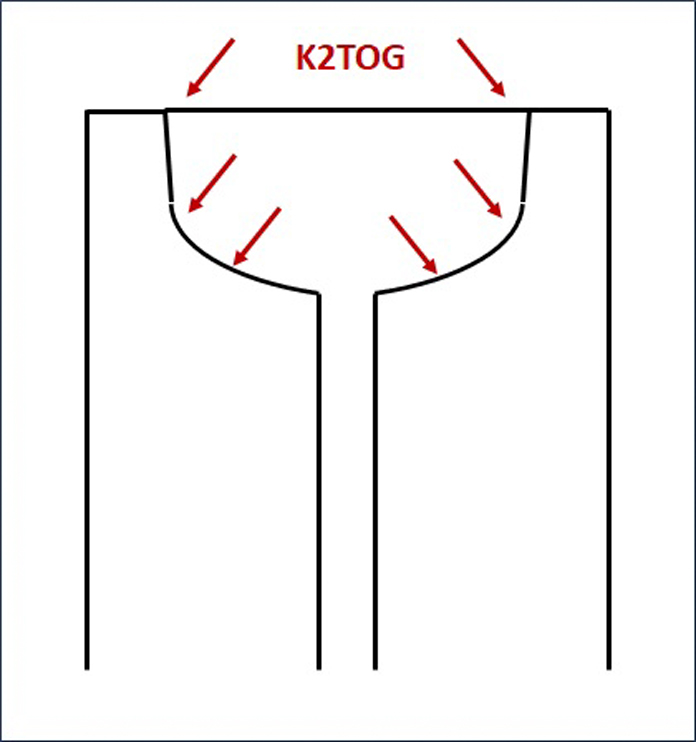
K2tog evenly around the neckline to get to the correct number of stitches.
Now that the stitches have all been picked up, proceed with knitting the 2×2 rib as follows beginning with the Wrong Side (WS):
Row 1: Sl1 (purlwise), *P2, K2, repeat from * to last 3 sts, P2, K1
Row 2: Sl1 (purlwise), *K2, P2, repeat from * to last 3 sts, K3
Repeat these 2 rows 13 more times (28 rows total), then repeat Row 1.
Cast off in pattern of Row 2.
The collar will be turned down toward the inside of the sweater and sewn in, however, I won’t do that until I sew the zipper in place.
Now that all the knitting is done, it’s time for the finishing. I hope you’ll join me tomorrow as I sew in the zipper and all the seams. I’m looking forward to the finished Roof Tiles Sweater knit with Universal Yarn Deluxe Worsted Superwash.

Deluxe Worsted Superwash in Charcoal Heather