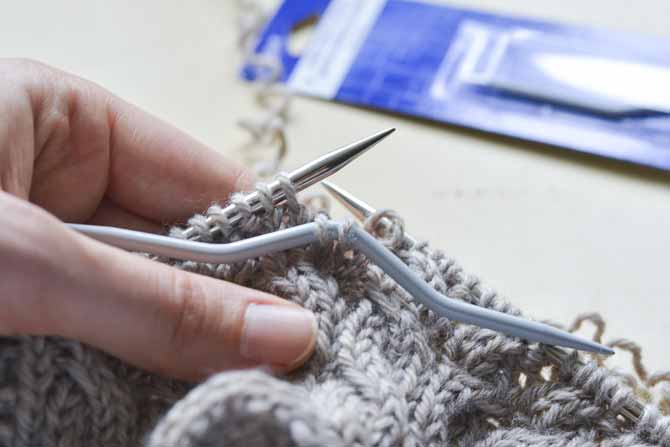
Happy Monday, dear knitters! This week on the KNITmuch blog, we’re looking at a few more accessories and tools that can help you take your knitting to the next level. We’re going to get things started today with one of the most popular knitting techniques out there: cables. Today we’ll show you how to knit cables with a cable needle, which is a tool that every knitter should have in their tool kit! Knitting with cables – easier than it seems!

Cable needles are essential tools for knitting cabled stitches!
Cable stitches are among the most popular kinds of stitch patterns out there. You don’t need to look very long before coming across patterns that use cables – socks, hats, scarves, sweaters and mittens are all just as likely to show off different kinds of cabled stitch patterns. This makes cables an all-year-round kind of technique, and one that is very versatile to know.
Cables are made by manipulating the stitches on your row of knitting so that a few stitches switch places with other stitches next to them on the needle. Essentially, a cable stitch isn’t a new kind of stitch, just a rearrangement of other knit or purl stitches. So, the cable needle is used to help with this “rearrangement”!

From right to left in this photo, we can see three right-twisting cables followed by three left-twisting cables.
All cables have a “direction.” They travel either to the left or to the right, depending on which direction the front stitches move. In the picture above, you can see three sets of “right leaning” cables on the right, and three sets of “left leaning” cables on the left. All of these stitches are worked as knit stitches, and all are worked over 4 stitches in total.
In a knitting pattern, these would be indicated as “C4R” for the right leaning ones (cable four right), and “C4L” for the left leaning ones (cable four left).
In the photos below we’ll demonstrate the steps for working a “C4L.”

C4L (left cable over 4 sts) Step 1: Slip 2 sts onto cable needle.
Because this is a C4L, that means we are working over 4 stitches for the full cable. Typical cables split this full number into two halves, where one half of the stitches travels in the front of the work. So, here we’re working with 2 + 2 stitches.
First, take your cable needle and slip the first 2 stitches onto it from the left hand needle. This one has a notch in the middle of the needle to allow these stitches to settle into the middle and sit more easily. Right now these stitches are just hanging out, waiting to be used again when they are next needed!

C4L (left cable over 4 sts) Step 2: Knit the next 2 stitches as normal.
The next step is to knit the next 2 stitches as normal (as shown above). This can feel a bit fidgety with the cable needle attached to the work, but you’ll get the hang of it with practice.
These two steps above will be described in a knitting pattern something along the lines of “slip 2 sts to cn and hold in front, k2.” Cable needle is typically abbreviated as “cn.”

C4L (left cable over 4 sts) Step 3: Slip the first 2 stitches back onto the left hand needle, from the cable needle, then knit them as normal.
The next and final step is to slip the stitches on the cable needle back onto the left hand needle, and then knit these 2 stitches as normal. You could even try knitting the stitches directly from the cable needle, if you’re comfortable with it!

The final product! Cables make very attractive stitches.
And then, you’re done! On the left of the photo above you can see a close-up of the C4L cable, and how it leans to the left. There are a few steps involved in creating a simple cable like this, but with practice you will get more quick at it. Some knitters develop habits like leaving the cable needle tucked behind their ear like a pencil, or piercing it through their sweater like a pin, to hold onto it, ready to grab for the next cable.
In tomorrow’s post will look at the opposite direction, C4R! Give the C4L a try if it’s new to you, and see how you like it. You may find knitting cables with a cable needle is easier than you think!
