
Just because we’re working with yarn scraps, there’s no reason for our knitting to look amateurish. Today I’m going to give you two tips to elevate your knitting to a professional level.
This week, we’ve been working with yarn scraps from last year’s reviews of Universal Yarns. On Tuesday, we made a soft, fluffy cowl, and yesterday, we adapted a different cowl pattern to make it with a different yarn.
Today’s yarn selection is Deluxe Dk Tweed Superwash, a nice, soft 90% wool, whose acrylic and viscose content comes from the flecks incorporated into the yarn to make it a tweed.

Our ‘orphaned’ ball of Deluxe Dk Tweed Superwash will be turned into something useful when it grows up!
In searching for a pattern, I went to the Universal Yarn website, but kept coming up empty. I have full ball – 284 yds/ 259m / 100g – of Deluxe Dk Tweed. While this may not seem like a true scrap of yarn, knitters often have an extra ball-and-a-bit remaining after finishing a sweater. This will easily make a hat, but I burned my bridge with hats last year when I made more than a dozen hats for charity. I don’t want to see a hat pattern for another year or two. If you want to make a hat, 100g of double knitting/ DK will be plenty for almost all patterns. It should also be enough to make a pair of mitts. There are numerous patterns on the Universal Yarn website for any of these items.
I could pull out my “box of bits” to stretch out the yarn. The walnut brown of the Deluxe Dk Tweed is a good main color, to “anchor” the bits.

A number of the colors in this box of scraps would complement our single ball of Deluxe Dk Tweed Superwash
There were patterns for DK yarn I could just cast on and knit — the Reune mitts, long fingerless mitts that cover much of the forearm, and the Paprika Seed Cowl. The short version of the Splatter Lace Cowl would also work. But, I wanted a challenge to knit, and something that would provide a teaching element. I considered the Cozy Snood, as it is made of Fisherman Rib, but, I only have enough yarn to make about 8″ of it’s 13″ width.
I settled on the Flint Ridge Scarf. It requires two balls of yarn, but it’s 72″ long plus a fringe, so I should get just over 36″ of length – enough for a man’s scarf . I showed the picture to my guy, and asked him if he thought the open areas were too lacy. When he said no, I saw my green light.
Elevating your cast on
A lot of people use one cast on for all their knitting. I most commonly use one of three, depending on what I’m doing.
I use a ribbed long-tail cast on when the pattern begins with ribbing.
If I won’t see the cast on edge (when I’ll be enclosing the cast on into a seam), or when I’m going to jump right into stockinette stitch in the round, I use a knitted on or cable cast on.
When a pattern starts with garter stitch worked back-and-forth (as this pattern does), I use the long tail cast on. Here’s why:
Either the knitted or cable cast-on creates knit “bumps” on the back of the work. At the end of the cast on, we don’t turn the work: the stitches are formed on the left needle, and we knit from them. Knitting that the first row forms a second row of “bumps” on one side of the work, the same way it happens in stockinette st.
A long tail cast on “builds” the stitches onto the right-hand needle. The bumps also form at the back of the work, however, when we turn the work, those bumps end up at the front of the work, and the first row of knitting creates a more natural ridge of garter stitch.

If I continue knitting with the purple yarn — cast on with a cable cast on — I will get two rows of bumps across the back of the work. But, the brown yarn, which was cast on with the long tail method, has been turned to work the first row, and when I knit that row, it will look closer to garter stitch, because the bumps are at the front of the work.

The photo on the left is the cable cast on. On the right is the long tail cast on, The long tail cast on takes the garter stitch border right to the edge of the scarf.
Elevating your edges
Once the lower garter stitch border is complete, we need to consider those garter stitch edges. These little blighters have a natural tendency to curl to the purl side of the work when they’re adjacent to stockinette stitch, reverse stockinette stitch, or cables.

This scarf was blocked severely to get it to lay flat for its completion photo (left). As soon as it is worn, it curls back up again! (right)
Why does this happen, and what can we do about it?
In relation to stockinette stitch, garter stitch spreads out horizontally and compresses vertically. It makes a neat edge, which is why designers choose it. Designers, however, rarely write a solution for the curling issue into their patterns. Why? because it breaks the “flow” of the written pattern.
My solution is to choose an interim number of rows, and make short rows at the edges to ‘build up” the garter stitch to approximate the height of the knitting in the middle. Two rows of garter stitch take up less height than the height of two rows of stockinette stitch. Adding short rows at intervals helps to keep the garter stitch edge from drawing in so much that it pulls toward the purl side of the work.

These two samples were knitted to the same specifications, on the same day, with the same yarn and needles. The only differences were the cast ons and the addition of short rows on the edges. The sample on the left was knit according to the chart, and the sample on the right had short rows added to the edges at every cable cross (every 8 rows). The result of this subtle difference is very clear!
You can get quite scientific about this by referring to your tension swatch, measuring the number of garter stitch ridges and center panel rows, and working with the data. Or, you can extend your tension swatch to experiment.
I always make sure I add short rows at regularly-spaced intervals. Short rows usually show, but when done at regular intervals, they either blend in with the rest of the work or appear as a design element. Like many cable patterns, the Flint Ridge Scarf pattern helps us out, because we can do the short rows at the cable rows, which makes them much less noticeable. And, these cables have an 8 row repeat, which should be just enough to minimize the curling. I make a note on my pattern or chart where I want to add my short rows (SR).
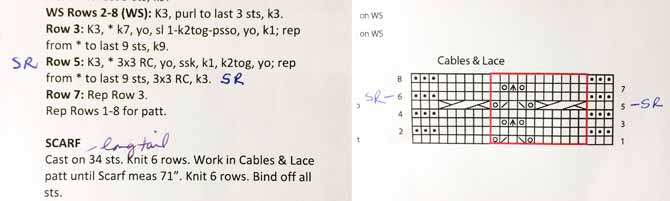
I always make notes on my patterns. I’ve inserted “SR” in both the text and on the chart to show where I want to make my short rows. Note, too, that I’ve also indicated the cast on I used. If I ever want to make this pattern again, I’ll know how to get the same result!
![The scarf, knit for about 12" [30cm], draped over a dress form to show how the edges are straight, and not inclined to curl.](https://knitmuch.com/wp-content/uploads/368brownscarf-215545-o-sa.jpg)
Employing my two tricks to my Deluxe Dk Tweed yarn is already showing promising results. It will be a perfect piece to wear with my woolen winter car coat!
You may think that these “tweaks” I’m making are fussy, but I’ve been knitting for over 50 years. I’ve learned that these small tweaks elevate your knitting to a professional-looking level. I hope you find them useful in your knitting life!
You’ve GOT to come back for tomorrow’s post to see my last scrap yarn project — you won’t believe it’s made of all scraps.