
Welcome back! This week I’m working with Lion Brand Yarns Feels Like Butta super squishy yarn. Every day, I’m helping you build your knitting skills with a group of free beginner’s knitting patterns for a perfect baby gift set. If you already know how to knit and purl, but are looking to expand your knitting know-how, completing these sweet baby knits will set you up to move into intermediate level projects like sweaters and socks. Yesterday I started with the I Wanna Knit a Baby Blanket with a free pattern from Lion Brand. There were tutorials on Yarn Over increases (YO) and Knit Two Together decreases (K2tog), and information on how to change colors and sew in ends. If you don’t know these basic techniques I suggest you pop back to yesterday’s post before beginning this PomPom Baby Hat, because you will need to know the techniques from the baby blanket to go onto this project. If you have done the I Wanna Knit a Baby Blanket work then you’re ready to jump into the PomPom Baby Hat.

After you finish your I Wanna Knit a Baby Blanket there will be lots of yarn for more baby projects. Let’s start with Lion Brand Yarns PomPom Baby Hat.
The PomPom Baby Hat is a free download, then we can get knitting together!
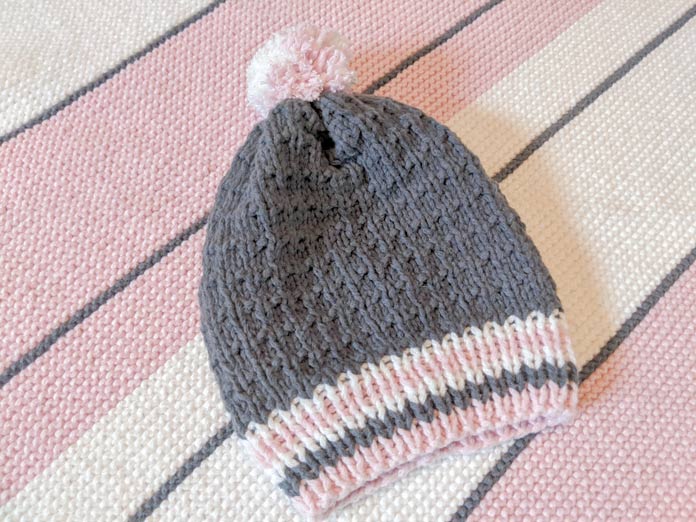
This infant hat is knit flat starting with the striped brim in ribbing then moving into a textured broken rib pattern for the rest of the hat. This simple patterning gives the hat a lovely texture. Since the hat is knit flat instead of in the round, you’ll need to sew up the seam to finish it. On the top is a sweet little pompom which is easy to make, and is the perfect flourish to this baby hat.
The Feels Like Butta yarn colors for my PomPom Baby Hat are as follows:
Col A: pink
Col B: gray
Col C: white
Brim
Cast on using Col A
Rows 1 and 2: Col A
Rows 3 and 4: Col B
Rows 5 and 6: Col C
Rows 7 and 8: Col A
Rows 9 and 10: Col C
The rest of the hat is knit in Col B.
You don’t need to follow my color scheme and can choose the color stripes that you like. If you have forgotten how to switch colors as you go, please refer to yesterday’s post.
I used gray for the main part of the hat, because that was the color of yarn I had the largest amount left after the blanket was completed. Now, if you have never done 1×1 Rib Stitch before (that’s the stitch used for the brim) I suggest you watch this video to get you on the right track.
Once you’ve completed the brim, you’re ready to move onto the main part of the hat. Switch to Color B, and begin to work the simple broken rib pattern that is a 8 row repeat found in the BODY OF HAT section. Don’t forget to knit 3 rows of Stockinette Stitch in between the two rib sections! If you don’t know what Stockinette Stitch is, it’s the pattern that is created by knitting on the right side and purling on the wrong side of your work. This is explained fully in the pattern. Continue repeating the same 8 rows until the desired length is achieved. The last row of the hat is K2togs. If you have forgotten this decrease stitch return to yesterday’s post for a video tutorial.
When you are ready to finish the top of your hat you will cut your yarn leaving a 6” strand of yarn. Pass this tail through the eye of your yarn needle then slowly pass the needle through each remaining stitch on your knitting needle dropping the stitches off as you go. Pull tight to close the top of the hat (See photos below).
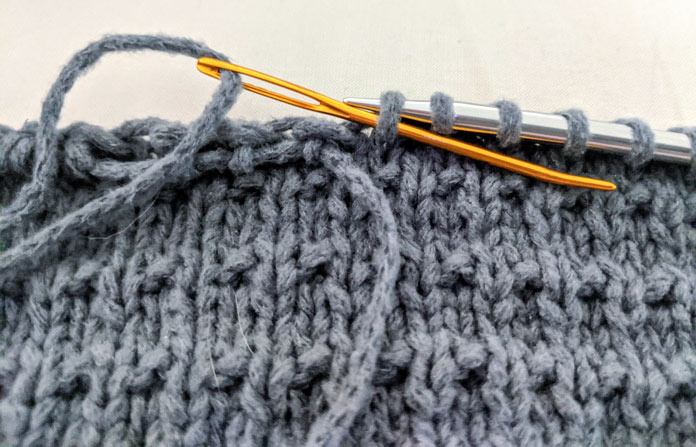
Closing the top of the hat Step 1: Pass yarn needle through remaining stitches as you drop them off the knitting needle.

Closing top Step 2: Tighten the yarn to close the top
The next step is to sew up the side of the hat. I used the 6” tail of gray yarn to sew up the side of the hat until I got to the brim. You’ll need to use a mattress stitch to sew up the body of the hat. Here is a great video to show you how:
Mattress Stitch Video1: https://youtu.be/46IUyefCkXA
If you’re having trouble seeing how to do the mattress stitch here’s a video by Very Pink that is slow motion:
Mattress Stitch Video2: https://youtu.be/wQnAfTmI0iA
Once you get to the rib section you’ll need to sew together the sides. It really doesn’t matter what color of yarn you use, because it will disappear into your seam as you work. Here is a good video to show you how to stitch up the seam of the brim:
Sewing Together Rib stitches video: https://youtu.be/FkNP0gH2WAU
Sewing (also called “weaving”) in the ends is easy if you follow along with these quick video tutorials:
Weaving in Ends in Ribbing video: https://youtu.be/ohtv2fyd_lY
Weaving in Ends in Stockinette video: https://youtu.be/v-p4qsiyuI8

All our hat needs now is a pompom!

Pompoms are easy to make with these Clover PomPom Makers!
Pompom makers are one of my essential knitting tools. From the Clover PomPom Maker Set.
I used the second largest to make my pompom. I alternated rows of pink and white yarn to make my sweet puff! With the strands of yarn left over from tying the pompom together at the center, I attached it to the top of the hat by tying the ends around the top stitches with a knot on the inside of the hat then weaving in the ends. The bonus of a pompom is that it covers the small hole left when you close the top of the hat off. And it’s CUTE!
Here’s a very helpful video tutorial that shows how to use these pompom makers:
Pompom maker video: https://youtu.be/W7tb_9YKoMU
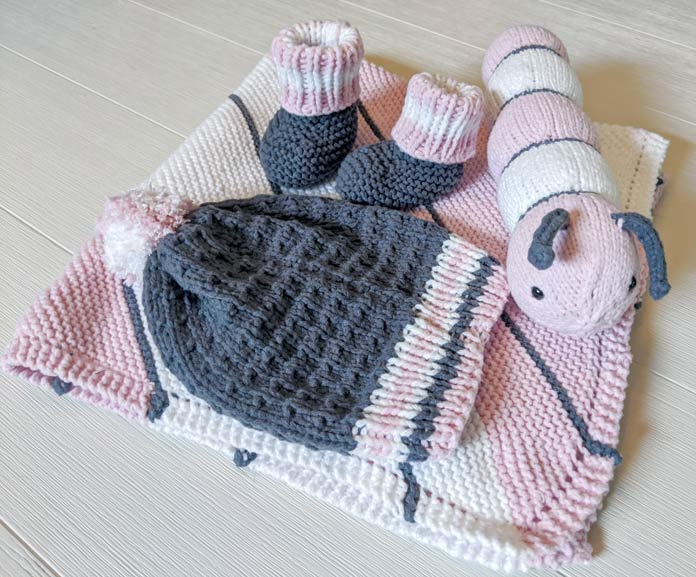
Hat and blanket completed! Booties and caterpillar stuffed toy to go. YOU CAN DO IT!!!
Ét Voilà! You now finished the hat! Tomorrow we’ll move onto the Booties which look complicated, but are actually knit flat with a few well-placed decreases to shape the toe. Easy!!!
Friday will be the final push to move you from beginner to advanced beginner or even, dare I say, intermediate level knitting with tutorials on knitting in the round and I cord.
This is part 3 of 5 in this series
Go back to part 2: The Beginner Knitter Skills Builder – Step 1: I Wanna Knit a Blanket
Go to part 4: The Beginner Knitter Skills Builder – Step 3: Baby Booties
2 comments
It says that the Pom Pom hat is a free pattern. Where is the link for the free pattern? It’s not in the magazine either…
Hi Linda. The link to the free pattern is in the first paragraph…click on “Pom Pom Baby Hat”. I’ve copied the link here: https://cdn.accentuate.io/4679696285789/12378270040157/l90215a-v1589358888930.pdf