
Linen has one of the oldest histories of any textile fiber. Lightweight, breathable, and stronger when wet than when dry, it has been used for clothing for thousands of years. Today, it’s also one of the most rewarding summer knitting fibers you can choose. This guide brings together five posts into one complete resource: a full yarn review, a practical guide to swatching linen correctly, and three free patterns for a beach cover-up, a triangle bandana, and a classic summer t-shirt.
All three projects use a linen and flax fingering-weight yarn in a variety of colorways. The cover-up and t-shirt use two strands held together on larger needles. The bandana uses a single strand. Each project suits warm weather wear and cleans easily in the washing machine.

These colors remind me of lawn chairs, cabana tents, and awnings, all reminiscent of summer.
Part 1: The Yarn
This yarn is spun from flax, the plant fiber that produces linen. Although it’s listed as a lace weight, it actually falls into the fingering weight category in practice. The recommended gauge is 28 sts and 36 rows per 4″ [10cm] on a US 2 [2.75mm] needle for a single strand, though many of the projects in this series use two strands together on a US 4 [3.5mm] needle for a completely different result.
What the yarn feels like before and after washing
Fresh from the skein, this yarn is crisp and a little stiff. First-time linen knitters sometimes set it down at this point, thinking it will be uncomfortable to wear. That’s a mistake. After going through the washing machine on a warm casual cycle and a medium tumble dry, the fabric transforms completely. The stiffness leaves and the yarn becomes soft, drapey, and beautifully smooth against the skin.
The yarn also has a natural sheen. This makes it look polished in any stitch, even a simple knit stitch. It also means that colorwork, lace, and textured patterns show up with exceptional clarity once the finished piece has been laundered.
Yarn specifications
- fiber: 100% flax linen
- lace weight, but knits as fingering
- ball size: approximately 1.75oz [50g]
- recommended needle for single strand: US 2 [2.75mm]
- recommended needle for 2 strands: US 4 [3.5mm]
- care: machine wash warm, tumble dry medium
A note on needle type
Linen has no elasticity at all. This is true of most plant-based fibers. As a result, the needle type matters more than it does with wool. Using a pattern designed for a different fiber type on a very tight gauge makes knitting uncomfortable. Instead, choose a pattern designed for linen, or swatch at a looser gauge and calculate your stitch count from there. The process below explains exactly how to do this.
Part 2: Swatching and Gauge for Linen
Swatching linen requires one extra step that swatching wool does not: laundering. Before measuring gauge, always wash and dry the swatch exactly as you plan to launder the finished garment. Linen behaves very differently after washing, and a dry gauge measurement gives you inaccurate information.
The tight swatch test
Here is what happens when you skip the relaxed knitting step. Knitting tightly with a US 2 [2.75mm] needle in an attempt to hit 28 sts over 4″ [10cm] is genuinely uncomfortable. After laundering that tightly knit swatch, the gauge actually measures 30 sts and 40 rows over 4″ [10cm], narrower than the target. The stitches close up as the fiber relaxes, replacing the air space between them with softened yarn. That tight, uncomfortable knitting session produced worse results than simply knitting at a relaxed pace.
How to swatch correctly for linen
- Knit at a comfortable tension without forcing gauge.
- Cast on at least 30 stitches and work at least 4″ [10cm] in length to get a reliable measurement.
- Wash the swatch on a warm casual cycle inside a mesh lingerie bag or pillowcase.
- Tumble dry on medium. Do not block. Just dry the swatch the same way you will launder the finished item.
- Lay the swatch flat. Do not stretch it. Measure the stitch count and row count over 4″ [10cm].
- Use this laundered gauge to calculate your stitch count for the pattern.
TIP When splitting a wound cake of yarn to work two strands together, divide the cake into two equal halves and draw one strand from each half. This is much easier than drawing both strands from the same ball and prevents tangles.
Also useful: a round cookie tin or a similar lidded container works perfectly for keeping one or two yarn cakes in place while knitting from both ends. Place the cakes inside, feed the yarn ends through a small hole in the lid or through the crack at the edge, and close. The cakes stay put while you work, and the lid keeps everything tidy when you pack up.
Two-strand gauge results after laundering
- 2 strands on US 4 [3.5mm] needle in stockinette: 22 sts and 28.5 rows per 4″ [10cm]
- 2 strands on US 4 [3.5mm] needle in open mesh: approximately 19 to 20 sts per 4″ [10cm]
- Gauge changes between stitch patterns: measure each pattern section separately

Multiple pattern techniques with 2 strands held together produced some interesting results and different gauges.
Part 3: Free Pattern: The Mesh Cover-Up
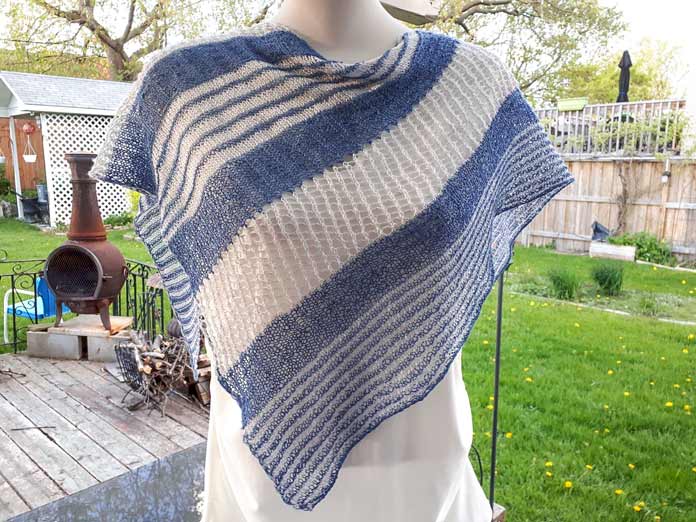
The cover-up uses two strands held together and three alternating stitch sections: a basket weave texture, a ribbed lace, and an open mesh. Working these sections in alternating colors creates a striped look that suits beach and city wear equally. The finished cover-up measures approximately 28″ long and 42″ wide after laundering, without blocking.
Note: open mesh lace elongates with wear and after washing. The cover-up will be slightly shorter before laundering. Trust your swatch calculation and launder before deciding whether to add length.
materials
yarn
- 2 skeins of fingering-weight linen yarn: 1 skein in color A (a warm or saturated solid), 1 skein in color B (a lighter or neutral solid)
needles and notions
- US 4 [3.5mm] circular needle, 32″ [80cm] long
- tapestry needle
Gauge (after laundering)
- stockinette with 2 strands: 22 sts per 4″ [10cm]
- open mesh with 2 strands: approximately 19 to 20 sts per 4″ [10cm]
Stitch count calculation
The cover-up is sized to approximately 42″ [106.7cm] wide (finished). Using a gauge of 19 sts per 4″ [10cm] for an open mesh section: 21.25″ (half the finished width) divided by 4″ multiplied by 19 = approximately 101 stitches. Round to the nearest multiple of 4 plus 2 stitches. Cast on 102 stitches.
Pattern
Cast on 102 stitches using one strand of each color A and B held together.
Texture Section: 2 strands of colors A and B held together
Row 1: *K2, p2, repeat from * to last 2 sts, k2.
Row 2: *P2, k2, repeat from * to last 2 sts, p2.
Row 3: K1, p1, *k2, p2, repeat from * to last 4 sts, k2, p1, k1.
Row 4: P1, k1, *p2, k2, repeat from * to last 4 sts, p2, k1, p1.
Repeat Rows 1 to 4 four more times. 20 rows total.
Ribbed Lace Section: 2 strands of color A
Row 1: K2, *yo, p2tog, k2, repeat from *.
Row 2: *P2, k2, repeat from * to last 2 sts, p2.
Row 3: K2, *p2tog, yo, k2, repeat from *.
Row 4: Same as Row 2.
Repeat Rows 1 to 4 three more times, then repeat Rows 1 and 2. 18 rows total.
Open Mesh Section: 2 strands of color B
Row 1: K2, yo, *k2tog, yo, repeat from * to last 2 sts, k2. (103 sts)
Row 2: Purl.
Row 3: K2, *yo, k2tog, repeat from * to last st, k1.
Row 4: Purl.
Repeat Rows 1 to 4 three more times, then repeat Rows 1 and 2. 18 rows total.
Note: At the end of the open mesh section you will have 1 extra stitch. On the first row of the next texture section, work k2tog once to return to the original stitch count.
Repeat the three sections (Texture, Ribbed Lace, Open Mesh) in sequence until the cover-up reaches your desired length, varying the color assignments as you choose. Each section measures approximately 2.25″ [5.7cm]. Seam the sides and shoulders, leaving appropriate openings for the armholes and neckline.

The knitted version of the Mesh-Up Tee softly blowing in the breeze – the perfect cover up for the beach
Part 4: Free Pattern: The Triangle Bandana
The bandana is triangular, worked from the narrow tip to the wide lower edge. It uses three stitch sections in two colors, each worked from a single strand of yarn. The two colors are carried up one side edge throughout, so only two ends need to be sewn in at the very start and finish of the piece.
Finished measurements: approximately 40″ [101.6cm] wide by 20″ [50.8cm] deep before blocking.
materials
yarn
- 2 skeins of fingering-weight linen yarn: 1 in color A (a medium or saturated tone), 1 in color B (a lighter or neutral tone)
needles and notions
- US 3 [3.25mm] circular needle, 32″ [80cm] long
- tapestry needle
Gauge
Gauge is not critical for this project. The bandana is decorative and the size is easily adjusted by adding or removing pattern repeats.
Pattern
With color A, cast on 3 stitches.
Set-up rows
Row 1: With one strand of each color held together, k1. Drop color B. Kfb, k1. (4 sts)
Row 2: P1, k2, then pick up both colors and p1. (Pick up both strands on every wrong-side row end to carry color B up the edge.)
Striped Weave Section
Row 3: Color B. S1 with both strands in back, k to last 2 sts, k1, m1, k1. (5 sts)
Row 4: Purl to last st, pick up both colors and p1.
Row 5: Color A. S1 with both strands in back, k to last st, m1, k1. (6 sts)
Row 6: P2, k to last st, pick up both colors and p1.
Repeat Rows 3 to 6 seventeen more times. (40 sts)
Waffle Weave Section
Row 1: Color A. S1 with both strands in back, k to last st, m1, k1. (41 sts)
Row 2: Purl to last st, pick up both colors and p1.
Row 3: S1, k2, *p2, k2, repeat from * to last 2 sts, p1, m1, k1. (42 sts)
Row 4: P2, work sts as they appear to last st, pick up both colors and p1.
Row 5: S1, k to last st, m1, k1. (43 sts)
Row 6: Same as Row 2.
Row 7: S1, *k2, p2, repeat from * to last 2 sts, k1, m1, k1. (44 sts)
Row 8: Same as Row 4.
Repeat Rows 1 to 8 once more, then repeat Row 1. (49 sts)
Row 18: P2, k to last st, pick up both colors and p1.
Open Mesh Section
Row 1: S1, k1, *yo, k2tog, repeat from * to last st, yo, k1. (50 sts)
Row 2: P1, p1tbl, p to last st, pick up both colors and p1.
Row 3: S1, k1, *yo, k2tog, repeat from * to last 2 sts, yo, k2. (51 sts)
Row 4: P to last st, pick up both colors and p1.
Repeat Rows 1 to 4 four more times, then repeat Rows 1 and 2. (60 sts)
Continue in sequence, repeating the Waffle Weave and Open Mesh sections and then the Wider Striped Weave section (where increases happen on every row rather than every other row) to build the full width. Cast off loosely with color A when the bandana reaches the desired width. Sew in the two ends at the start and finish.
A soft and lacy bandana to tie around your neck, drape over your shoulders, or tie back your hair.
Part 5: Free Pattern: The Summer T-Shirt
The summer t-shirt uses two strands of linen yarn on a US 4 [3.5mm] needle and features a ribbed lower band and stockinette body. The pattern is sized for multiple bust measurements. The finished t-shirt works as casual daywear and also suits warm summer evenings.
Note on gauge and ease: after laundering, check the finished width against your target measurement. Linen does not have the recovery of wool. If the t-shirt comes out wider than expected, launder it again and allow it to finish drying while slightly damp and laid flat. This lets you gently ease it closer to the intended size without the full heat of the dryer.
materials
yarn
- 3 to 4 skeins of fingering-weight linen yarn, 2 strands held together throughout
- color shown: a soft mint green, used doubled throughout
needles and notions
- US 4 [3.5mm] circular needle, 32″ [80cm] or longer
- US 2.5 [3.0mm] needle for the 1×1 rib band (a smaller needle keeps the rib from being too loose)
- tapestry needle
- stitch markers
Gauge (after laundering, 2 strands held together)
- stockinette: 22 sts x 28.5 rows per 4″ [10cm]
Stitch count and sizing
The pattern this t-shirt is based on is written for 24 sts per 4″ [10cm]. At a gauge of 22 sts per 4″ [10cm], knitting the smallest size in the original pattern produces a fit equivalent to one size up. Calculate your stitch count using your actual laundered gauge, or use the original smaller size and accept 2″ [5.1cm] of additional ease.
Construction notes
The t-shirt works in two flat pieces: a front and a back. Both pieces begin with a 1×1 rib band worked on the smaller needle. After the band, switch to the larger needle for the stockinette body.
Work the ribbed band: cast on a multiple of 2 stitches. Row 1: k1, p1 across. Repeat Row 1 for all rows of the rib section. The band is typically 1″ to 1.5″ [2.5 to 3.8cm] deep.
After the rib, switch to the larger needle and work in stockinette until the body reaches the armhole shaping. Shape the armhole with a simple bind-off at each side, then continue straight to the shoulder. Work short-row or bind-off shoulder shaping, then seam the shoulders. Pick up stitches along the armhole edges and work short sleeves or leave sleeveless. Seam the sides, leaving the ribbed band open for the hemline.
Four key tips for knitting linen garments
Tip 1: Start with a non-fitted project. A bandana, scarf, or shawl teaches you how linen behaves on the needles without the pressure of achieving a precise size.
Tip 2: Choose a pattern designed for linen. The gauge will reflect how the fiber actually knits rather than how wool or cotton would behave. Swapping linen into a wool pattern without adjusting tension creates problems.
Tip 3: Swatch every stitch pattern, not just stockinette. Rib, lace, and open mesh all produce different gauges even with the same needle and yarn. Measure each section after laundering.
Tip 4: Knit at a relaxed tension. Linen does not reward tight knitting. A looser, more comfortable tension yields a better gauge than straining to meet stitch counts. The fiber softens and closes up after washing anyway. So ease up and enjoy the process.
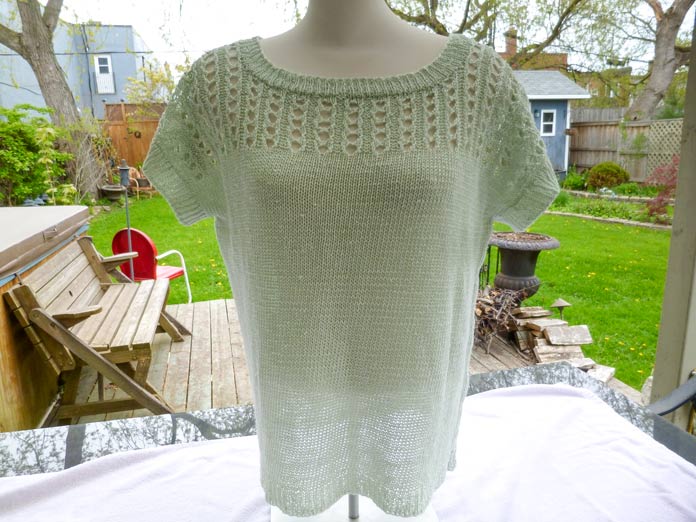
My Blissful Tee made with 2 strands of Fibra Natura Flax Lace in Lily Pad
Final Thoughts
Linen is a seasonal pleasure. It softens with every wash, improves with wear, and looks better the more it is used. The three projects in this series suit the beach, the garden, a summer dinner, and anywhere in between. Together, they make a complete warm-weather set knitted from just a few skeins of yarn in complementary colors.
Do the swatch homework first. Launder it correctly. Then relax, trust your calculations, and enjoy one of knitting’s most rewarding fibers.
