
Every once in a while a yarn comes along that changes how you think about a fiber. Soft, silky, machine washable polyester in a chain construction is one of those surprises. It does not feel like acrylic from a decade ago. Instead, it is squishy, buttery soft, and produces stitch definition that rivals natural fibers. In this post, I’m going over four free beginner patterns, each one building on the skills learned in the last. By the end, you’ll have completed a full baby gift set and gained a solid foundation in flat knitting, circular knitting, seaming, color changes, and I-cord.

Blanket is finished! Hat, Booties, and Caterpillar to go!
Part 1: The Yarn
Choose a silky and squishy polyester yarn for baby knits. Even simple garter stitch takes on a richness and crispness that looks almost textured, as if a pattern stitch is at work when it is simply knit every row.
Why polyester works for baby knits
Many knitters who prefer natural fibers still choose polyester for baby projects. The reason is practical. Baby clothing and blankets get washed constantly. Polyester handles repeated machine washing and tumble drying without felting, shrinking, or losing its softness. It’s also cost effective, which makes it possible to complete larger projects like blankets without significant expense. For all of these reasons, a high-quality soft polyester is an excellent choice for anyone knitting a baby gift.
Yarn specifications
- weight: bulky (weight 5)
- fiber: 100% polyester in a chain or i-cord construction
- ball size: 3.5oz [100g] per ball
- yardage: 218 yds [199m] per ball
- recommended needle: US 8 [5mm]
- gauge: 14 sts x 20 rows per 4″ [10cm] in stockinette
- care: machine wash and tumble dry

Ready to work a little more magic with this super soft Feels Like Butta yarn by Lion Brand?
Part 2: The Baby Blanket
The blanket is the ideal first project in this set. It teaches the four core knitting skills that everything else builds on: the yarn over (YO) increase, the knit 2 together (K2tog) decrease, color changes, and weaving in ends. Despite using these techniques, the overall pattern is straightforward and meditative to work.
Yarn over increases and K2tog decreases
A yarn over is simply bringing the yarn to the front of the work between two needles, then knitting the next stitch as usual. The loop left on the needle forms a new stitch and a small decorative eyelet. Combined with a K2tog decrease on the same row, the stitch count stays even and a lace-like pattern builds up over time.
To work K2tog, insert the right-hand needle tip through two stitches at once from left to right, and knit them together as one stitch. This leans the decrease to the right and is the most common decrease in knitting.
Color changes
Changing color mid-row or at the end of a row is straightforward. At the point of the color change, drop the old color, pick up the new one, and continue knitting. For this blanket, the colors change at the end of rows rather than in the middle, which is the simplest version of this technique.
Do not cut the yarn at every color change unless the pattern asks you to. Instead, carry the unused color loosely up the side of the work. Every two rows or so, twist the two yarns around each other at the edge to prevent long loops from forming. This keeps the side edges tidy and reduces the number of ends to weave in at the finish.
materials
yarn
- soft polyester chain-construction yarn, bulky weight (5): 3 to 4 balls in coordinating colors
- colors used in original: pink, white, and grey
needles and notions
- US 8 [5mm] straight or circular needles
- tapestry needle for weaving in ends
- scissors
finishing
Block the finished blanket by soaking it briefly in cool water, pressing out the excess moisture gently in a towel, and laying it flat to dry. Blocking evens out any tension inconsistencies and gives the edges a clean, professional finish.

Almost done…just a few ends to weave in!
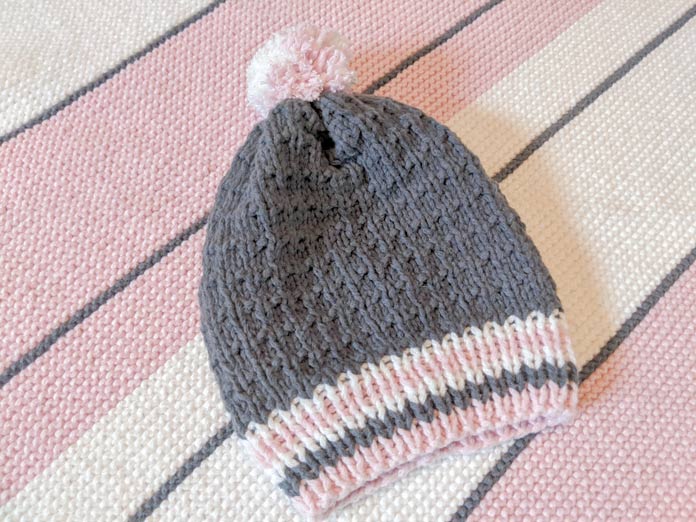
Part 3: The Pompom Baby Hat
The hat builds on the blanket skills and adds three new ones: 1×1 rib, seaming, and making a pompom. It knits flat as a rectangle, then seams up the back. A pompom sits at the top for a playful finish that babies and parents both love.
1×1 rib
Rib stitch alternates knit and purl stitches across the row. For 1×1 rib, the pattern is knit one, purl one, repeated to the end. On return rows, knit the knit stitches and purl the purl stitches as they face you. Rib is stretchy and lies flat without curling, which makes it ideal for hat brims and cuffs.
When working in rib, it is important to move the yarn correctly between knit and purl stitches. Before a knit stitch, the yarn sits at the back of the work. Before a purl stitch, bring the yarn forward between the needle tips. Keep this movement smooth and consistent to avoid accidental yarn overs.
Seaming the hat
Once the hat rectangle is complete, fold it in half with right sides together and seam the short edge using a mattress stitch or a simple whip stitch with a tapestry needle. Turn the hat right side out and fold up the brim. The seam sits at the center back.
Making a pompom
Wind yarn around two fingers (or a cardboard template) approximately 50 to 80 times, depending on how dense you want the pompom. Slide the bundle off, tie a length of yarn tightly around the center, and cut through both loops on each side. Fluff the pompom and trim any uneven ends into a round shape. Tie the pompom securely to the top of the hat using the tail from the center tie.
A pompom maker tool speeds up this process and produces a more even result. However, fingers and cardboard work just as well for a first attempt.
materials
yarn
- soft polyester chain-construction yarn, bulky weight (5): 1 ball
- small amount of a second color for the pompom, if desired
needles and notions
- US 8 [5mm] straight needles
- tapestry needle
- pompom maker or cardboard template
The PomPom Baby Hat is a free download, then we can get knitting together!
Part 4: Baby Booties
The booties look complicated. They are not. The pattern knits flat, using a series of well-placed increases and decreases to shape the toe and sides. Two new techniques appear here: the Make One (M1) increase and carrying yarn up the edge for stripe color changes.
The Make One (M1) increase
The M1 is a nearly invisible increase. To work it, insert the left-hand needle tip from front to back under the strand of yarn running between the last stitch worked and the next stitch on the left-hand needle. This lifts a small loop onto the left needle. Knit through the back loop of that lifted strand to twist it and prevent a hole from forming. The result is one new stitch with no gap or eyelet.
Two versions exist: M1L (lean left) and M1R (lean right). For most bootie patterns the direction is specified. Follow the pattern notes exactly to keep the shaping symmetrical.
Carrying yarn for stripes
Booties often feature stripes for visual interest. Rather than cutting and rejoining yarn at every color change, carry the unused color up the side of the work. Every time you start a new section in the working color, twist the two yarns around each other once at the edge. This prevents long loops and keeps the inside of the bootie tidy.
Shaping and seaming
After completing the flat knitted piece, seam the sole and back using a tapestry needle. The decreases worked across the toe section pull the fabric into the correct shape when sewn. Take your time matching the stitches evenly, and the finished bootie will look like it was knitted in the round.
materials
yarn
- soft polyester chain-construction yarn, bulky weight (5): 1 ball in each of 2 coordinating colors
needles and notions
- US 8 [5mm] straight needles
- tapestry needle
- stitch markers

How cute are these!!! Are you ready to make baby booties?
Part 5: The Cuddly Caterpillar Stuffed Toy
The caterpillar is the most ambitious project in the set and the most rewarding. It introduces knitting in the round, which opens up a whole world of knitting possibilities. Two methods are covered here: double pointed needles (DPNs) and the magic loop technique. Both produce the same result. Choose whichever feels more comfortable.
Knitting in the round: double pointed needles (DPNs)
DPNs come in sets of four or five short needles. Cast the stitches onto three or four needles, distributing them evenly. Join to work in the round by knitting the first stitch of the first needle with the free needle. Always be careful not to twist the cast-on row when joining. Mark the beginning of the round with a locking stitch marker.
DPNs can feel awkward at first. The key is to focus only on the two needles actively in use and let the others hang. After a few rounds, the fabric stabilizes and the process becomes much smoother.
Knitting in the round: the magic loop method
The magic loop uses a single long circular needle (at least 32″ [81.3cm]) to knit a small circumference in the round. Divide the stitches evenly between the two cable tips, with the cable looping out to one side between the needle tips. Knit the stitches on one needle tip, pull the cable through, rotate the work, and knit the stitches on the second tip. Repeat this sequence to work in continuous rounds.
Magic loop suits knitters who already own long circular needles and prefer not to manage multiple short needles. Both methods produce identical fabric, so choose whichever tools you have.
I-cord
The caterpillar’s antennae and legs are made using I-cord, a knitted tube worked on two double-pointed needles or the tips of a circular needle. Cast on 3 to 4 stitches. Knit a row, then do not turn. Slide the stitches to the right end of the needle and pull the working yarn firmly across the back, then knit the row again. Repeat this sliding and knitting until the cord reaches the desired length. Cast off and the yarn at the back forms a seamless tube.
Stuffing and assembly
Each body segment of the caterpillar is a small sphere knitted in the round with increases, then decreases to shape it. Stuff each segment firmly with polyester fiberfill before closing the final stitches. The softness of this yarn makes the finished toy satisfying to squeeze, which is ideal for small hands.
Join the segments using a tapestry needle and a length of yarn. Attach the I-cord legs and antennae at the correct placement points as specified in the pattern. Add eyes using safety eyes or embroidery, depending on the baby’s age. For very young babies, always use embroidered features rather than safety eyes, as any attached component poses a potential safety risk.
materials
yarn
- soft polyester chain-construction yarn, bulky weight (5): 2 balls in assorted colors
needles and notions
- US 8 [5mm] double pointed needles OR US 8 [5mm] circular needle at least 32″ long for magic loop
- tapestry needle
- polyester fiberfill stuffing
- stitch markers
- embroidery thread or safety eyes (use embroidery only for babies under 3 years)

Add the antenna by sewing them on the top of the head about 5 rows apart. SO CUTE!!!
Final Thoughts
This series proves that a single skein type can carry a beginner from their first cast-on to circular knitting in one week. Each project adds a new technique without feeling overwhelming. The blanket teaches color changes and basic increases. The hat introduces rib and seaming. The booties add the M1 increase and stripe carry. The caterpillar opens up knitting in the round and I-cord.
Soft polyester yarn is the perfect material for this journey. It’s forgiving on the needles, easy to frog and rework when mistakes happen, and produces a finished fabric that delights anyone who receives it. Completing all four pieces gives you a beautiful gift set and a confident new skill set to carry into your next project.

Learn how to make a pair of simple and sweet Baby Booties using the uber soft Lion Brand Feels Like Butta yarn (free pattern and knitting instructions)