
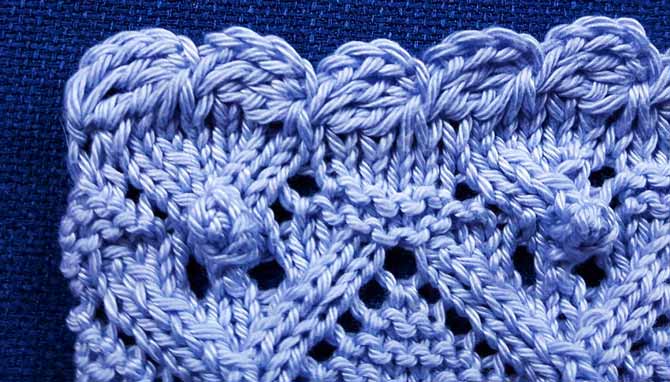
Today we’ll continue looking at how Radiant Cotton yarn by Fibra Natura is ideal for knitting textured stitch patterns, and especially for this scalloped cast-on edge.

Radiant Cotton makes the bobbles, lace, and scalloped edging pop on this swatch.
Yesterday we saw how this lovely cotton yarn works up in a lace pattern. Today I’m delving into a little more texture.
First, the scalloped edging. Isn’t it fabulous?!

Top-down view of the crocheted scalloped edging! Adorable and worthy of this cotton yarn.
Now – I’m a patient man and a patient knitter, but when it comes to scalloped edgings, I’m not patient at all. I haven’t really ever found a knitted scallop edging that either a) didn’t look like bunting banners, or b) didn’t give me a headache. So I cross over into some of my other craft skills and turn to crochet. I know some of you are die-hard non-crocheters, but we’re not making a whole garment or afghan.
Trying a new activity and using new hand muscles and brain cells is important for some of us who get set in our ways. New skills are good for aging synapses, right? So I hope you’ll give it a try. If not,after we look in detail at the edging, I’ll talk about the other textures in this swatch, which are ALL knit.

It takes 4 simple steps to make the first double crochet stitch.
To make this scalloped edging, you need to know how to chain, how to yarn over, how to make a double-crochet stitch and a treble-crochet stitch. You begin by making 4 chains, then yarn over (1 in the photo above), then insert the hook in the first chain and pull up a loop (2 in the photo above). Yarn over and pull through first 2 loops on hook (3) and yarn over and pull through remaining 2 loops (4). That’s the double-crochet completed. The next stitch is a treble crochet (tc or tr). To make it, yarn over twice (5 in the photo below) and insert hook in same chain space as the dc, yarn over and pull up a loop (6). Yarn over and pull through 2 loops (7) and do that twice more to finish the treble-crochet (8).

The second stitch is a treble crochet in the same chain.
To make the next scallop, chain four again, and work both the double-crochet and the treble crochet under the 2 strands that are the front loop and the first vertical bar of the last treble-crochet you made.
To do a little planning for your knitting project, you need to know that you can get 4 knit stitches to each scallop of this crocheted border.

A strand of 6 scallops, ready to become a cast-on scalloped edging.
To pick up and knit stitches, start with the loop that was on your crochet hook and slip it onto your right needle. Then flip to the wrong side of the row of scallops where you’ll find…wait for it…purl bumps! Yes, on the back of each treble crochet stitch you can find 3 bumps. Each one is an insertion point to pick up and knit 3 of the 4 stitches that will be allotted to each scallop.

“Purl” bumps on the back of the scallops are highlighted to show where to pick up and knit stitches.
Then after you pick up 3, you flip the scallop back to the right side up and you can see the juncture between the scallops. This is where you pick up and knit the fourth stitch.

You pick up and knit every 4th stitch from the right-side under the highlighted strands on the scalloped edging
When you’ve picked up all the stitches across you’ll have a multiple of 4, plus 1. The first row is a purl or wrong-side row. In this row, you can increase or decrease the 1 or 2 stitches you may need to adjust to get the given stitch count for your pattern. For this bobble and lace swatch however, 25 sts was just what I needed.

4 stitches per scallop, plus 1 for the edge creates a balanced row ready for knitting.
This scalloped edging or cast-on (if you want to think of it that way) is great for blankets, and other items of home decor. You may like it on a shawl or scarf, too. It adds a marginal amount of weight, so to balance a finished item, like a blanket, I would crochet on a scallop border that looks exactly the same after I had bound off the last row. To do an added on edging, you simply join the crochet to the knit fabric with a slip stitch. Then you chain 4, double crochet in the same spot the chains come from, treble crochet in the same spot, too. Then you lean the scallop across the edge to equal a distance of 4 stitches and you slip stitch into the edge of the fabric and you’re ready to repeat from there.
Now, on to the bobbles and lace of this swatch. I saw a little baby bunting on Pinterest that was completely covered in bobbles and it struck a chord with me. Once I started knitting with Radiant Cotton, this stitch seemed like a perfect pairing to knit with this soft glistening cotton. Here’s the lace pattern I re-engineered from a very blurry photograph on Pinterest.

Symbol chart for this easy and charming bobble and lace stitch pattern.

Legend for chart symbols
Knowing that not all of you love knitting charts, I’ve added the text instructions below, too. This isn’t a complete pattern, but you can use this chart for any project that you like. Explanations for some of the abbreviations are given in the Stitch Glossary, below, but the trickiest bit is the bobble, so I’ll explain that separately.
Make bobble (MB): In next st, (k 1, yo, k1) all together, turn your work, leaving rem sts unworked, purl 3, turn, knit 3, turn, purl 3, turn, slip first st purlwise, knit 2 together, pass slipped stitch over the first st and then proceed to follow the rest of the row instructions. You can do it at any time, but popping the bobble out to the RS of the fabric is easiest right after you’ve made it.
Row 1: Knit.
Row 2 and all even rows: Purl.
Row 3: P2, [p1, yo, k1, ssk, k1, k2tog, k1, yo, p4] across to last 11 sts, p1, yo, k1, ssk, k1, k2tog, k1, yo, p3.
Row 5: P2, [p2, yo, k1, s1-k2tog-psso, k1, yo, p5] across to last 11 sts, p2, yo, k1, s1-k2tog-psso, k1, yo, p4.
Row 7: K1, rki, [ssk, k3, mb, k3, k2tog, k1, yo, rki] across to last 11 sts, ssk, k3, mb, k3, k2tog, yo, k1.
Row 9: P1, yo, [k1, ssk, k1, yo, s2tog-k1-p2sso, yo, k1, k2tog, k1, yo, p1, yo] across to last 11 sts, k1, ssk, k1, yo, s2tog-k1-p2sso, yo, k1, k2tog, k1, yo, p1.
Row 11: P2, [yo, k1, ssk, k3, k2tog, k1, yo, p3] across to last 11 sts, yo, k1, ssk, k3, k2tog, k1, yo, p2.
Row 13: P2, [p1, yo, k1, ssk, k1, k2tog, k1, yo, p4] across to last 11 sts, p1, yo, k1, ssk, k1, k2tog, k1, yo, p3.
Row 14: Purl
Repeat Rows 5-14 for pattern.
Stitch Glossary
k2tog: Knit 2 stitches together.
rki: Lift the stitch 1 row below the next stitch onto the left needle and knit this stitch.
mb: (K, yo, k) in 1, turn work, p3, turn, k3, turn, p3, turn, s1-k2tog-psso.
ssk: Slip 2 stitches knitwise, then knit slipped stitches together.
s1-k2tog-psso: Slip one stitch knitwise, then knit 2 stitches together and pass the slipped stitch over.
s2tog-k1-p2sso: Slip 2 stitches together knitwise, knit 1, then pass slipped stitches over.
Try something new! Use this scalloped edging on one of your upcoming projects!
I hope you’ve enjoyed today’s post. Tomorrow is our last day with Radiant Cotton, and once again, I’m combining lace and knitting — this time, for children.
This is part 4 of 5 in this series.
Go back to part 3: Knitting delicate lace in a summer stole with cotton yarn
Go to part 5: Crossing stitches is easier than knitting cables
[shareaholic app=”follow_buttons” id=”23784471″]
2 comments
I love the beautiful effect created by this yarn. I think I need this!
I like how you explain it well