
This series of posts has been about Aunt Lydia Classic 10 crochet thread. Red Heart also makes Aunt Lydia’s Metallic 10 crochet thread that comes in 5 colors: white with a pearl metallic thread, white with a silver thread, silver with a silver strand, natural with a gold metallic strand, and gold with a gold metallic strand. The makeup of the metallic yarn is 85% cotton and 15% metallic.
Each ball of the metallic yarn has 100yds [91m]. Now that you know more about the metallic version, the remainder of this post will be dedicated to the Horseshoe Lace Bridal Bolero.
Yesterday I divulged the secret to blocking lacework knit up with this crochet thread. Today, we’ll use that knowledge for blocking the bolero.

This ball of Aunt Lydia’s Metallic crochet thread has a silver thread wrapped around the pearly gray thread.
Horseshoe Wedding Bolero
Finished measurements Small: 36″ [91.5cm] Medium/Large 42″ [107cm] Instructions for larger size are given in ( ) brackets.
materials
- 5 (6) balls Aunt Lydia Metallic 10 crochet thread, 100yds [91m] per ball
- US 3 [3.25mm] circular needle or size needed to obtain gauge
- stitch markers (optional, but recommended)
- row counter (optional)
- decorative button or snap fastener (optional)
gauge
23 sts to 4″ [10cm] after blocking / 1¾” [4.4cm] per pattern repeat
Take time to sample and get gauge!
abbreviations
pm – place marker
sk2p – slip 1 st to right needle, knit next 2 sts together, pass slipped stitch over
slm – slip marker
Note: The bolero is knitted from the top down. Model is knitted in size Medium/ Large.
Instructions
Beginning at the neck edge, cast on 171 (207) sts
Rows 1-8: *k1, p1; rep from * to last st, k1
Row 9 (inc row): (K1, p1) 4 times, k2; (k5, m1, k4) 3 (4) times, (yo, k1) twice, (k5, m1, k4) 2 (2) times, (yo, k1) twice, (k5, m1, k4) 6 (8) times, (yo, k1) twice, (k5, m1, k4) 2 (2) times, (yo, k1) twice, (k5, m1, k4) 3 (4, 5) times, (K1, p1) 4 times, k1. (185, (235) sts) If desired, place markers around the k st between each yo pair to mark the raglan shaping and place a marker after the 9th and before the 9th last st to mark the front edge sts.
Row 2 and all even numbered (WS) rows: (K1, p1) 4 times, k1, p to last 9 sts, (k1, p1) 4 times, k1.
Notes for Chart A:
1. Chart A shows right side rows only. Remember to work Row 2 in between each row of chart.
2. The first and last 9 sts of each row are for the front borders.
3. The area between the black vertical lines show the pattern repeat for each body part. The green stitch is also part of the body section. It is outside the repeat because it is only worked once at the beginning of each front, sleeve, and back. Its purpose is to center the pattern in each garment piece. Repeat the stitches between the black vertical lines as many times as needed for the fronts, sleeves and back, until reaching the raglan shaping section
4. The raglan shaping is incorporated in the chart (sts 21-41). It has been charted so that the yo, k1, yo of the raglan shaping lines up on the chart. The dark grey squares are “no stitch.” and the number of stitches vary. As the raglan shaping increases, additional stitches are created in this area and are worked to flow in with pattern of the body pieces.
5. Work Chart A as follows: work sts 1 through 9, *work the green stitch, repeat sts 11-20 as many times as required for the body part, work the raglan shaping (sts 21-41); repeat from * for the sleeve, the back, and the other sleeve, work the next green stitch, repeat sts 43-52 as many times as needed for the remaining front, then work the last 9 sts of the row.

This is the chart for the raglan shaping for the bolero. Follow the notes for the chart very carefully!

The key for both Charts A and B
Work all 19 rows of Chart A (both sizes), paying close attention to the notes. (339 (379) sts)
Work a WS row (row 2, above)
Divide for sleeves and body: Work border sts, slm, then work 5 (6) repeats of Row 4 of Chart B. Check – the last st on right needle should be the center st of the raglan shaping.
Put next 49 (59) sts onto holder. Turn work, cast on 9 sts, turn work, knit 10 (12) repeats from Chart B. Check – the last st on right needle should be the center st of the raglan shaping. Put next 49 (59) sts onto holder. Turn work, cast on 9 sts, turn work, work 5 (6) repeats of Chart B, slm, work border sts. (249 (279) sts) on body.
WS Body row: (work between every row of the chart): (k1, p1) 4 times, k1, slm, p to marker, slm, (k1, p1) 4 times, k1.
Keeping border sts on the first and last 9 sts, as established, work 5 (6, 7) row repeats of Chart B, or to desired length. Work a WS Body row. (RS facing for next row).
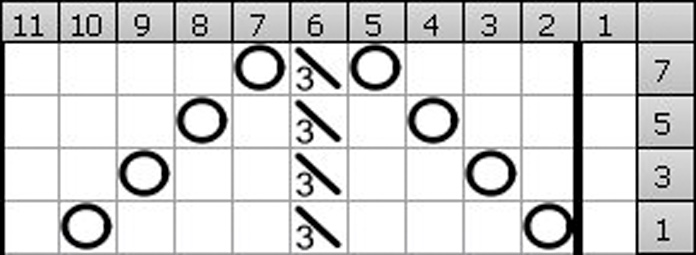
Chart B – much simpler than Chart A! Remember to work the border stitches for the body, and repeat from the bold vertical line on the right to the not-so-bold vertical line at the left of the chart.
Bottom border
Row 1: (k1, p1) to last st, k1. Repeat this row 8 more times, then cast off LOOSELY in pattern.
Sleeves
Sleeves are worked in the round using only the repeated sts 2 through 11 of Chart B.
Left Sleeve
Move sts from holder onto a circular needle. With RS facing, cast on 10 sts, and work Round 4 of Chart B to the last st, kfb in last st. Join to work in the round (70 (70) sts)
Round 2 and all even numbered rows: K around.
Beg with Row 1 of Chart B and omitting Column 1 of the chart, work 3 repeats (23 rounds). K 1 round.
Bottom border
Round 1: (k1, p1) around.
Round 2: (p1, k1) around.
Repeat Rounds 1 and 2 3 more times, then work Round 1. Cast off all sts LOOSELY in pattern.
Right Sleeve
Move sts from holder onto a circular needle. With RS facing, cast on 1 st and work Round 4 of Chart B to end of row, turn work and cast on 10 sts. Join to work in the round. (50 (60) sts)
Work the remainder of sleeve as given for left sleeve.
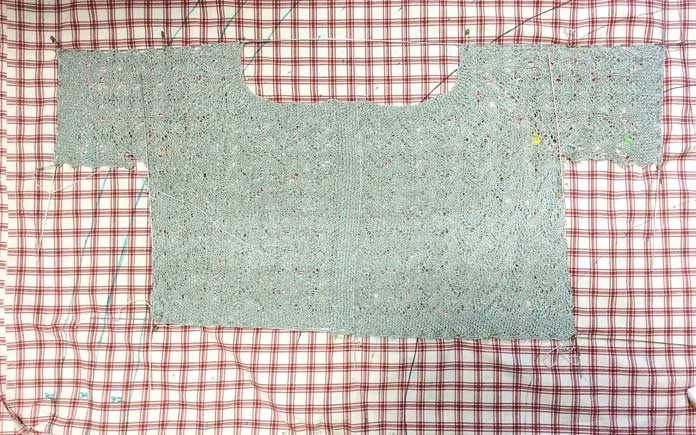
I used blocking wires to finish this piece. I ran wires across the shoulders, I “sewed” the blocking wires into the front band, across the bottom of the body and sleeves, and up the “side seams” then I pinned the underarm of the sleeves and the neckline with individual pins.
finishing
Block before weaving in ends or sewing the underarms closed. Block to 2″ [5cm] more than the finished bust measurement to allow for post-blocking take-up. Weave in ends and sew underarm seams. Apply a snap or frog fastener at the neckline.

The finished bolero. As you can see, the blocking was just a little less successful than I would have liked. Part of my issue is that one of the pins popped out on one side – I could re-block it when I have time. This is the Medium/ Large size on a size 12 dress form. An experienced knitter might want to make the raglan shaping a little deeper which would raise the neckline slightly and add more width to the sleeves and body pieces.
This is part 5 of 5 in this series.
Go back to part 4: Aunt Lydia’s lace knitting secret
[shareaholic app=”follow_buttons” id=”23784471″]