
Knitting with Italian DK weight superwash merino called Dona by Fibra Natura, this week has been a great experience. I love this wool. But to really test it’s worth, I tried it with fair isle knitting and made this swatch. And Dona didn’t disappoint.
While I was knitting this swatch I recalled and thought of and tried 8 strategies to make my fair isle knitting better. To be honest, some of the strategies came to mind after I had almost finished the swatch, as a result of trying to avoid further mistakes.

Fair isle swatch using Dona yarn by Fibra Natura
Technique
If you can, take a class in the technique that you don’t usually knit. If you’re a thrower (aka English-style knitter), take a picker (Continental style) class, and vice versa. When you can knit both ways, even if one isn’t your dominant approach, you can carry one or two colors in your dominant yarn feeding hand and one of the contrasting colors in your other hand and knit with both methods simultaneously. This makes for very even tension and small floats across the wrong side.
Bobbins
2 strategies have to do with bobbins. It’s important not to overload them so that they aren’t too heavy and drag down on your stitches. One reason for bobbins is to avoid the drag that happens when we knit fair isle directly from the skeins. The twisted disasters that usually plague the project a few inches below the working row are definitely mitigated by bobbins. If a bobbin is too heavy it’ll do the same thing to the stitches as twisted skeins do: it tightens them up too much.
The second reason to use bobbins is that they’re nifty devices to help keep those strands untwisted. At the end of every row, it’s a quick untangle and you are ready to go.
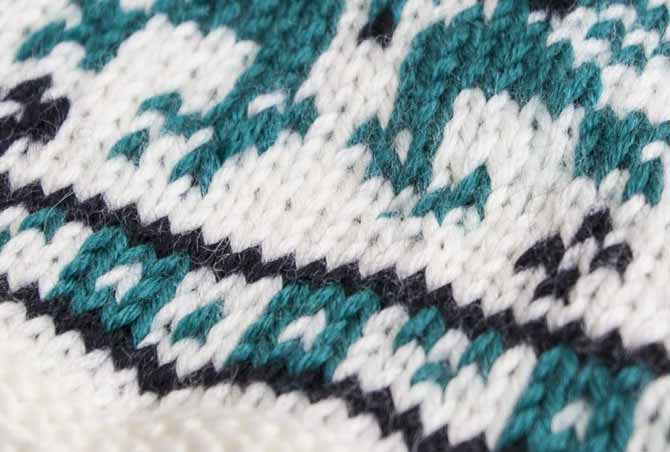
Close-up of tight stitch
This knit fair isle swatch is based on an item of Russian embroidery that I saw once. The colors of the embroidery were the traditional red, white, yellow and black of much of 19th century pieces and the theme of roosters and hens figures a lot in folks pieces. I had to change things up and use teal, however (it does happen to be a prevalent color in my yarn stash). I love how they took a nordic snowflake icon and modified with the roosters.
If you look at the cockscomb in the rooster to the right and compare it to its reflection, you’ll see that I have some extra tight stitches in teal that have disappeared into the knit fabric. Unfortunately, I was using a mixture of bobbins and some skeins and things got messy and tight and tangled and I didn’t notice what was happening until it was too late. I shouldn’t have avoided having a bobbin for every color.
Pre-knitting Preparation
Another strategy is to study your charts carefully. Make notes about how many places you’ll be joining in new bobbins of yarn. Ask yourself if you’ll be carrying a color across a whole row or if you’ll be adding a new bobbin for each motif or section that needs a flash of a contrast color. For this chart I had 2 bobbins of teal, 1 of white, and 3 of black. The third black one was used for the feet of the birds and the few “seeds” sprinkled in front of them. I used 1 of each teal to work the side border up to the center of the reflection, where I took up with another bobbin of teal.

Nordic Rooster fair isle chart
Keeping track of your stitches and rows
Having a row counter is an essential strategy for knitting fair isle successfully. There are apps with row counters and clickable ones for your knitting back, and going back to the basics with pen and paper is always good too.
A second way to keep track of your progress through a fair isle chart is to use a magnetic white board and magnetic strips. You place a copy of the chart on the white board and hold it down with magnetic strips that you move every time you finish a row. This can be done for under $20. For less, you can use whiteout tape or highlighters to draw a line through a completed row.
If any of you give this chart a try, I’d love to see a picture of what you knit.
materials
Using wool is the best choice of yarn for fair isle knitting. Traditionally, the yarn used was a fine yarn and the wool had some “tooth”, the term for the grippy texture that does involve an itch factor, but ensures that the colors bond to each other well. Knitting with superwash that’s tightly spun is often frustrating when it comes to stranded color work because the yarn loops slip away from each other and it’s difficult to get cohesive fabric. I found that the loft and lighter twist of Dona yarn, and especially its ‘springiness’, made it a great yarn for fair isle.
One thing is for sure, you don’t want to pull tight on the stitches knit with Dona yarn because of its springiness it gets quite thin when over-tightened. Cotton, silk, or acrylic yarn poses problems for fair isle knitting because there is no clinginess or little elasticity, both which contribute to uneven fair isle fabric.

3 color stranded-knitting swatch
The last strategy for successful fair isle knitting is one that is shared in common with all good knitting. We’ve got to block the fabric that is knit in fair isle (or stranded as it’s also known).
I think I’m going to take this motif and make a cute little sweater for a baby boy. One of those “be prepared” knitting projects, in case someone needs a gift. No, it’s not for my first grandchild…that’s an event that is still years away.