
This week I’m knitting with Lion Brand Two of Wands Color Theory yarn. This medium-weight acrylic yarn offers an array of colors that work together harmoniously and make for easy-care garments and accessories for the whole family.
Yesterday, I knitted swatches to measure my gauge and determine the needle size I’ll use on my projects this week. Today, I’m knitting a button-up cowl using Color Theory in Amethyst. I love wearing cowls in chilly weather, but I know some people who don’t like pulling a cowl over their head as it can mess with their hairdo. The benefit of a button-up cowl is that you don’t have to pull it over your head, but you can if you want to, and you can wear it in a variety of ways, making it versatile.

Lion Brand Color Theory in Amethyst is my color choice for this project.
When I tested my needle size for gauge yesterday, I stated how pleased I was with the fabric created by both the US 7 [4.5mm] and US 6 [4.0mm] needles. I decided to use the US 6 [4.0mm] needle for this project as I think the denser fabric is better for the cowl. So, I mapped out this project based on a gauge of 20sts = 4”.
The cowl is worked flat using a crochet cast-on, slipped stitch edges, and a crochet cast off which creates a continuous edge all around the cowl. The crochet cast-off also makes the button holes. Before we get started, I want to explain the process for a slipped stitch edge. I do this quite often when I want a finished edge, and until recently, I assumed everyone knew how to do it. You know what they say about assumptions. There’s more than one way to accomplish this, but here’s how I do it.
Slip the 1st stitch purl-wise on each row and knit the last stitch on each row. That means, when you start a new row, the yarn is in front. Slip the 1st stitch purl-wise, then take the yarn to the back between your needles, in other words to the left of the stitch on your right needle. If you take the yarn to the back on the right side of the stitch on your right needle, you end up with a bump instead of a lovely slipped stitch edge.
gauge: 20 sts = 4”
Gauge is not that important for this project, but it affects the overall finished size.
finished size
Approximately 21” x 10”
abbreviations
K – Knit
P – Purl
Sl – Slip the 1st stitch purl-wise
St(s) – stitch(es)
CH – Chain
materials
- 1 – 3.5oz [100g] ball of Lion Brand Color Theory in Amethyst
- US 6 [4.0mm] knitting needles
- 1 – US G-6 [4.0mm] crochet hook, or close in size
- 6 – buttons with a shank, I used 9/16” buttons
- tapestry needle or needle threader
Instructions
Using the crochet cast-on method, cast on 44 sts.
Border rows
Rows 1 and 2: Sl1, knit to end.
Pattern rows
Rows 1 – 4: Sl1, K1, *K4, P4, repeat from * to last 2 sts, K2.
Rows 5 – 8: Sl1, K1, *P4, K4, repeat from * to last 2 sts, K2.
Repeat pattern rows 1 – 8 until the work measures approximately 20½” (or desired length) ending with either a Row 4 or 8, then repeat the border rows.
Crochet cast off and button holes
Before proceeding with the crochet cast off and button holes, it’s best to have your buttons on hand and placed on the fabric so you know exactly how you want to space them out.

Lay out the buttons to determine the placement before proceeding with the cast off.
The crochet cast-off is quick and easy to do. Basically, the crochet hook replaces your right needle.
Slip the 1st stitch, then insert the crochet hook into the next st on your left needle just as you would do to knit, draw the yarn through and drop the st off of the left needle. You now have 2 stitches on the crochet hook. Draw the stitch just created through the 1st stitch. You just cast off 1 stitch. Continue in this fashion until you reach the 1st pin marker to denote a buttonhole.
CH1, then continue with the cast off to the next pin marker and repeat.

Crochet cast off and button holes in one easy step
Just a side note…when I demonstrated this cast-off to the knitting group of our Guild, some of the members adopted this method as their regular cast-off. Have you ever struggled when a pattern called for ‘cast off loosely’? Use this method and a larger crochet hook and Bob’s your uncle!
Finishing
Weave in all ends and attach buttons.
TIP Leave a long end to weave in once the cast off is finished. If you ever need to reposition or increase or decrease the number of buttons, you can easily remove the cast-off edge and redo it for the new buttons.
If you notice in the picture above, I’m placing my buttons a pattern in. In other words, I’m overlapping the fabric. Knitted buttonholes tend to stretch. If you place them at the edge of the fabric, they’ll likely leave a gap after wearing.
When it comes to attaching buttons, it can be a bit of a challenge because buttons are designed for sewing thread, not yarn. I suppose you can use sewing thread, but I prefer to use the same yarn as my project. Tapestry needles don’t typically fit through the shank or eye of the button, so I use a needle threader instead.

Use a sewing needle threader to pull the yarn through the shank of the button.
Now that the project is complete, it’s time to choose how you want to wear it. I mentioned at the beginning that it’s versatile. Well, here are photos of some of the different ways you can wear it.
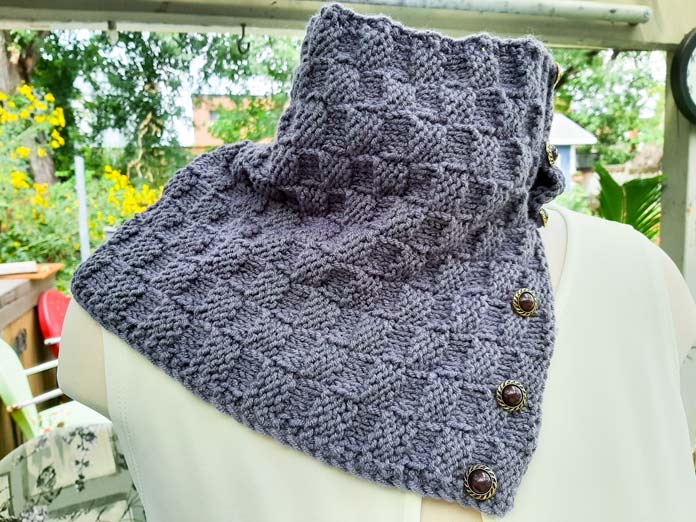
Completed cowl with lower buttons open to show full length

The completed cowl with buttons offset reveal the reversible pattern.

The completed cowl folded over for double the warmth.
This is a quick and easy project and it looks great. Whether you make it for yourself or as a gift for someone else, it’ll surely be appreciated. It’s so soft and cuddly, I’m sure the recipient will be pleased, and remember, the buttons you choose are the adorning factor.
I hope you enjoyed this project. I certainly enjoyed making it. I think I spent more time selecting the buttons than I did knitting it (just kidding).
Tomorrow brings another comfy, cozy project that’s also easy and quick to knit. I hope you join me as I use two strands of Lion Brand Color Theory to make some traditional (or not so traditional) slippers.