
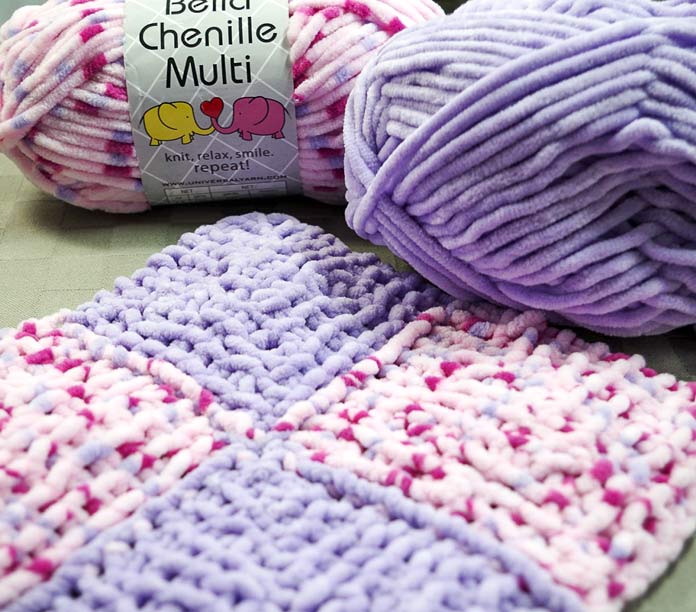
This week I’ve been looking at knitting with Bella Chenille multis and solids. Yesterday, I shared several free baby blanket and garment patterns with you. Today, I’ll share another blankie pattern I designed that has a few bobbles worked in.
So many people don’t like bobbles because it’s tedious to turn the work back and forth to work the little extra short rows to build up the bobble, but I’ve figured out a creative solution by using backwards purling. Read on to learn this technique.

Well-placed bobbles make this cute mitered square blanket fun for the baby to squeeze.
This blankie pattern features mitered squares. I chose this technique because I liked the different directions of the garter stitch ridges, particularly how they look when knit with Bella Chenille. There are 4 different ways to set-up a mitered square for an attach-as-you-knit type pattern. The set-ups all happen in the cast on or pick-up rows, so let’s look at how to do each set-up row.
First Block
You only do this block once, right at the start. The best cast on for this non-elastic chenille is the cable cast-on, because it’s much stretchier than long-tail or similar cast-ons. Cast on 21 sts, and knit the first row. I’ll give you the rest of the pattern after we’ve read about all the other set-up rows.
2nd Block
Most right-hand knitters start with the block to the right of the First Block when it’s rotated into a diamond. Cable cast-on 10 stitches. Then, with right side facing, pick up and knit into the middle right corner of the First Block rotated to be a diamond, pick up and knit 10 stitches evenly along the block edge, usually into the garter stitch ridges, ensuring to have 2 strands of yarn under the right-hand needle when you insert it to pick up. Then, knit the first row.
3rd Block
With right side facing, pick up and knit 1 stitch in the top tip of the First Block, and then pick up and knit 10 stitches along the other edge, working into the ends of the garter stitch ridges as for the 2nd Block. Cable Cast on 10 more stitches. Then knit the first row.
Filler Blocks
These are the blocks that are worked into the V-shaped gaps between the other 2 blocks. With right side facing, pick up and knit 1 stitch in the top tip of the right-most block in the next tier of blocks. Then pick up and knit 9 more stitches along the edge, using the ends of the garter stitch ridges. Then pick up and knit a stitch in the bottom of the V, and 10 stitches along the other side for a total of 21. Knit the first row.

This solid purple diamond, or mitered square, is one of the Filler Blocks.
Before you get started on your blanket, please review how to work a double centered decrease and how to knit a bobble.
The decrease stitch that we need to maneuver to make these mitered squares is the centered double decrease (sl2tog, k1, psso). Insert the right-hand needle into the front legs of the first 2 stitches as if to knit 2 together, and slip them off the left needle. Knit the next stitch and pass both slipped stitches over the stitch just knit. Here’s a video demonstrating how to do this.
We also need to know how to work a bobble stitch.
Step 1: (K1, k1tbl, k1) all in the next stitch. Step 2: To make a bobble without too much bother, we need to learn how to purl in reverse. To do this, insert the left-hand needle from back to front up into the front leg of the first st on the right-hand needle. Wrap the yarn counter-clockwise around the left hand needle, and purl through that strand. Do this 2 more times. Step 3: Slip first stitch of bobble from left hand needle, ssk in next 2 sts, pass slipped st over. The bobble is now done.
In the following video, I show you how to work the bobble in the middle of a centered double decrease, which is a little trickier than Step 1 explained above, but Steps 2 and 3 are the same and will appear in the video as well.
Other Abbreviations
k = knit
p = purl
sl = slip
tog = together
psso = pass slipped stitch(es) over
st(s) = stitch(es)
rep = repeat
Remainder of the Blocks
Row 2: K10, p1, k10.
Row 3: K9, sl2tog, k1, psso, k9.
Row 4: Knit to center st, p1, knit rem stitches.
Row 5: K8, sl2tog, k1, psso, k8.
Row 6: Rep Row 4.
Row 7: K3, make bobble in next st, k3, slip 2, work step one of bobble in next st, pass 2 slipped stitches over the 3 just made, work steps 2 and 3 of bobble, k3, make bobble, k3.
A non-bobble row 7 would be: K7, sl2tog, k1, psso, k7.
Row 8: Rep Row 4.
Row 9: K6, sl2tog, k1, psso, k6.
Row 10: Rep Row 4.
Row 11: K5, sl2tog, k1, psso, k5.
Row 12: Rep Row 4.
Row 13: K4, sl2tog, k1, psso, k5.
Row 14: Rep Row 4.
Row 15: K3, slip 2, work Step one of the bobble as follows: Slip 1 stitch, working into front legs of both of the next sts together, work (k1, k1 tbl, k1). Then work Steps 2 and 3 of bobble as explained above or shown in the video, k3.
Alternative Row 15: K3, sl2tog, k1, psso, k3.
Row 16: K3, p1, k3.
Row 17: K2, sl2tog, k1, psso, k2.
Row 18: K2, p1, k2.
Row 19: K1, sl2tog, k1, psso, k1.
Row 20: Insert right hand needle from back to front through back leg of 2nd stitch on left hand needle and immediately through back leg of first stitch on left hand needle as if to purl 2 together, but just slip them, purl 1, pass 2 slipped stitches over the stitch just purled.
Fasten off.
If you don’t want the bobbles along the center line of the block, simply work a normal centered double decrease in those three stitches.

Bobbles look like squishy rosettes and add attractive texture to the blanket.
How to build the blanket
You can use as many colors as you like for a mitered square blanket. It’s a good way to use up odds and ends of yarn, but I thought one multi-colored Bella Chenille and one solid color would look the nicest.
Begin First Block with a solid yarn.
For the 2nd strip of diamonds, use a multi-colored yarn and work a 2nd block and a 3rd block.
By the way, I weave in ends every 2 strips of diamonds, just so I don’t have that task to do at the end.
For the 3rd strip of diamonds, use a solid yarn and work a 2nd Block, 1 Filler Block, and one 3rd Block.
For the 4th strip of diamonds, use a multi yarn and work a 2nd Block, 2 Filler Blocks, and end with a 3rd Block.
Continue adding strips of diamonds until the length along the edge of the work is the desired width of your blanket.
Then you need to choose between a rectangular version and a square version; regardless, keep alternating yarns each strip.
Rectangular Version
For the next strip, do not work a 2nd Block. Begin with a Filler Block in the first gap and in each gap across, end with a 3rd Block.
For the next strip, begin with a 2nd Block, work a Filler Block in each gap across, but do not work a 3rd Block.
Repeat the last 2 strips until your longer edge if the work is the desired length of the blanket. Then continue with the Square Version.
Square Version
For the next strip, do not work a 2nd Block, Begin with a Filler Block in the first gap and in each gap across.
Repeat this strip until you work a sole diamond for the final strip.
I hope you have fun knitting this mitered square blanket using the exciting color combinations you can make with Bella Chenille Multis and solids. Tomorrow, I’ll share one more free pattern.
The reverse side without the bobbles highlights the edges of each block where the stitches are picked up. A lovely braid-like border separates each block.
This is part 4 of 5 in this series.
Go back to part 3: 5 baby gifts to knit up in a few days with chunky Bella Chenille yarn
[shareaholic app=”follow_buttons” id=”23784471″]