Today we’ll continue our series on how, when, and why to change stitch patterns. We’ll continue to use the wisteria stitch pattern as our starting off point.
The first way to change a stitch pattern is to replace knit stitches with purl stitches, and vice-versa. Naturally, we don’t want to do that to every stitch in the motif repeat, but by selecting key stitches, we can achieve an interesting effect that won’t have been recorded in any stitch dictionary anywhere, ever. Unless, of course, someone else has been busy reading this blog and swatching their changes to stitch patterns.
So, the first reason to change a stitch pattern, then, is to be original. You don’t have to be a professional designer to make these changes. Sometimes, a tweak to the stitch pattern is just what you need to maintain interest when you’re making the same cowl for 8 people for the next gift-giving holiday.
Let’s have a look at the wisteria stitch pattern after I made a few changes. The unchanged version of the wisteria stitch pattern has mostly knit stitches on both the right and the wrong side, so this is where I began to make the changes.

Right side, version 2 of wisteria stitch pattern
On the right side of this first variation of the wisteria stitch pattern, the first thing you’ll notice is the colors. This stitch pattern very easily makes multi-colored hand-dyed yarn look great. It especially prevents pooling of one color in one area because the stitches lift new colors into proximity with those above them.
The change that I introduced to this stitch pattern was to use purl stitches instead of knit stitches on the wrong side of the row. This gave the right side a consistent knit stitch appearance and made the paired decreases clear and balanced.
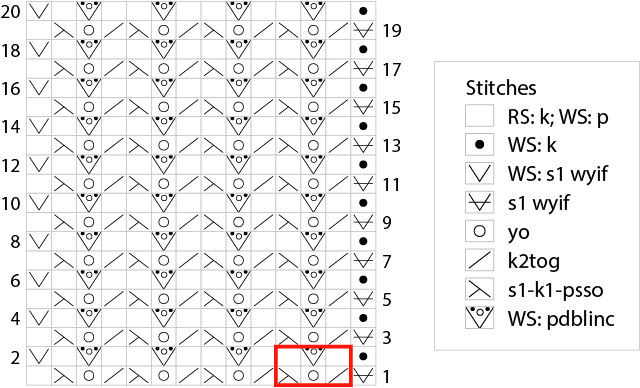
The diagram and instructions to make this version with purl stitches on the wrong side follow below.

Diagram for version 2 of wisteria stitch pattern
Instructions
Cast on desired number of stitches. There should be a multiple of 5 stitches, plus 2 (one for each selvedge).
Row 1: S1 wyif, [k2tog, yo, sl1 wyif, s1-k1-psso] across to last st, k1.
Row 2: S1 wyif, [p1, pdblinc, p1] across to last st, k1.
Rows 3-20: Repeat rows 1-2.
Abbreviations
k = knit
k2tog = knit 2 stitches together
p = purl
pdblinc (purl double increase) = [purl, yrn, purl] all in next st together with yarn over
s1 wyif = with the working yarn in front, insert the right needle into the next stitch as if to purl and transfer the stitch from the left needle to the right
s1-k1-psso = slip one stitch knitwise, then knit next stitch and pass the slipped stitch over
yo = bring yarn forward and as you knit next stitch, allow to form a new stitch over right needle
yrn = take yarn from front over right needle and return to front between needles (counter-clockwise)

Purl side of version 2 of wisteria stitch pattern
I’m very impressed with how a simple change to a few stitches makes a completely new look to a pattern. In the picture above, you can see the purl side (what some people may call the wrong side) of this version of the stitch pattern. I really like how this side makes certain colors pop and others recede into the background. The column of eyelets also stands out more in this version than the original. I think I will use this version of the stitch pattern in a design and this will be the right side! It’s key never to forget the purl side!
