
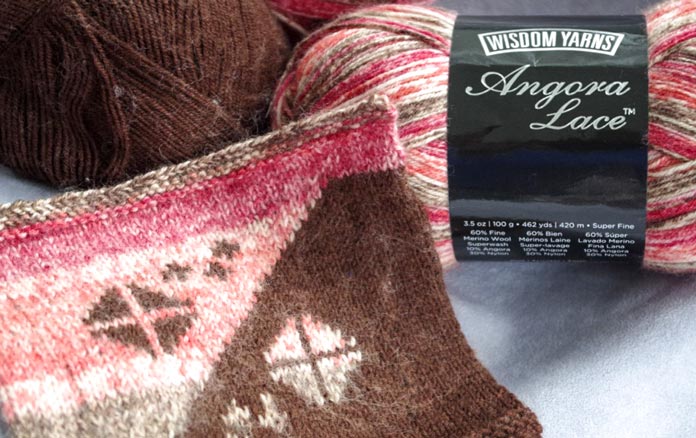
Until now, knitting intarsia patterns in the round or even Fair Isle motifs with more than 5 stitches between color changes has been challenging or almost impossible. Today, I’ll introduce you to the Ladder Back Jacquard technique by using it to knit a cowl with Angora Lace yarn.
Yesterday, I reviewed the qualities of Angora Lace yarn in detail. I chose to knit this cowl using Angora Lace for its merino and angora content. This blend is perfect for colorwork because of the ‘stickiness’ factor that keeps the strands of yarn close to each other between colors, as opposed to something like a cotton yarn, which makes colorwork more challenging.

Angora Lace is a good companion for intarsia knitting as stitches of different colors stay nestled up against each other neatly.
Ladder Back Jacquard is a technique that was developed by machine knitters. Its name comes from the appearance of the floats of yarn in the unused colors as they form a mesh of connected ladders on the back of the work. This mesh keeps the yarn floats close to the back of the work, and reduces the chances of the floats snagging on buttons or buckles on clothing worn below a knit item, or catching on jewelry.

The Ladder Back Jacquard technique neatly manages floats of unused yarn colors on the wrong side of your knitting.
How to start a Ladder Back Jacquard mesh
When you want to use the Ladder Back Jacquard technique, you don’t have to start at the bottom of the project. It’s okay to start on the first row that a stitch of a contrast color appears. It pays to plan ahead a little way to see how wide you want the ladder back mesh to be.
Let’s think of hypothetically. Say you have a motif that’s 12 stitches across and in the fifth row of the pattern repeat, there are 2 stitches in the contrast color but the other 10 are in first color. At this point, you can introduce the foundation row of a ladder back mesh and continue using it until the motif has color gaps of 3 or fewer stitches, over which you can stop using the ladder back over those few rows.

Tomorrow, a crisp, clear, zoomable PDF version will be available.
On the other hand, in the above chart for a cowl, which I’ll look at in more detail tomorrow, we have to start setting up the ladder back mesh on the first row of the pattern because of the diagonal stripes in the motif.
Setting up the ladder back mesh
If you study the photo of the ladder back mesh above, you can see vertical columns of knit stitches that are spaced quite a few stitches apart and have floats of yarn that strand between them. To set up those columns of knit stitches, we actually have to add a stitch to the total count about every 5th or 6th stitch, by working M1 (make 1) stitches in the horizontal strands between stitches. These extra stitches will lie on the wrong side of the work and will not affect the finished project. They are what makes intarsia in the round possible!
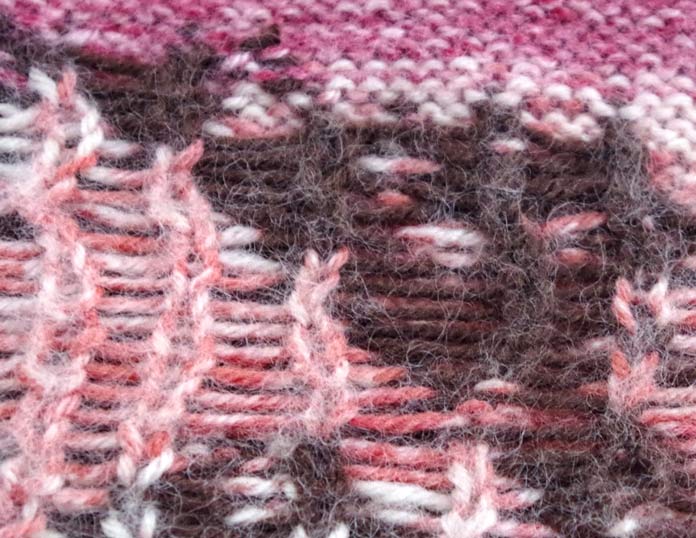
These ladder back stitches keep the unsightly color changes at the wrong side of the work.
Working the ladder back mesh stitches
Although I knit this swatch with knit and purl rows, the ladder back jacquard technique is more useful for knitting in the round with knit rows only, so that’s what I’ll describe.
Work across the stitches in the main color, leaving the contrasting color unused on the back. When the next stitch on the left-hand needle is one of the extra stitches that you’ve added with the contrast color between 2 stitches of the other color, then bring the yarn forward…but it’s both strands of yarn that you bring forward, the main color AND the contrast color. Then with the contrast color, you purl the extra stitch, then you take both colors back to the wrong side of the work and knit with the main color across to the next extra stitch and repeat.
Bringing both yarns forward is key to making the ladder back meshwork. The next thing that’s important is to allow the rungs of the ladder on the back of the work to lay flat and not to pull between the extra stitches or to be too loose. The columns of extra stitches in the mesh on the wrong side are very elastic and if you keep the rungs flat your tension will stay even on the mesh as well as on the right-side stockinette fabric.
Tomorrow, we’ll share the full pattern for this cowl.
Ending the ladder back lace
When you no longer need to carry colors across wide spans of stitches of the background color you can close off the mesh column. Knit with the background color and when you get to the stitch before the extra mesh stitch, decrease by working an SSK the next stitch and the extra stitch together. This traps the top of the mesh column and prevents unraveling.
Join me tomorrow, I’ll go over the pattern details for this cowl knit up in the luxurious Wisdom Yarns Angora Lace, Coffee and Spice Tree colorways.
2 comments
Hi, I need help on how to do the ladder back jaquard on the purl side as I am knitting something flat where I want to use it. I can only find videos on how to do it in the round and the description above states you can do it on the purl side but then only explains it in the round. Thank you
Hello Lydia.
To work it on the purl side, as I did in the swatch, you do the following:
WS of work
With both yarns on WS of work, purl with the first color to the first ladder back stitch. Take both yarns to the front of the work; knit the ladder back stitch with the contrast color, bring both yarns to the back of the work. Continue in the main color across to the point where you need to make visible stitches on the RS with the contrast color, working all ladder back stitches as above. Change colors with a half-twist of the two yarns and knit the stitches in the contrast color that will be visible on the right side. If you encounter a ladder-back stitch in the main color, work it as above, bringing both yarns to the front of the work, knitting the ladder-back stitch, and returning both yarns to the WS and purling with the contrast color. I hope you share with us how things are turning out.