
Joining in a new strand of yarn can be done in several ways.
The best way to hide a yarn join is to do it at the end of the row on garments so they can be worked into a seam. But, not every garment has a seam, and not every yarn join can be worked into a seam on a garment that does have seams.
We can change yarns in the middle of a row of knitting, simply dropping the old yarn and adding the new yarn. In intarsia work, we have no choice but to do this, and in yesterday’s post I blogged about how to do it so as to prevent a gap in the fabric and weave the ends in almost invisibly.
My favorite way of avoiding a bulky yarn join in knitting, is to stagger the join by making a splice join.
Why do I like this join so much? Well, it’s an economical use of yarn – you don’t have to leave an extra yard or two of yarn at the end of a row. You can stretch it out to the last possible few inches. The splice join staggers the yarn over a number of stitches, so there’s a continuous strand right through the join, which makes it strong. And, because the yarn ends have been untwisted, the plies are already situated to weave off in different directions as we did yesterday, which, as I demonstrated, gives further strength to the join.
Yes, there’s a downside in that there are extra ends to weave in, but if we are investing time and money to make a garment, isn’t it worth the time and effort to make your yarn joins as strong as possible?
Here’s how I do a splice join:
I work the first ball of yarn until there is about a foot of yarn 6-8″ [15-20cm] of yarn trailing from my hand for a 2 or 4 ply yarn. For a three ply yarn, I leave at least 12″ [30cm] length.
For a 2 or 4 ply join, I separate the yarn into two sections, and treat them the same way as for the 3 ply join, but using fewer of the steps.
For 3 ply yarn, untwist the yarn coming out of the knitting into three plies and trim them down so that one is the full 12″ length [30cm], one is about 8″ [20cm] and one is about 4″ [10cm]. Do the same with the new yarn from the ball.

The old and new yarns untwisted and trimmed for splicing. The arrows show the different sections, which will be referenced in the text, below.
For 3 and 4 ply yarn, I untwist the yarn into plies and trim them down so that one is the full 12″ length [30cm], and trim the other plies to 3- 4″ [8-10cm] less. So, for the three ply example in the photo, the plies have been trimmed to about 8″ and 4″ [20cm and 10cm].
Then I overlap the ends so that single ply part of the new yarn overlaps all plies of the old yarn and a part of the next section (which in the photo has two plies of yarn). I add a little twist to the length, then knit a few stitches with the old yarn and the extra ply (section 1 of the photo above). If I need to hold the twist in place, I use a paperclip, clothespin, or a small bag clip.
Seven stitches knitted with 4 strands of yarn. The strand coming out of the knitting on the right is ready to weave in. For the photo, I left the strands untwisted so you can see that the next several stitches will be knit with 3 plies of yarn; two from the old and one with the new.
At this point, I drop the strand of yarn that is shortest, and knit several stitches with the remaining plies (in this case, three – see section 2 of the photo).
The next sections (3 and 4) have two plies coming from each of the knitting, and the new ball. Again, I bring them together and add twist. I knit several stitches with all four plies, then I drop the strand that is shortest in length and knit several more stitches.

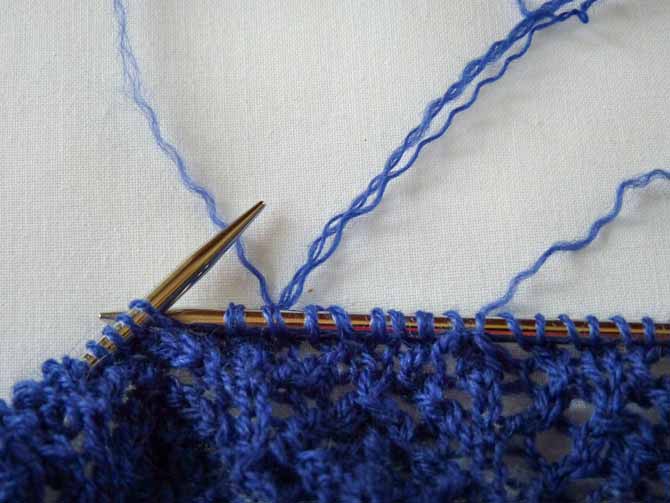
The start of Section 3: the next approaching loose strand of the new yarn (shown over the needles) is from Section 2. It’ll be dropped,and the knitting will continue with four strands of yarn for several stitches, then the strand in the center of the upper section of the photo will be dropped, and several stitches will be knit with the remaining three strands (section 4).
Only Section 5 remains. The last short strand from the ball yarn will be left at this point (the strand just above the right needle in the photo below), leaving me with all three plies from the new ball, and the last ply from the yarn from the old ball. I could drop both this strand and the last strand of yarn from the old ball, but if I want the maximum strength in my join, I’ll twist that strand with the new yarn, and work several stitches with four plies. Then, I’ll drop the last free strand, and continue on with the new yarn.

The strand on the right, just above the knitting is the last strand from the ball yarn. The strand leading toward the top of the page is the remaining strand from the old ball of yarn. It will continue on for several stitches, then be dropped, and the work will continue with the three strands of yarn coming from the top right corner of the photo.
Sections 1, 3, and 5 ended up being knitted with four strands of yarn, and sections 2 and 4 had the three plies, like the yarn coming off the ball. But, by working only a few stitches with 4, then a few with 3, and a few with 4 and so on, we have spread out the extra thickness over a bunch of stitches, which helps to make it less glaring to the eye. At the same time, we’ve created a join that has yarn from both the old and new ball running right through the join, making our join strong.
This is particularly effective when you want to join yarn in fine knitting, such as the lace shawl in the photographs. And, because the strands are already woven in over a span of several stitches, it takes a minimal amount of weaving in to reinforce those ends.
The next time you’re working a project, try incorporating splice joins. I think you’ll see their benefits!