
One of the great joys in my knitting life is knowing I have finished a project to the best of my ability. Some knitters dislike sewing up and weaving in ends, but I embrace them as part of the process.
Over the years, I have gone to great lengths to get my yarn ends woven in as undetectably as possible. I even weave in the ends on almost all of my project samples. The practice of weaving in ends can elevate the quality of your knitting project from ‘home made’ to ‘couture’ level.
Different yarns weave in differently, and, depending on the thickness of the yarn, ends should be treated in different ways. It’s easier to hide a woven-in end on sock yarn, for example, than it is on chunky yarn. When working with a thicker yarn, the ends can be woven in more invisibly by splitting the yarn plies into two or three sections, and weaving the ends off in different directions. This adds strength to the fabric, and it is a useful technique for items such as afghans, socks, and baby blankets that will receive a lot of tugging. When the yarn is sent off in more than one direction, the chances of any end coming loose are substantially reduced.
First, let’s look at a bad example of woven-in ends. The sample below is the blue and gold sample from my June 3 post. In the center circle of the sample, I had two gold ends to weave in. I did not separate the yarn into sections, and got a bulky result, visible on both sides of the work. There are six ends woven-in in the blue areas surrounding the gold circle, and they’re almost invisible — I can only detect one in the photo.

The lumpy-bumpy woven in ends can be clearly seen in the center of this sample.
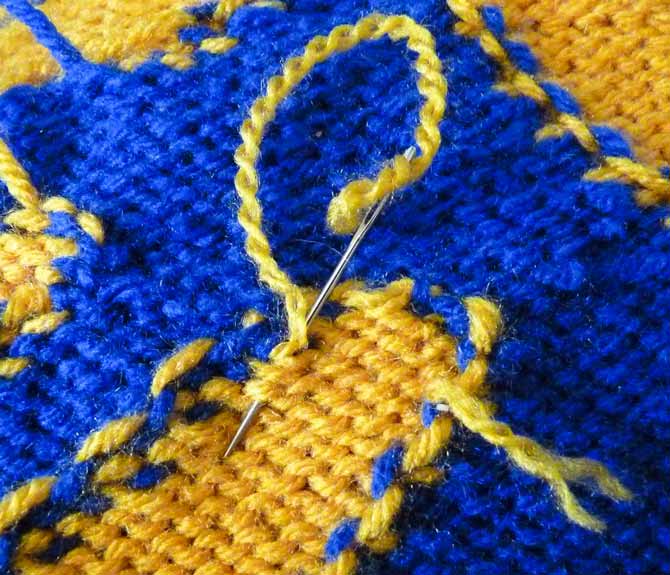
To do a nearly invisible join, I thread the needle with the full strand of yarn on the back of the work. Then, I turn the work over to the right side — I want to make sure that the stitch is not distorted on the front of the work, and that it gets anchored in a way that won’t result in a hole or a gap. With a knitting needle tip, I’ll coax the stitch to match the others, and then take the excess thread to the back (normally it’s an excess, because the stitches tend to stretch out during the knitting).

The photo on the left shows the excess drawn to the middle stitch after the excess yarn has been pulled in. This excess will be taken to the stitch to the left and “tamed” into place. The result is the three even stitches shown in the right photo.
With all 4 strands, I anchor the yarn on the back of the work, following the path of the yarn. Sometimes, I’ll do this once or twice more until I get the yarn end to a spot where I can weave in different directions.

Weaving in the full strand of yarn to anchor it to the back of the work.
At this point, I untwist the yarn. If it’s a two ply yarn, I end up with two singles. A single ply, or singles, can be quite weak, and I often need to add twist back into the strand to give it enough strength to weave it into the fabric. If it’s a three ply yarn, I usually split it into one section with two plies, and one section with a single ply. In this case, I’m working with Red Heart Super Saver, which is a four ply yarn, so I have untwisted the yarn into two sections, each with two plies of the yarn in it.

The strand of gold yarn has been divided into two strands with two plies in each.
Each section gets the same treatment, just in different directions. I thread one section into the sewing needle and begin to follow the path of the knitted stitches.

The sewn yarn is following the path of the knitted stitches.
When I’m about halfway through the length, I’ll go back over one of the stitches, wrapping the yarn end right around a stitch. Then, I continue as before, taking the end along the same path as the knitted stitches.
For the second section, I thread it, then I carry it away for a distance of a few rows. By doing this, I avoid having a lumpy area where the ends cross over each other.
Taking the second half of the untwisted yarn to a place where it can be woven in. Note the end of the first strand on the right.
Again, I take the yarn end on a journey that duplicates the path of the knitted stitches, anchoring it over one stitch at about the half way point. When finished, I have two skinny ends to trim off.

The finished weaving, showing the two ends ready to be trimmed off.
Practice weaving in ends whenever you get the chance; it will make a huge difference in the quality of your knits, whether they are hand or machine knit.