
In my last series of posts, I designed a flag and took you through the steps to use technology to chart a graphic design. Naturally, while I was doing this, I researched a lot of different flags, and found a diagram for the Canadian flag.
Since I am Canadian, I decided to continue my charting experiments, and in the process, knit a piece to show my patriotism. Today, I’m going to talk about the challenges I encountered, and tomorrow I’ll provide the finished pattern so you can, if you’re quick, knit your own patriotic piece for the long weekend ahead.
In my post from Day 4 in May, I taped knitter’s graph paper to my computer screen and traced out a maple leaf from a Canadian flag.

Knitter’s graph paper was taped over the computer screen over the right half of the image. The design was then lightly traced using a pen that wouldn’t bleed through the paper.
After I traced the maple leaf, I figured out where the borders of of the flag and the red stripes should be placed, and I “blocked in” the maple leaf using a pink erasable highlighter.
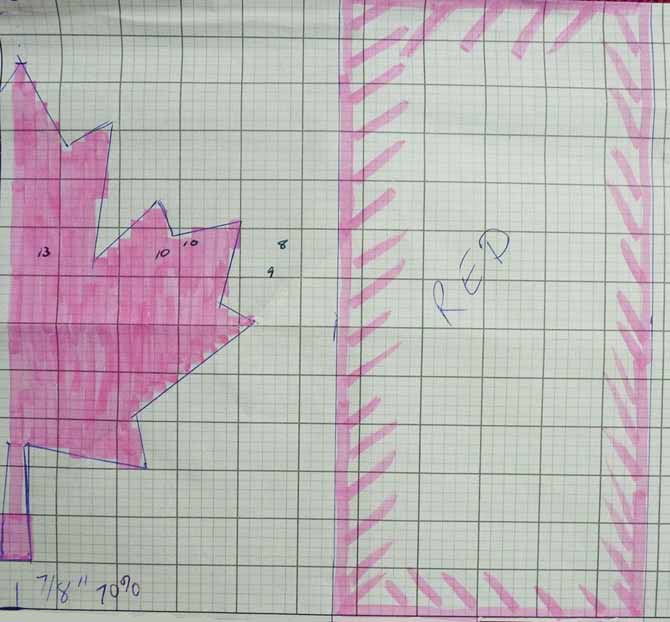
The tracing from the computer screen, with the squares “blocked in” to the squares that represent knitting stitches.
The experiment
The knitter’s graph paper has a gauge of 40 stitches and 50 rows to 4″ [10cm]. The tension on my knitting (I’m still working with Red Heart Super Saver yarn from my last series), is 17 sts and 24½ rows to 4″ [10cm].
In terms of ratio, the knitter’s graph paper is 4:5 (8:10), and my knitting tension is 8.5:12.25, which is slightly different from that of the graph paper.
For the first sample, I knit the chart exactly as it is set, to see what happens. My theory is that the maple leaf will be too short for its width. The question is, by how much?

The knitted maple leaf from the chart above. Does this look squished to you?
Yes it is squished: while it looks good, this maple leaf is vertically challenged.
On the graph paper, the length of the maple leaf is 105 percent of its width (5″ wide by 5¾ʺ high [12.5 x 13cm].
The knitting measures 8¾ʺ wide by 9¼ʺ high [22.5 x 22cm] which means the height of the knitted maple leaf is only 99% of its width. To figure out how tall the maple leaf should be, we need to multiply the height times 1.05 (the percent difference between width and height). 8.75 x 1.05 tells us that our maple leaf should be 9.7″ [23.5cm] high and that it is a scant inch too short.
We know that the tension has 24½ rows to 4″ [10cm], so six rows is just less than 1″ [2.5]cm. Therefore, to bring our maple leaf to scale, we need to incorporate six rows into the chart. What is the best way to do this? Let’s look at the chart to see:

This is the Canadian flag chart reproduced in a knitting charting program exactly as it was in the original graph.
Optimally, we need to add 3 rows in each of the top and bottom half of the design. I don’t really want to break up that lovely diagonal line in the lower half, but, if I must, I want it to be done as evenly as possible.
To do this mathematically, take the number of rows you need to add (6) and divide it into the total number of rows you need to expand to (50). The answer is 8 with a remainder of two. Starting at the top of the chart, count down 5 rows. Why five? Because if you count down 8, you will only get to add 5 rows — you need to split the first multiple of 8 and the remainder (2) into two sections. Half of 8 is 4, plus 1 (half of 2) makes 5.
Then, insert one row after every eighth row down the remainder of the chart.
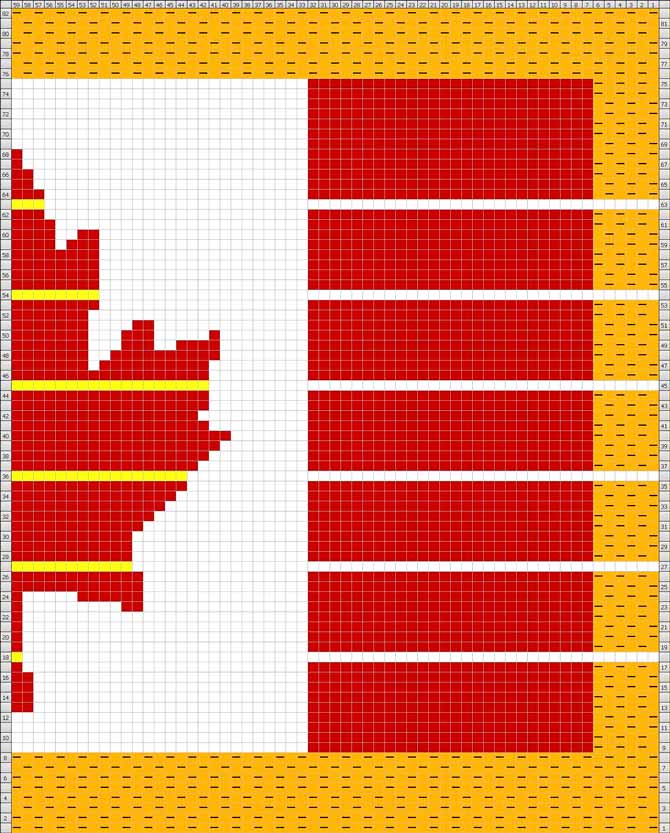
Using the math above, the yellow lines in the maple leaf (and the white lines in the red and gold sections) show where rows will be added for the next knit.
The only change I would make to the chart above, would be to move the added row 36 down to between rows 34 and 35 (and make the same as row 34).
Note that adding these rows interrupts the pattern of the moss stitch border. Tomorrow, we’ll fix that and offer a .pdf of the finished chart for you to knit.
1 comment
So glad to have found your page!
I am proudly Canadian too!
I am knitting a plain cardigan to be used for when we travel and I would like to incorporate a Maple Leaf into it. Not the whole flag just the leaf. I am thinking of adding it into either the sleeve pattern or shawl collar stitches.
Any suggestions for graphing it?
Should I embelish it on later?